
Why Bucephalandra Melts (And How to Save the Rhizome)
Melting Bucephalandra is usually swapping air-leaves for water-leaves, not dying. Get the ten-second rhizome test and a step-by-step rescue.
Samuel Reed · Published 2026-08-15 · 15 min read
Key Takeaways
- Melt is your plant swapping air-leaves for water-leaves, not dying, so judge it by the rhizome.
- Firm green rhizome means recoverable melt. Soft brown mush means rot, so cut back to firm tissue.
- Never bury the rhizome. Glue or tie it to rock or wood with the rhizome exposed to flow.
- Keep light low-to-medium and parameters steady. CO2 is optional and stability matters more.
- Remove decaying leaves, keep up water changes, then watch the firm rhizome for gradual new growth.
You added a beautiful Bucephalandra last week, and now the leaves are turning to mush. This can be normal transition melt, but it can also signal rot or a water-quality problem.
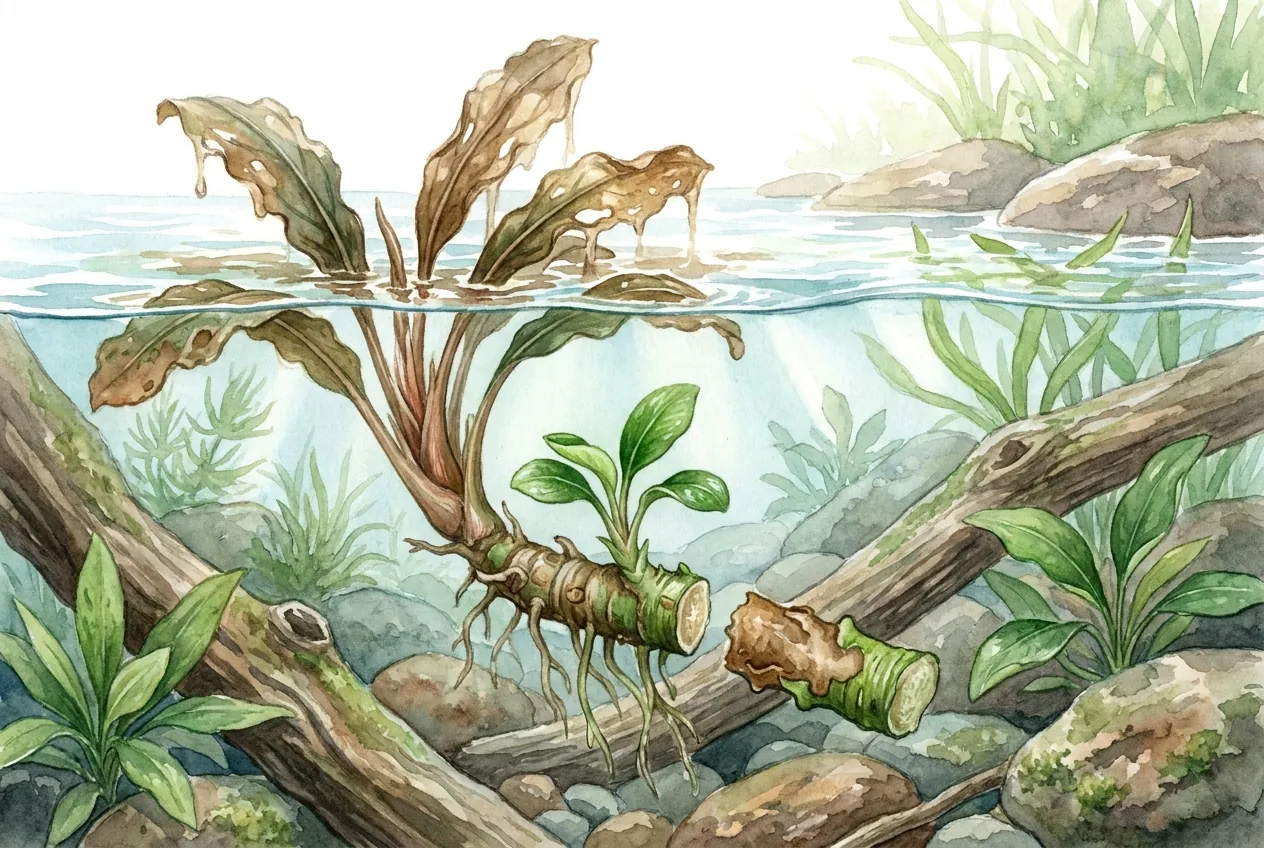
The plant may replace leaves it grew in air with leaves adapted to life underwater. A firm, green rhizome gives it the best chance to recover, while a soft or discolored section needs prompt attention.
Check the rhizome before reacting to melting leaves. A firm rhizome supports recovery, while a soft, discolored section needs prompt attention.
Keep the rhizome exposed to the water, remove clearly rotten tissue, and then give the plant stable conditions to rebuild.
Is My Bucephalandra Dying, or Just Melting?
It may be normal transition melt, especially after a plant is moved fully underwater. For a rhizome plant like Bucephalandra, leaf loss can be survivable, but check the rhizome before assuming the plant is safe.
The rhizome is the plant’s storage and growth stem. A firm, green rhizome is a good recovery sign even when leaf loss is heavy, but it does not rule out an unstable tank or future rot.
I number firm rhizome sections on a photograph before removing melted leaves and roots. Each section keeps its own record of firmness, cut surface, and emerging bud so one surviving tip does not make the entire rhizome look recovered.
Soft sections go into isolation, and I disinfect tools between cuts. If a numbered firm boundary later darkens, the original image shows how far the decline advanced.
Before changing the rescue setup again, I wait for a bud to enlarge and produce tissue that remains firm. A tiny green point is encouraging, but it is not yet evidence that the root zone has stabilized.
What melt is, in plain terms
Melt is your plant replacing air-adapted leaves with water-adapted leaves. Plants that grow in air and plants that grow underwater build genuinely different leaves, and an emersed leaf simply does not work well once it is submerged.
Air-grown leaves and submerged leaves are built for different conditions. After submersion, an older emersed leaf may no longer work well enough to keep, while new leaves form for life underwater.
That switch is a normal response in many amphibious plants, but it does not rule out a separate rot or water-quality problem. Use the rhizome and the plant’s overall condition to tell whether waiting is sensible.
Why a rhizome plant survives losing every leaf
The rhizome stores the reserves that fund new growth. Building new leaves costs energy and minerals, and Bucephalandra pays for that rebuild out of the carbohydrate and nutrients held in its rhizome.
This is why a stem plant that loses all its leaves often dies while a rhizome plant recovers.
The stem plant has no reserve tank, but Bucephalandra does. A bare clump with a firm rhizome will push new shoots within weeks, so judge recovery by the rhizome, never by the leaf count.
Why Bucephalandra Often Melts After You Buy It
Bucephalandra is a rock-clinging stream plant from Borneo. Many plants are sold after growing in air or tissue culture, so their first leaves may need to be replaced after submersion.
A Bornean rheophyte that grips rock in moving water
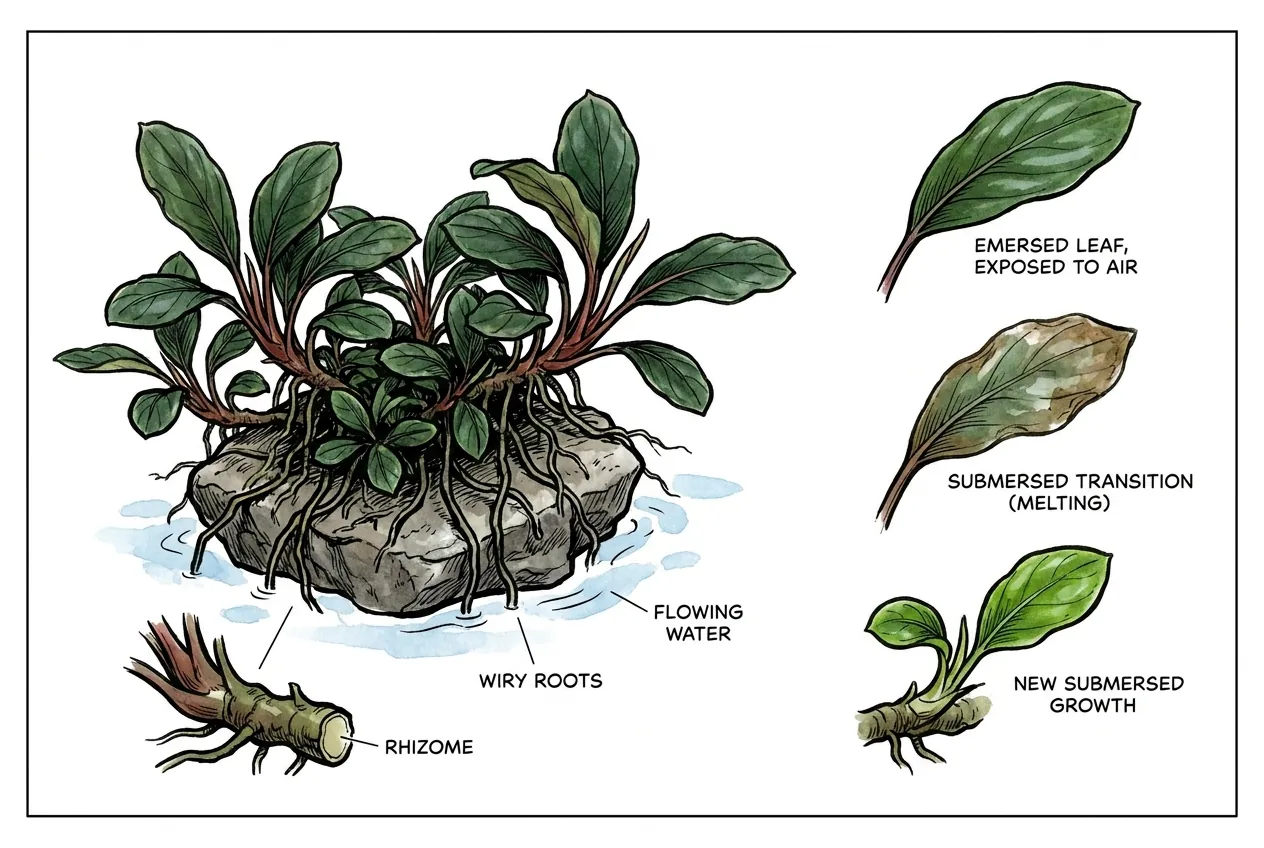
Bucephalandra is a rheophyte, a plant adapted to fast-flowing water. The genus has roughly 30 described species, all endemic to the island of Borneo, where they grow as dense mats on rocks in shaded, fast-moving streams.
It anchors with a creeping rhizome and tough, wiry roots that grip stone rather than feeding in soft soil.
In its home streams it is underwater during the rainy season and exposed to air in the dry season.
So it is naturally built to switch between emersed and submersed leaves as the waterline moves, and that built-in flexibility is exactly the machinery behind tank melt.
How it is farmed sets up the melt
Most retail Bucephalandra is grown out of water on farms or in tissue-culture cups, so the leaves you buy are rarely water-adapted.
Farms grow plants emersed because they grow faster in humid air, and tissue-culture plantlets are raised small and soft in a sterile nutrient gel.
Those leaves may be replaced once the plant reaches your tank, but the amount of melt varies with the source and transition. Watch the rhizome rather than judging the plant only by the first leaves.
Melt or Rot? Check the Rhizome
The rhizome is the most useful place to start, but it is not a complete diagnosis. Check its firmness and color together with smell, spread, and the plant’s recent conditions.
A firm, green rhizome supports a watch-and-wait approach. A soft, brown, mushy section points to active decay and should be removed from the rest of the plant.
Melting leaves dissolve or turn translucent while the rhizome underneath stays solid. Rot is different, a brown mush that spreads through the stem itself, often with a foul smell.
How to run the test without hurting the plant
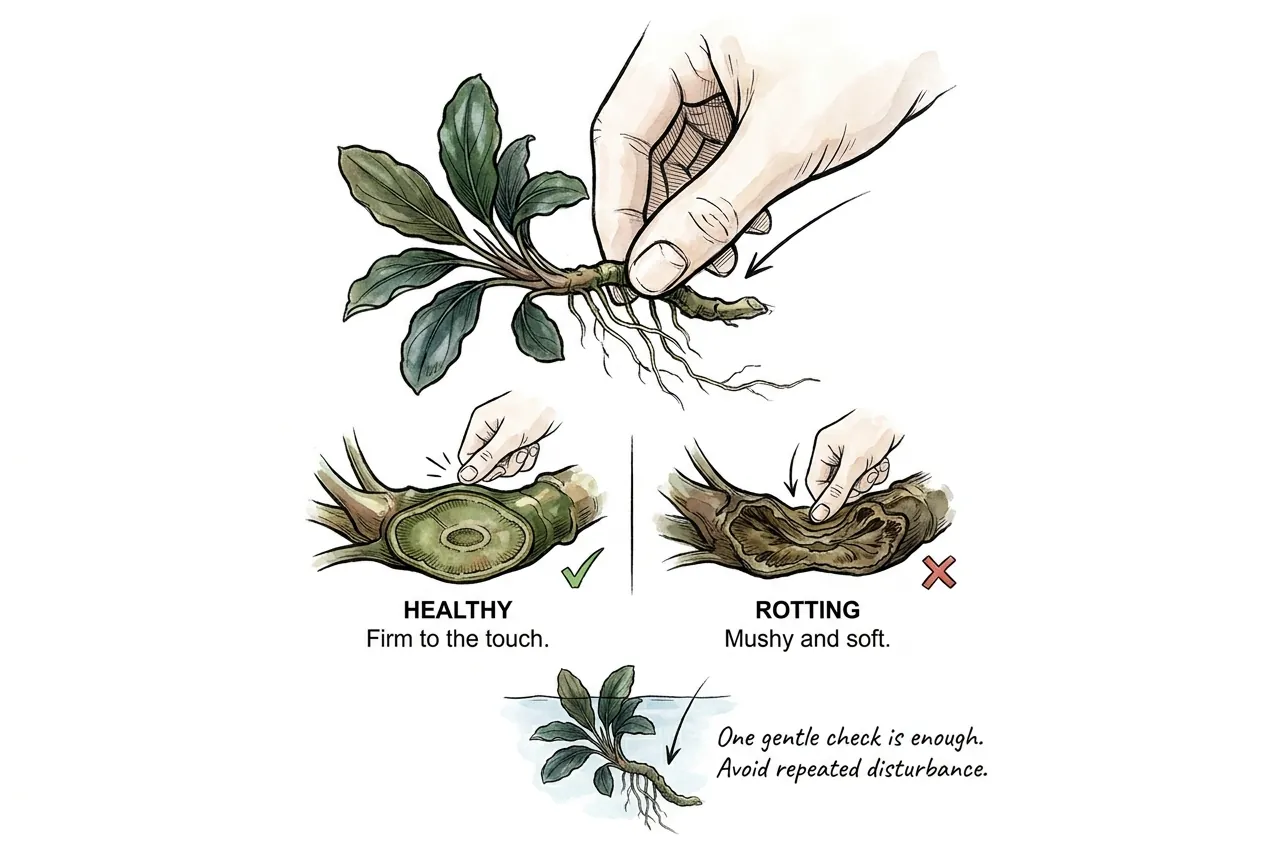
Gently pinch a small length of the rhizome and judge its firmness. Healthy rhizome resists like a firm twig, while rotten rhizome squashes like a soggy bean.
Do not yank the plant out repeatedly to inspect it, since disturbance sets back recovery. One gentle check is enough.
If the whole rhizome is firm, your only job is patience. If part of it is mushy, move on to the rescue steps below.
Common Rhizome-Rot Risks
Burying, crushing, or otherwise damaging the rhizome can increase rot risk. Fine substrate can hold moisture and slow water movement around the stem, but this is a common risk pattern rather than proof of the exact cause in every plant.
Melt affects leaves and does not automatically rot the rhizome. If the stem is decaying, check whether it was buried, tightly glued, or physically damaged and correct that condition first.
Attach It With the Rhizome Exposed
Keep the rhizome above the substrate. Attach the plant to rock or wood with the rhizome exposed to the water, and let only the roots, if anything, reach toward the substrate.
Why you should not bury the rhizome
A buried rhizome can stay wet and receive less water movement, especially in fine substrate. Keeping it exposed is the safer placement and lets you inspect it easily.
Rot has more than one possible cause, but covering the rhizome makes a common risk harder to manage. Leave it exposed instead of treating an exposed stem as a guarantee against rot.
Roots and the rhizome do different jobs. Roots are built to grip rock or sit in substrate and absorb a little nutrition, while the rhizome is a storage-and-growth stem that must breathe.
If you want the plant low in your scape, let the roots trail down toward the substrate but keep the rhizome proud of it.
Glue, thread, or wedge
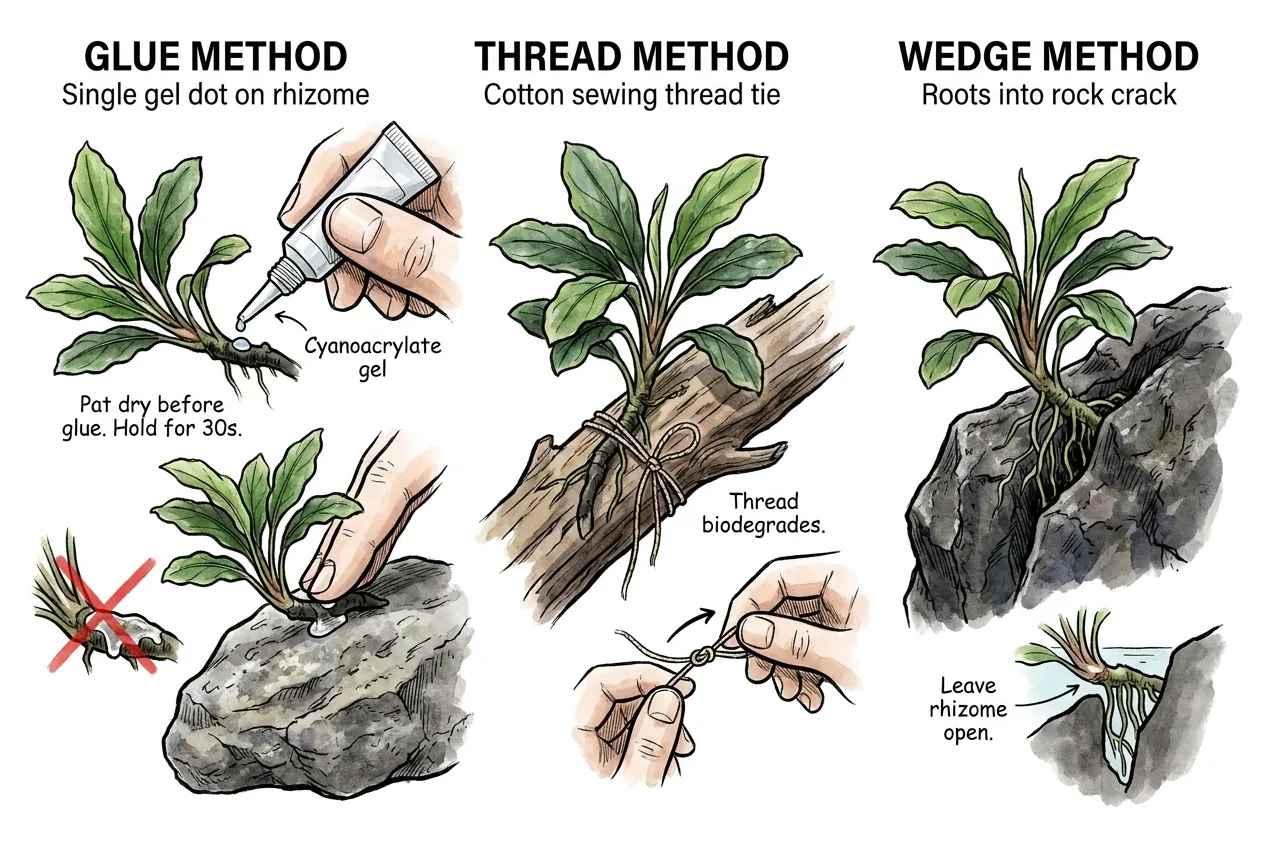
Use a small dab of aquarium-safe cyanoacrylate gel on the roots or hardscape, not across the whole rhizome. Pat the contact point dry, then hold the plant in place for the cure time on the product label.
Too much glue on the rhizome can harm the plant, so use the smallest amount that holds it.
If you would rather skip glue, tie the plant on with cotton sewing thread that will biodegrade after the roots grip.
Or simply wedge the roots into a crack in the rock. All three methods share the same goal, holding the plant in place while leaving the rhizome open to the water.
When you do reach for glue, choose a cyanoacrylate gel explicitly labeled for attaching aquarium plants or moss to hardscape, and follow its directions. A hardware-store gel may use the same base chemistry, but additives, cure instructions, and aquatic-use claims vary, so the absence of scent or accelerator does not establish equivalent livestock safety. Apply only a small amount to the hardscape, not the rhizome.
Choose a package that lets you place a small, controlled dot without smearing the rhizome. If you want to compare adhesive types, see how to pick an aquarium-safe adhesive for plants and hardscape.
Fine curved tweezers can make placement easier, especially for a small tissue-culture portion. Choose a length that reaches the hardscape comfortably without making a nano tank awkward to work in.
Tank Conditions That Make Melt Milder
Stable, moderate conditions ease the transition far better than aggressive light or fertilizer. Bucephalandra is a slow grower, and the biggest mistake is trying to force it through melt with bright light, which mostly feeds algae on the weakened leaves.
Light, and why less is safer during transition
Keep light low to medium while the plant transitions. Bucephalandra grows fine in low to medium light, and higher light mainly invites algae because the plant grows too slowly to use the extra energy.
A slow plant under strong light leaves that light and its nutrients free for algae, which colonize melting leaves fastest.
Moderate light matches the plant’s slow uptake and keeps the melt clean.
Temperature, pH, and flow
Bucephalandra tolerates a wide but steady window. It handles temperatures from roughly 70 to 82 degrees Fahrenheit, about 21 to 28 Celsius, and a pH of around 6 to 8.
The word that matters is steady. Because the plant is already spending reserves on the leaf switch, large sudden swings in temperature or chemistry pile stress on top of the melt it is already managing.
Flow suits it well. As a rheophyte from fast rivers, Bucephalandra likes gentle-to-moderate water movement once attached.
That flow delivers carbon dioxide and nutrients to the leaves and sweeps away debris that would otherwise settle on a weakened plant. So place it where water moves, not in a dead corner.
Do you need carbon dioxide? No.
Carbon dioxide injection is optional and not required to survive melt. It can support growth when it is already stable, but a recovering Bucephalandra can re-leaf in a low-tech tank. The pace varies with the clone, light, temperature, and root condition.
If you already run carbon dioxide and can keep it stable, fine, but do not add a pressurized system just to rescue a melting plant. Stable conditions matter more. If you use a liquid all-in-one fertilizer, follow the label rather than overdosing in hope of a faster fix.
The Rhizome Rescue, Step by Step
Here is the recovery sequence for a melting or partly-rotted clump. Work in order, keep the rhizome, and then leave the plant alone to do its slow work.
Step 1: Trim the dead leaves
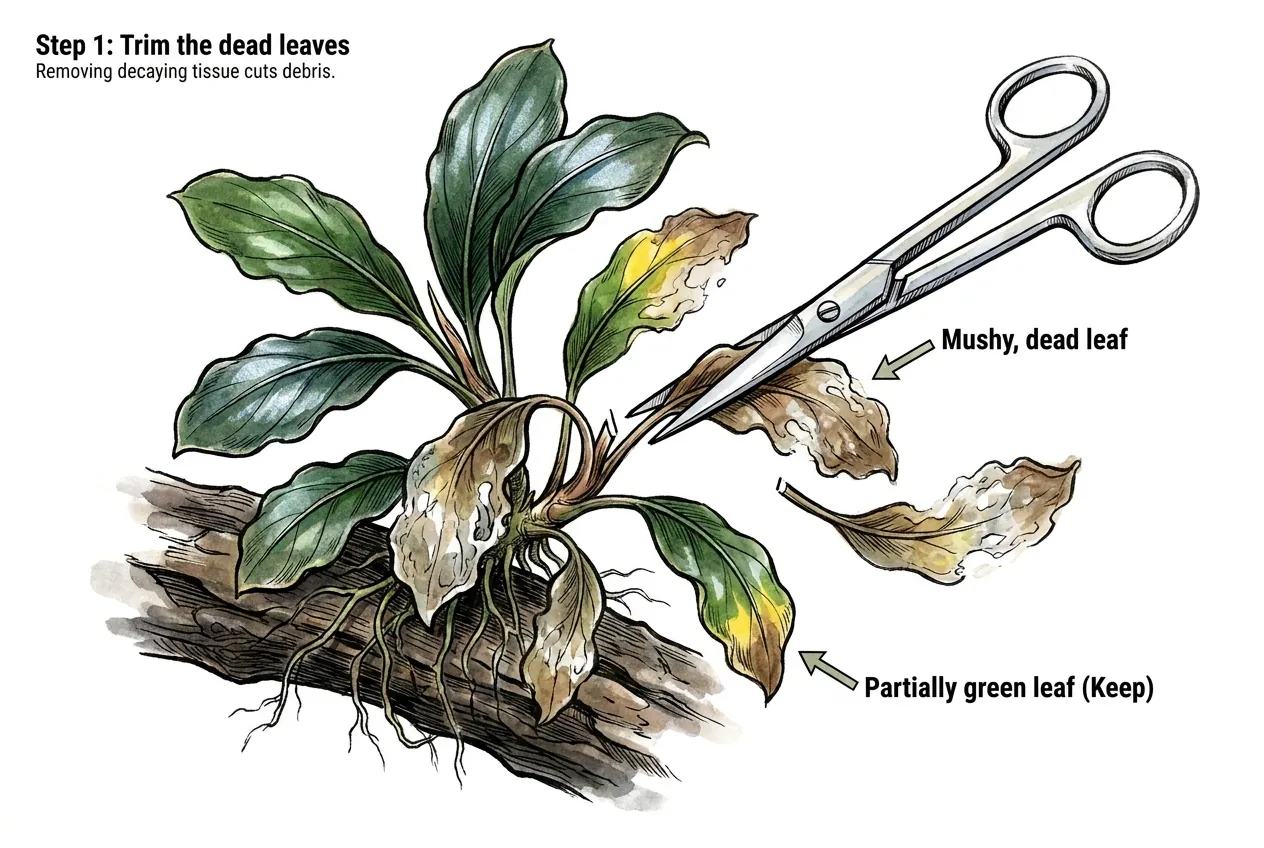
Snip off fully melted or mushy leaves at their base, and keep any leaf that is still partly green.
Removing decaying tissue cuts the debris and bioload that feed algae and bacteria, while partly-green leaves may still contribute a little energy. Do not strip the plant bare out of tidiness.
Step 2: Cut any rot back to firm green tissue
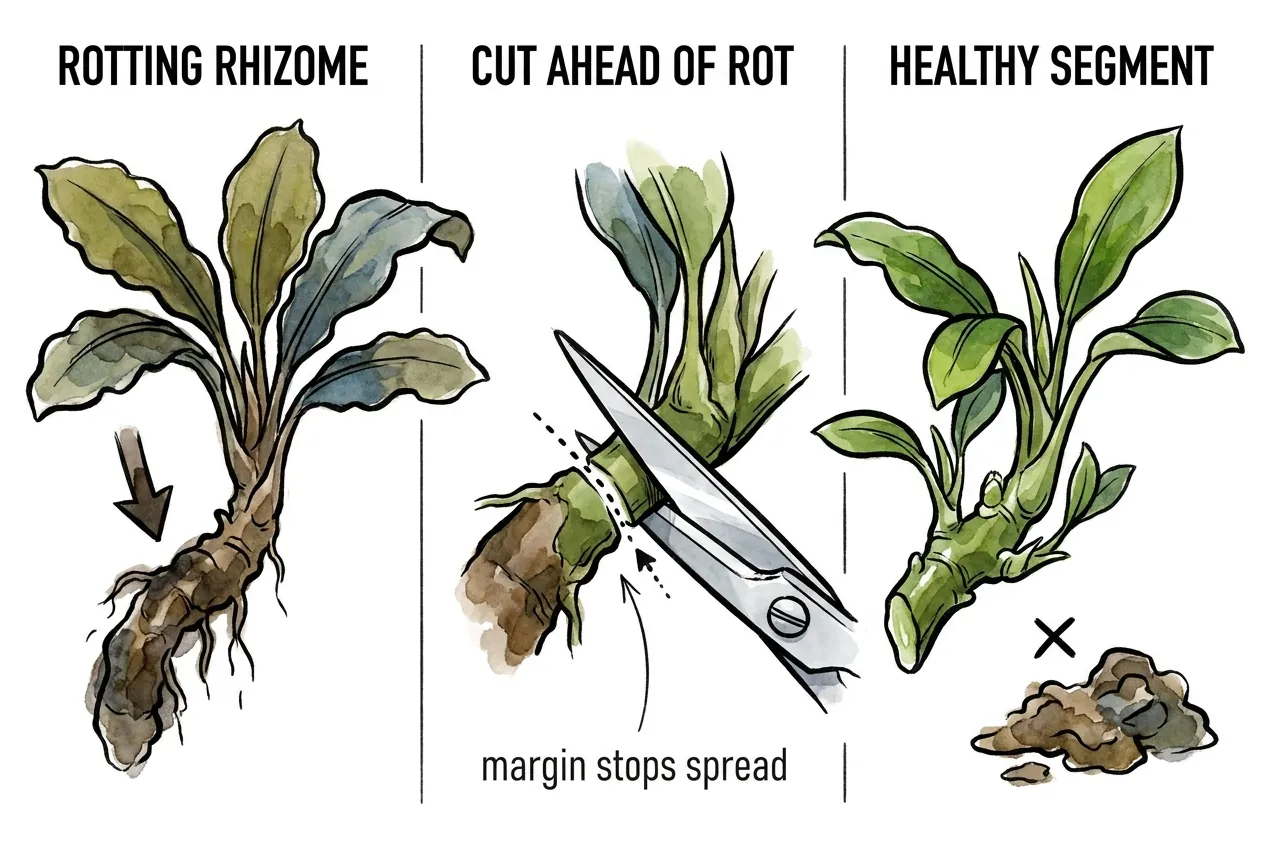
If part of the rhizome is soft and brown, remove it. Using a clean, sharp razor or scissors, cut through firm green rhizome ahead of the rot and discard the mush.
Keep any segment with a few leaves or a visible growth point.
Cutting back to firm tissue removes the failed section and preserves as much sound rhizome as possible. It does not identify the cause of the rot, so correct the placement and water conditions as well.
Step 3: Re-attach and stabilize
Glue or tie the firm rhizome back onto hardscape with the rhizome exposed, then set conditions to moderate light, steady temperature, and gentle flow. If you divide the plant, keep a healthy growth point and as much firm tissue as practical on each piece.
Step 4: Wait, and resist the urge to fiddle
New leaves can take several weeks. Avoid moving or replanting a recovering plant repeatedly. Attach it once and let the rhizome show whether it remains firm.
As long as the rhizome stays firm, the plant can produce new submerged leaves and re-establish. Those leaves may be smaller or darker than the originals.
Keeping Melt From Fouling the Rest of the Tank
While a plant melts, your main job is housekeeping. Decaying leaves feed algae and add to the tank’s organic load, so removing dead tissue and keeping up water changes protects both the plant and everything around it.
Why melting leaves become algae magnets
Decaying plant matter is a recognized algae trigger. As leaves break down they leak organic carbon and nutrients into the water and onto surfaces.
Algae exploit both that nutrient flush and the soft, weakened leaf surface, which is far easier to colonize than a healthy cuticle.
Physically removing melting leaves, rather than letting them rot in place, cuts off that food supply.
Water quality and simple maintenance
In a cycled, lightly stocked tank, a melting plant is mostly a cleanliness issue rather than a poisoning risk.
Bacteria turn decaying tissue into ammonia, but a healthy biofilter usually handles the small amount a melting plant produces, and it often stays below what a test kit can read.
The risk rises in a new or overstocked tank, where the extra load can outpace the biofilter.
The routine is straightforward. Use a turkey baster to spot-clean bits of decaying leaf, and keep steady flow so debris stays suspended for your filter to catch.
Do regular, ideally weekly, water changes to dilute dissolved organics and reoxygenate the water, and together these break the algae feedback loop before it starts.
Setting Up the Next Plant to Melt Less
You cannot fully prevent melt, but the right stock and gentle handling shrink it. Two choices do most of the work, buying water-adapted stock and preparing tissue-culture plants correctly.
Choose stock that is already water-adapted
Growing method predicts melt. Submersed-grown stock, often sold by other hobbyists or specialist shops, already carries water-adapted leaves and transitions most smoothly.
Emersed farm plants melt the most, because every leaf has to convert. Tissue-culture plants sit in between, pest-free and clean but grown soft in gel, so they must harden into normal submersed leaves.
If you can find and afford submersed-grown Bucephalandra, it is the gentlest start. Otherwise, expect melt and plan for it.
Prepare tissue-culture plants correctly
Rinse every trace of gel off a tissue-culture plant before planting. The growth medium is sugar-based, and any left on the plant will fuel a bacterial bloom that clouds the water and cancels the pest-free advantage.
Gently pull the plantlet from the cup, and rinse all the gel off under running water.
Throw the gel in the trash rather than washing it down the drain, then attach the clean plant to hardscape as usual.
Finally, avoid piling shocks onto the transition. Moving a plant between very different waters at once, a big jump in dissolved solids for example, adds osmotic stress on top of the leaf switch.
Keep the destination tank stable, and give the plant a calm environment to do the one hard job it already has.