
Tissue Culture Acclimation Product Chooser
A practical tissue culture acclimation product chooser: humidity chamber, substrate, disinfectant, hygrometer and low light for deflasking plantlets, with honest limits on each pick
Jordan Cole · Published 2026-07-23 · 40 min read
Key Takeaways
- Three common failure modes have practical countermeasures. A chamber slows desiccation, rinsing agar reduces rot pressure, and low light avoids bleaching. They are not the only ways plantlets fail.
- Start high and vent gradually. Sources differ on the exact number, from about 80 to 85% RH upward, so pick a schedule for your species and adjust by measured RH and turgor.
- Rinse every trace of agar off the roots with clean water. Leftover sugar can feed contaminants.
- Keep light LOW during acclimation. Reported safe values vary by species, roughly 35 to 150 µmol depending on the study, so measure at leaf height rather than assume.
- For a few plantlets, a sealed box plus a hygrometer is usually enough. Automation is a scale convenience.
You opened the flask, the plantlets looked perfect, and three days later they melted, rotted, or bleached white.
Some of that is bad luck, but much of it is avoidable. Freshly deflasked plantlets fail for several interacting reasons. Desiccation, rot, and light stress are three common modes with practical countermeasures. Other causes, such as hyperhydricity, bacterial soft rot, root injury, and nutrient or temperature problems, are not solved by a shopping list, so treat this kit as a starting point rather than a complete diagnosis.
Buy only what addresses the risk you found in your batch. A setup that manages common risks still cannot guarantee against rot or transplant loss.
What do I actually need to buy to acclimate tissue-culture plantlets?
You need roughly six things, each aimed at one of the three common failure modes. The core items are inexpensive, though a full basket including a logging sensor and a grow light runs to around a hundred dollars or more depending on the models you choose.
The core kit is a humidity chamber, an airy low-bioburden substrate, a clean-water agar rinse plus a tool disinfectant, an accurate hygrometer, a low-intensity grow light, and clean handling gear.
I number every plantlet and its chamber position on the first photograph. If losses cluster beside a vent, wall, or light edge, the map exposes an environmental zone that a single humidity reading cannot show.
Positions rotate only as a planned test, with every move recorded. Without that record, a recovering plantlet can make a new position look safer even though it was already healthier before the change.
Humidity chamber
A clear snap-lid box holds high humidity at deflasking and can be vented down gradually over a few weeks. A Sterilite 6 Quart Storage Box is one inexpensive option. Check how well it seals and what humidity it actually holds before relying on it.
Acclimation substrate
Long-fiber New Zealand sphagnum, such as Besgrow AAA grade, is a forgiving choice for many setups. Use it only after you rinse the agar off the roots.
Disinfectant and agar rinse
Clean lukewarm water carries the nutrient gel away from the roots. Physan 20 is a registered disinfectant for tools and surfaces when used according to its label.
A brief 3% hydrogen peroxide dip is optional and not strongly evidenced for tender plantlet roots.
Environment monitor
A hygrometer lets you run the ramp instead of guessing. SensorPush HT.w is useful for logging trends, while Govee H5075 is enough for a budget alert on many small batches.
Consumer sensors lose accuracy near saturation, so treat readings above roughly 90% RH as approximate.
Low-intensity light
A modest full-spectrum LED held well back from the canopy can keep in-vitro leaves in a safer low-light band. The SANSI PAR25 24W Grow Light Bulb is a strong point source, so measure at leaf height rather than trusting the package wattage.
Clean handling
Clean nitrile gloves reduce transfer of skin oils and microbes to wounded, sugar-rich tissue. They are non-sterile disposable gloves, so change or disinfect them between plants.
That covers the core kit. It does not replace attention to temperature, water quality, species-specific needs, and the plantlets' starting condition, which matter just as much.
Enhancing Acclimatization of Micropropagated Pistachio Through Optimization of Light Spectrum and Vapor Pressure Deficit
Why do freshly deflasked plantlets die?
A plantlet raised inside a sealed jar is often poorly prepared for open air, because the flask environment does not demand the traits an outdoor plant relies on. Several systems can be underdeveloped at once, to varying degrees.
Inside the flask, humidity sits high, light is dim, and sugar is available in the agar. Plantlets commonly emerge with weak stomatal control, a thin or reduced cuticle, sugar-coated wounded roots, and limited photosynthetic capacity.
How pronounced each is depends on the species and culture conditions, and hyperhydric plantlets can be worse.
Those deficits underlie the three common failure modes below.
How does desiccation kill them so fast?
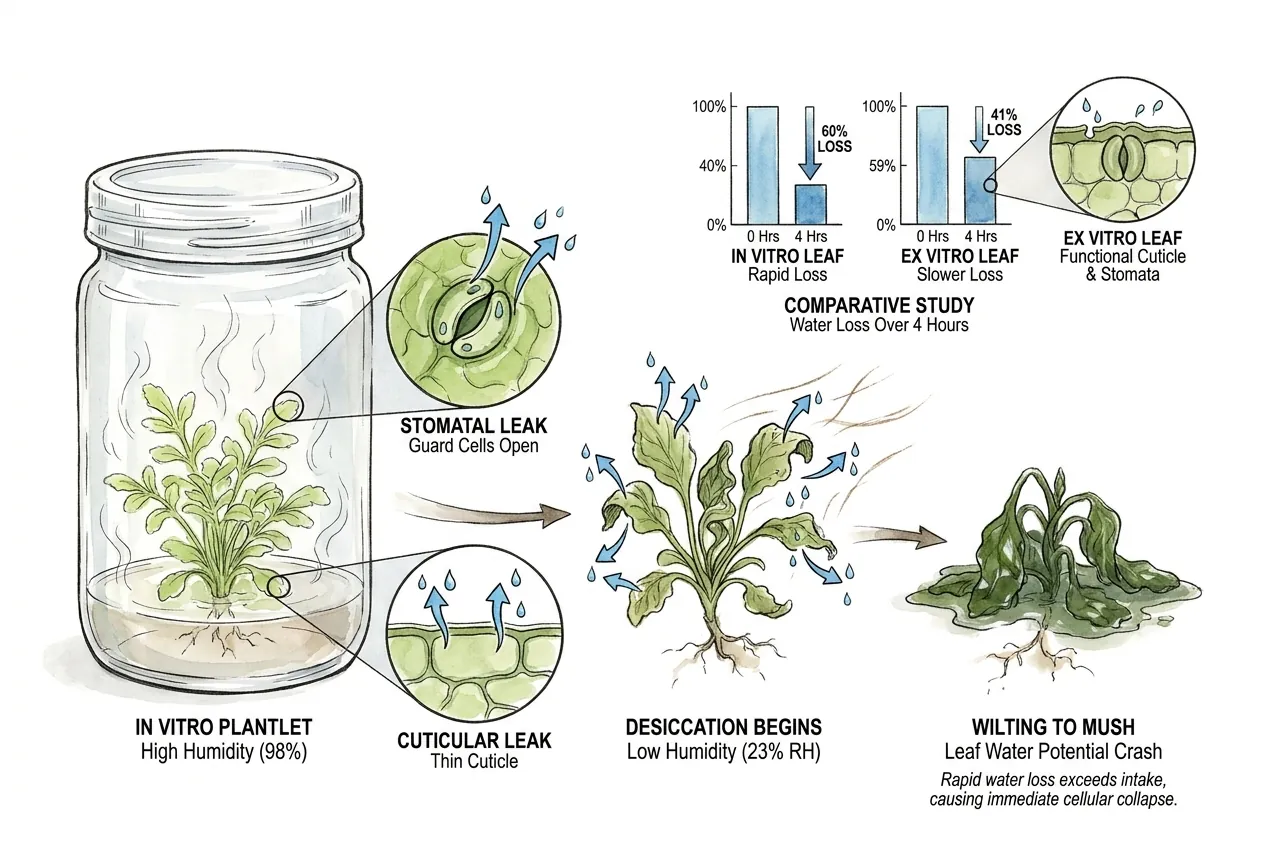
Desiccation often strikes first because in vitro leaves are poor at controlling water loss.
Their stomata commonly respond slowly or stay open, and their surface tends to have a thin or reduced waxy cuticle, though the degree varies by species and culture conditions.
A peer-reviewed protocol on Artemisia tridentata describes in vitro plantlets with little epicuticular wax deposition and stomatal abnormalities such as poorly functioning guard cells.
Rapid desiccation occurs when plantlets grown above 98% humidity meet air near 23% RH.
Freshly deflasked leaves can lose water far faster than hardened leaves. The exact rate varies by species, but the practical response is the same. Start with high humidity and lower it gradually as roots and new leaves develop.
Two paths leak water at once. Guard cells that are slow to seal let stomatal water loss run high, and a thin cuticle lets water evaporate through the surface as well.
With both paths open and roots too immature to keep up, leaf water potential can crash. Badly affected tissue wilts, dries, and turns crisp and translucent, sometimes within hours.
That is why the humidity chamber holds high RH at first. It lowers the vapor-pressure deficit so transpiration demand drops sharply while the plant grows new, better-adapted leaves.
Transpiration is reduced, not truly zero, and leaf temperature and airflow still matter.
Acclimation and hardening of a slow-growing woody species emblematic to western North America from in vitro plantlets
Influence of Polyethylene Glycol on Leaf Anatomy, Stomatal Behavior, Water Loss, and Some Physiological Traits of Date Palm Plantlets Grown In Vitro and Ex Vitro
Why is damping-off a major risk?
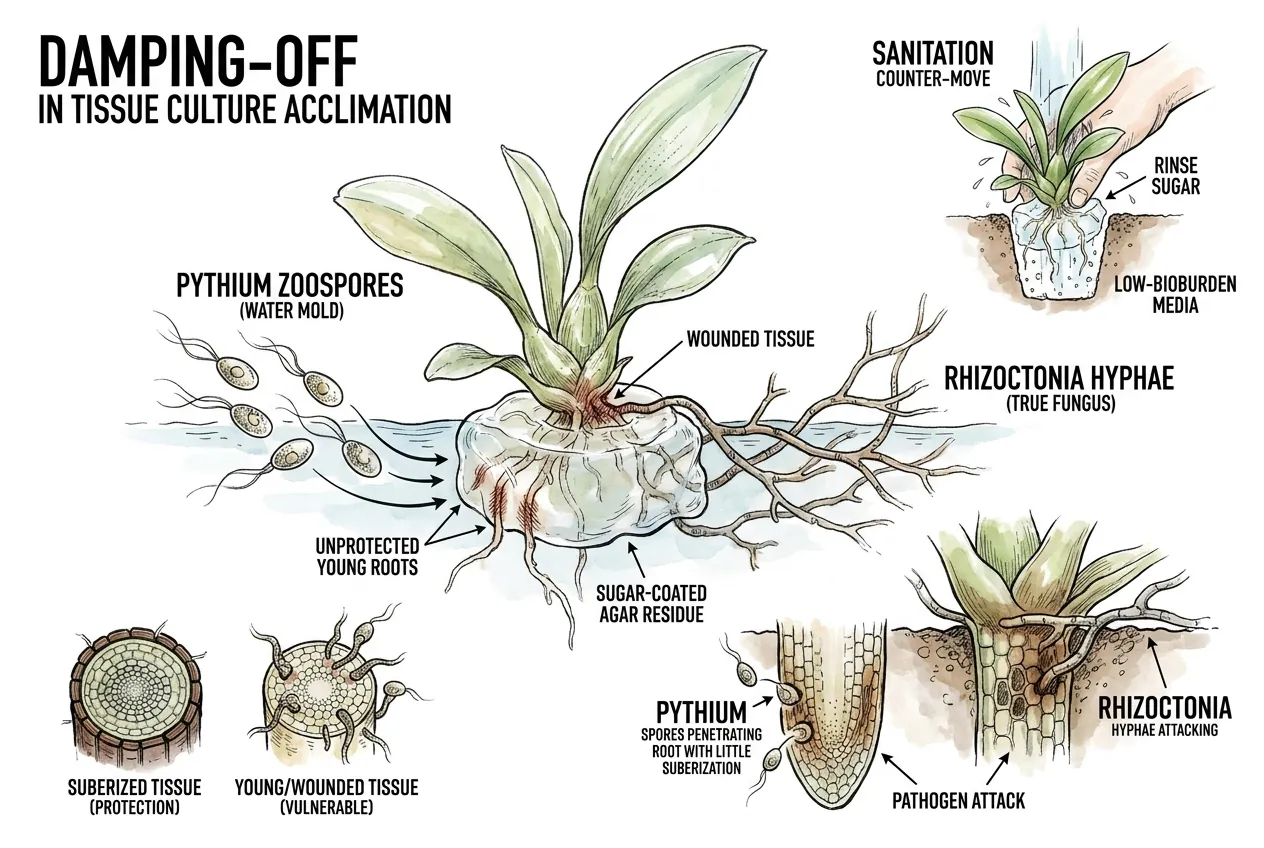
Damping-off is a common and serious loss mode, because deflasking exposes wounded, sugar-coated, unprotected tissue where pathogens can attack.
It is not the only way plantlets fail. Bacterial soft rot, root injury, and light or water stress also cause losses, so treat it as one risk to manage rather than a proven number-one killer.
Residual agar feeds contamination, so rinse it away gently before potting. Handle plantlets and tools cleanly because contamination can spread quickly in a warm, humid chamber.
The Pythium ultimum genome paper reports its penetration is primarily limited to wounded tissue, or to young roots and seedlings with little or no suberized tissue, the exact tissue exposed by deflasking.
That same paper notes P. ultimum does not typically produce zoospores in culture, so it is not the swimming-spore example.
Pythium is an oomycete, a water mold. Some species spread by motile zoospores that swim through films of water, though zoospore biology varies by species and isolate.
Rhizoctonia is a true fungus that grows along the surface and attacks at the soil line. Overwatering and standing moisture favor both.
The counter-move is sanitation and moisture control, not fertilizer. The flask environment was clean, and deflasking exposes tender tissue, so you rinse off the sugar, pot into a lower-bioburden medium, avoid saturation, and disinfect the tools and surfaces that touch the plant.
Genome sequence of the necrotrophic plant pathogen Pythium ultimum reveals original pathogenicity mechanisms and effector repertoire
Isolation, Identification and Pollution Prevention of Bacteria and Fungi during the Tissue Culture of Dwarf Hygro Explants
Why do the leaves bleach white under my grow light?
Bleaching can happen because in vitro leaves often have a limited photosynthetic capacity and weak photoprotection, so light levels a mature aroid handles easily can overwhelm freshly deflasked leaves.
Newly deflasked leaves cannot handle strong light as well as established plants. Too much light can bleach or damage them before their protective systems adapt.
That excess energy can generate reactive oxygen that photo-oxidizes pigment, so affected in vitro leaves may go pale, yellow-white, and translucent while new ex-vitro leaves often come in greener.
Nutrient, pH, and root problems can cause pale foliage too, so bleaching is a clue, not a certain diagnosis.
Aroid studies point to low targets, but they do not agree on one band. Dieffenbachia acclimated best near 35 µmol·m⁻²·s⁻¹, with stress markers rising as intensity climbed toward 100. Spathiphyllum showed markedly more photoinhibition at 300 versus 100 µmol.
So the light target during acclimation is LOW. Reported values span roughly 35 to 150 µmol·m⁻²·s⁻¹ at leaf height depending on the species and study, with the most tender genera doing best near the bottom of that range.
Treat these as species-specific estimates, not one universal value, and measure at leaf height.
Integrative approach reveals new insights into photosynthetic and redox protection in ex vitro tobacco plantlets acclimatization to increasing light intensity
Effect of photosynthetic photon flux density on growth, photosynthetic competence and antioxidant enzymes activity during ex vitro acclimatization of Dieffenbachia cultivars
How do the RH ramp-down and light band actually work?
Acclimatization is a gradual transition from high humidity down to ambient, paired with LOW light, slow enough that the plant adapts its leaves as conditions change.
It is not simply taking the lid off. Each humidity step is a small, survivable water-stress cue, and over time the plant tends to replace poorly adapted flask leaves with new ones that have better stomatal control and more wax.
Existing leaves can also adapt to some degree, so this is a general pattern rather than a strict one-way process.
Published protocols run the ramp over one to several weeks depending on species. A common hobbyist approach compresses this into roughly two to three weeks in a box plus a brief hardening step, but that is a starting point to adjust, not a validated fixed schedule.
A university extension sweetpotato schedule gives one concrete cadence. Plantlets go into a humidity box at roughly 25 to 27°C and 80 to 85% RH under 50 to 70% shade.
Note that this is lower than the 90%-plus some hobby setups aim for, which is why you should match the target to your species and measured conditions rather than to any single number.
In that schedule the box is opened in stages. Remove a quarter of the cover after two to three days, then half on day four.
Take it to three-quarters on day six, fully open by day eight, then a short week of hardening.
Light and humidity are managed together. A common conservative approach keeps light low while humidity comes down, then raises light as new ex-vitro leaves appear and the plant shifts toward self-feeding. The sweetpotato protocol instead runs shade and cover-opening in parallel.
A sensible working rule is to change conditions gradually and watch the plants, rather than making several large changes at once.
Whether you always drop humidity before raising light depends on your species and setup.
Sweetpotato. Acclimatization of Tissue Culture Plants (Washington State University Extension)
A Beginner’s Guide to Begonias. Micropropagation and Tissue Culture (UF/IFAS ENH1397/EP662)
Which spec matters for each product role?
The table below turns the physiology into a measurable spec you can check before buying, then names the pick for each role.
| Product role | Measurable spec | Why it matters | Example option |
|---|---|---|---|
| Humidity chamber | Clear, holds high RH, vents gradually (verify actual RH) | Weak stomatal control plus thin cuticle can desiccate leaves quickly at room RH | Sterilite 6 qt clear box |
| Acclimation substrate | High air-filled porosity, low starting bioburden, agar rinsed first | Residual agar sugar feeds Pythium and Rhizoctonia | Besgrow NZ sphagnum, AAA grade |
| Agar rinse | Clean lukewarm water. Optional brief 3% peroxide dip | Removes sucrose-rich agar from wounded roots | Clean water. A 3% hydrogen peroxide rinse is optional |
| Tool and surface disinfectant | Label-dilution contact disinfectant | Tools and benches carry the pathogen inoculum | Physan 20 |
| Environment monitor | Logging or min/max. Accuracy degrades near saturation | You cannot ramp what you cannot measure | SensorPush HT.w or Govee H5075 |
| Low-intensity light | Full-spectrum LED, measured to a low target (roughly 35 to 150 µmol by species) at leaf height | Low photosynthetic capacity plus weak photoprotection can cause bleaching | SANSI PAR25 24W |
| Clean handling | Nitrile gloves (non-sterile), fine blade or forceps | Reduce transfer of microbes to wounded, sugar-rich tissue | Nitrile gloves |
What container makes a good deflasking humidity chamber?
A deflasking chamber is any transparent, tall-enough, sealing container that can hold high RH at first, then be vented down gradually.
Whether a given box actually reaches 90% or more depends on its seal, the substrate moisture, and the room, so verify with a hygrometer rather than assume.
Four physical jobs map to four specs you check before buying, and cleanability, drainage, and temperature also matter.
It must be transparent
Clear walls transmit the low grow light and let you inspect for condensation and early rot without breaking the seal.
It must be tall enough
Leaves must not press against wet plastic, which wicks rot, and there must be headroom for a couple of weeks of growth.
It must seal to hold high RH
A snug snap or latch lid lets the moist substrate raise the headspace humidity. A loose lid leaks the humidity you are trying to hold.
Few storage boxes are truly airtight, so measure the RH the box actually reaches rather than assume it self-saturates.
It must vent on a schedule
You must be able to step humidity down by cracking the lid or opening ports. Drilling holes works but is not reversible, so start by cracking the lid.
Start with high humidity, then lower it only after the plantlets hold their shape and begin new growth. The exact starting number depends on species and room temperature, so follow the sensor trend and the plantlets rather than treating one humidity reading as universal.
Should I buy the Sterilite box or a commercial propagator?
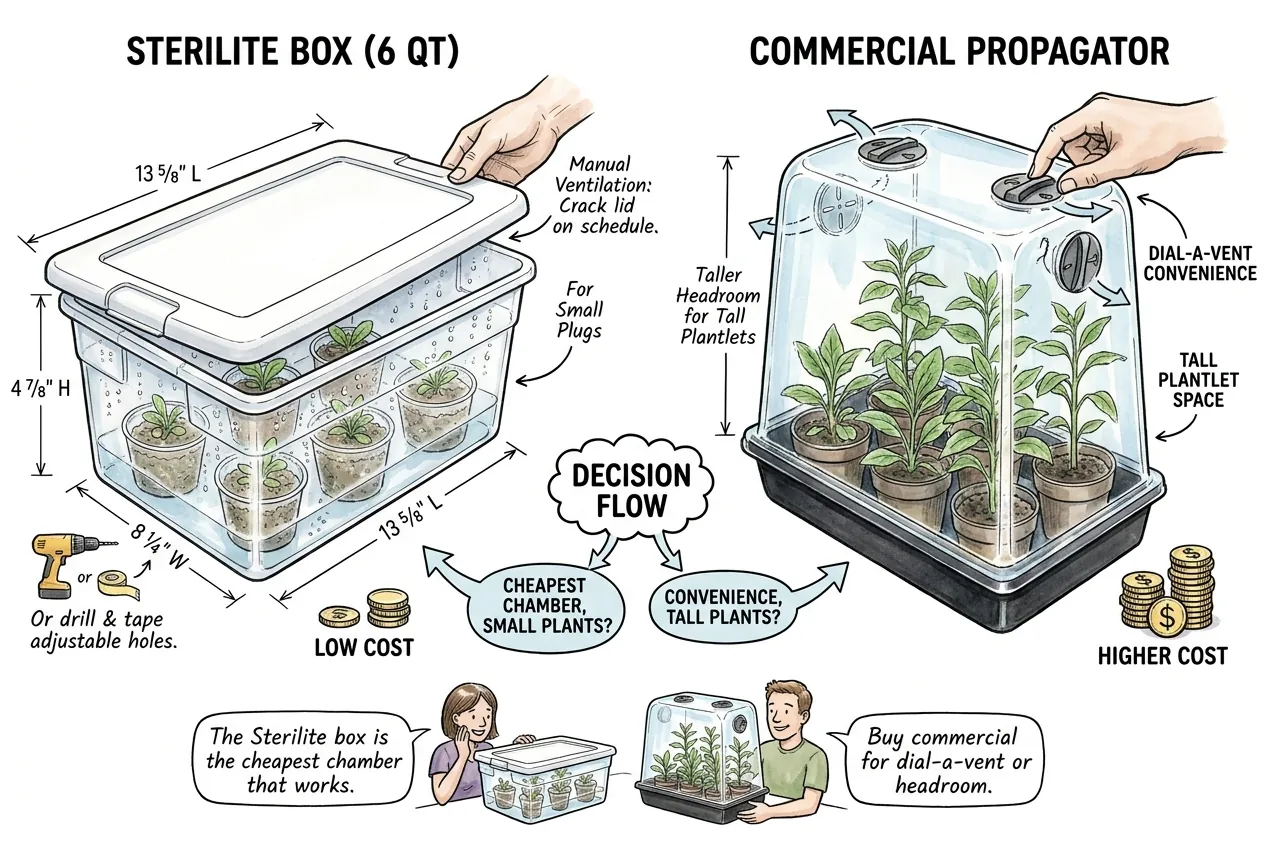
Consider the Sterilite box as one inexpensive chamber option, and a commercial vented dome if you want dial-a-vent convenience or headroom for tall plantlets.
Confirm the seal and actual RH before relying on either.
Sterilite 6 qt clear storage box is a low-cost chamber for small plugs. Its clear base and walls let light in and make condensation easy to see, while the snap lid lets you hold humidity early and vent it later by cracking the lid.
The lid is snug but not rated airtight, so measure the chamber rather than assuming it will hold a particular humidity. It suits a small batch with short plantlets.
Limitations
It has no built-in vents, so humidity control is manual. Its low height suits small plugs, not tall specimens.
One accuracy note
Do not expect the lid to be fully see-through. If top-down inspection matters, choose a clear-lid tote or vented dome instead.
Who should not buy it
Choose a commercial dome if you want ready-made adjustable vents. Choose a taller chamber for tall plantlets. Check the quantity and usable internal height before buying.
The Sterilite box is a reasonable, low-cost humidity-chamber option.
Use case
Keep it closed at high RH early on, watching the hygrometer, then crack the lid a little wider as the plants hold turgor. Adjust by measured RH rather than a fixed calendar.
A taller clear vented humidity dome is the plug-and-play alternative when you need more headroom or adjustable vents.
Published acclimation protocols also lower humidity by opening vents gradually. Their results are species-specific, so use them to support the gradual approach rather than to predict survival for aroids or aquarium plants.
Moisture management during vegetative cutting propagation (MSU Extension)
Antioxidant metabolism and chlorophyll fluorescence during ex vitro acclimatization of micropropagated Stevia rebaudiana
What substrate should freshly deflasked plantlets go into?
The first medium mainly needs to give wounded new roots oxygen while keeping contamination pressure low.
It also has to provide moisture, some support, and reasonable pH and nutrient conditions.
Two levers help a lot. Rinse the sugar-rich agar off the roots with clean water, and choose a substrate with high air-filled porosity and a low starting bioburden.
These help but do not fully control the outcome. Water quality, temperature, and the plantlets' condition matter too.
Wounded new roots do best in an aerated root zone rather than a waterlogged one. When pores fill with water, air-filled porosity drops and oxygen falls, which is a low-oxygen setting that favors root rot pathogens such as Pythium.
How do I rinse the agar off without snapping the roots?
Rinse under gently running lukewarm water until no gel remains, holding the plantlet by the base or roots, never by the fragile leaves.
Cold water shocks the roots, so keep it room-temperature to mildly warm. Tease stubborn gel out of crevices with your fingers or a soft stream. Do not forcibly strip roots.
The clean-water rinse is the important step here, and it is easy to skip, because any leftover sucrose leaves food for contaminants in the pot.
A brief dip in 3% hydrogen peroxide is sometimes suggested to sanitize the surface, but its benefit and safety on tender plantlet roots are not well established, so it is optional rather than required.
A peer-reviewed acclimatization study found that reducing sucrose in the medium reduced plant loss from biological contamination.
That supports removing sugar in general, though it studied sucrose in the growing medium rather than a peroxide root dip.
Sucrose and substrates on the acclimatization of micropropagated Luehea divaricata plants
Sphagnum or LECA for the first potting?
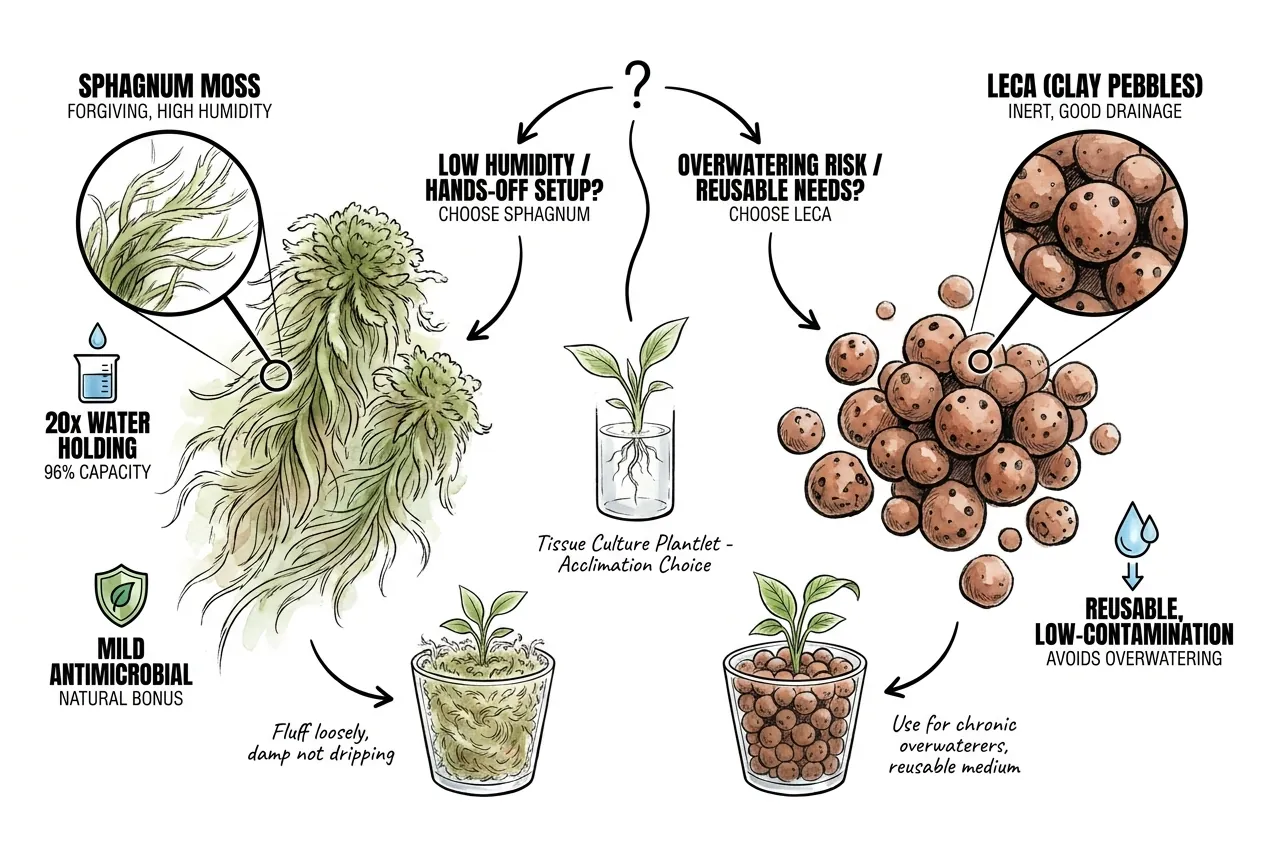
Long-fiber sphagnum suits growers who cannot hold steady humidity, since it retains moisture.
Inert LECA suits those who tend to overwater or want a reusable, easy-to-clean medium, but only with proper washing, watering, and nutrient management.
Long-fiber sphagnum is a forgiving option because it holds moisture while staying airy when fluffed loosely. It begins relatively clean but is not sterile and should never be treated as a fungicide.
Besgrow NZ sphagnum moss is a moisture-retentive option for growers who want a lower-attention setup. It still needs fluffing and replacement as it compacts, and it is clean but not sterile.
Use case
Fluff it loosely, pre-moisten to damp not dripping, and pot the crown at the surface.
Limitations
It decomposes and compacts over time, so refresh it when it turns sour or mushy. If you tend to overwater, its large water reserve can keep roots too wet.
Inert LECA is a reusable, low-organic alternative. It is inert with a near-neutral pH, does not break down in water, and its air-filled cavities give consistently high porosity.
It is not automatically low-contamination. It needs washing and, ideally, disinfection and salt conditioning before use.
Legigo LECA clay pebbles suit a reusable semi-hydro setup where you want drainage and a visible reservoir. They do not supply complete nutrition, so the water and nutrient routine still determines whether roots thrive.
Use case
Wash and condition it, run it as a semi-hydro medium with a small reservoir or wick so roots get steady moisture, and reuse it between batches after cleaning.
Honest tradeoff
It holds far less water than sphagnum, so you must supply moisture at the root zone rather than rely on air humidity alone. Roots can dry out if the reservoir or wick is neglected.
Growers who cannot manage a semi-hydro watering routine may find sphagnum simpler. Horticultural perlite is another inert option where reuse matters less.
Sphagnum versus inert media at a glance
| Feature | Long-fiber NZ sphagnum AAA | LECA / perlite (inert) |
|---|---|---|
| Water-holding | Very high, holds many times its weight | Low, coarse, drains fast |
| Air-filled porosity | High when fluffed, falls as it compacts | Consistently high |
| Starting bioburden | Relatively clean (not sterile), organic | Low organic carbon. Wash and disinfect before use |
| Lifespan | Decomposes and compacts, refresh roughly yearly | Inert, rinse and reuse after cleaning |
| pH | Naturally acidic | Near-neutral |
| Best for | Moisture-retentive, lower-attention setups | Semi-hydro workflows, reuse, drainage control |
Untargeted metabolomic profiling of Sphagnum fallax reveals novel antimicrobial metabolites
Soil Mixes Part 2. Water and Air Porosity (UC ANR)
Which disinfectant stops damping-off, and how do I use it safely?
There is no single anti-damping-off product, and prevention rests mostly on the clean-water rinse, an airy medium, moisture control, and disinfecting tools and surfaces.
Treat any concentrate as genuinely hazardous and follow its current product label.
Physan 20 is a registered disinfectant for tools and surfaces, used per its label. A brief 3% hydrogen peroxide dip is an optional, weakly evidenced surface rinse.
Copper fungicides are covered below mainly to explain why most home growers should not use them here.
What does each disinfectant actually do?
Each has a real, narrow scope you need to understand before you buy.
Physan 20, the tool and surface disinfectant
Physan 20 disinfectant is a quaternary-ammonium contact product used for benches, pots, and tools.
Follow the current EPA-registered product label on your container for the correct site, dilution, contact time, and rinsing, since those govern lawful and safe use.
Use only the current label’s rate for the exact tool or surface you are disinfecting. Do not extend a surface-use rate to soaking tender plantlet tissue, and confirm that any plant contact is expressly permitted.
Its scope is limited. It disinfects surfaces it contacts but does not move inside the plant or protect roots after it dries. It is not a systemic fungicide.
Physan 20 is a reasonable tool and surface disinfectant when used per its label.
Use case
Wipe the bench and disinfect forceps at the label rate and contact time before you open the flask.
Caution
The current EPA label carries the signal word DANGER and the concentrate is corrosive, so it requires the PPE the label specifies, covered in the safety section below.
3% hydrogen peroxide, an optional surface rinse
Hydrogen peroxide can disinfect surfaces, but that does not establish it as safe or useful on living plantlet roots.
Its scope is limited and its use on tender plantlet roots is not well established. One 3-minute orchid root dip caused a minor plant setback and did not remove algae, and long-term effects were not measured, so there is no clear evidence it strips agar or is safe across species.
Remove agar with clean water first. A brief peroxide dip is optional, not required, and best reserved for growers who have tested it on their own plants.
Swan 3% hydrogen peroxide is a widely available solution if you choose to use one. Note it is sold as a first-aid antiseptic, not a horticultural product.
Use case
If you use it at all, only after the clean-water rinse, and watch for any setback on your species.
Caution
Use only the 3% grade. Federal guidance notes solutions above 10% are corrosive, so never scale up concentration, and even 3% can set plants back.
Copper fungicide, generally not recommended here
Copper products such as Southern Ag Liquid Copper are genuine registered fungicides, but they are not a good fit for acclimating plantlets and are covered here mainly so you know why to avoid them.
Its label is the limit. The Southern Ag Liquid Copper label lists it as a preventative foliar spray for specific crops and diseases. It does not list a substrate drench or a use against Pythium on plantlets, so applying it that way would be off-label.
It also carries an aquatic-toxicity warning, which matters especially near aquarium plants.
Cornell documents that young plant tissue is generally most sensitive to copper, and injury is worse when leaves are wet and at low pH, exactly the conditions around fresh plantlets.
Most home growers should skip copper entirely here and rely on the clean-water rinse, an airy medium, moisture control, and sanitation.
If losses keep recurring despite good sanitation, the right next step is to identify the pathogen, discard affected plants, and if needed consult an extension diagnostic lab or a plant pathologist, not to reach for an off-label copper drench.
Note
Listed here for reference only. Use it, if at all, strictly for its labeled crops, diseases, and application method, never as an unlisted plantlet drench.
How do I handle these chemicals safely at home?
Treat the Physan 20 concentrate as corrosive, wear PPE, ventilate, and never mix products.
The Physan 20 current EPA label and safety data sheet carry the signal word DANGER, and state the concentrate causes severe skin burns and eye damage and is very toxic to aquatic life.
Follow the PPE and handling instructions on your current product label, which are stricter than a generic glasses-and-gloves summary.
PPE
Read and follow the PPE on the current Physan 20 label, which can include items such as coveralls, waterproof or chemical-resistant gloves, chemical-resistant footwear and socks, and eye protection when you handle the concentrate.
Do not rely on a lighter setup than the label requires. Verify chemical resistance from the glove manufacturer rather than assuming a given material or thickness is adequate.
6 mil nitrile work gloves are one option for the plant-handling steps. They are non-sterile disposable gloves, not certified chemical-protection PPE.
Use case
Reduce transfer of skin oils and microbes to wounded, sugar-rich roots while you rinse agar and move plantlets. Change or disinfect between plants.
Limitations
Single-use, so buy the size that fits, otherwise dexterity for fine forceps work suffers. For handling corrosive concentrate, use the chemical-resistant gloves the label specifies rather than bare hands or thin disposables.
Ventilation
Work near an open window or with a fan. The SDS calls for general or local exhaust ventilation to prevent buildup of vapor or mist.
Dilution
Measure to the label rate with a spoon and never estimate by eye. Keep concentrates off skin and eyes, and keep all products away from children and aquariums.
Do not mix
The SDS lists strong oxidizers as incompatible. Hydrogen peroxide is an oxidizer, so use Physan 20 and H₂O₂ as separate steps, never in one container, and never mix either with bleach.
Copper is phytotoxic on wounds, so keep it off cut, wet, young tissue.
For blades, 70% isopropyl alcohol can be used straight from the container with no dilution and no long soak, wiped or dipped between plants.
Physan 20 Application Guide, measuring conversions and disease dosages
Chemical Disinfectants. Guideline for Disinfection and Sterilization (CDC)
Minimizing Injury from Copper Fungicides (Cornell Vegetables)
Hydrogen Peroxide. Medical Management Guidelines (ATSDR)
How do I sanitize my pruning shears? (Iowa State University Extension)
How much light should deflasked plantlets get, and which fixture?
Keep freshly deflasked plantlets at a low PPFD at leaf height, well below what an established aroid tolerates, then raise it as new leaves form.
Reported low targets range roughly 35 to 150 µmol·m⁻²·s⁻¹ depending on the species and study, so pick a value near the low end for tender genera and measure.
Distance is the simplest way to reduce light. Raise the fixture, move it off-center, or use a dimmer or shade cloth, then check the light at leaf height because reflective walls and beam shape change the result.
Broad full-spectrum white light is generally suitable for acclimation. Start low and increase it only after new ex-vitro leaves appear without bleaching.
Which grow light hits the low band?
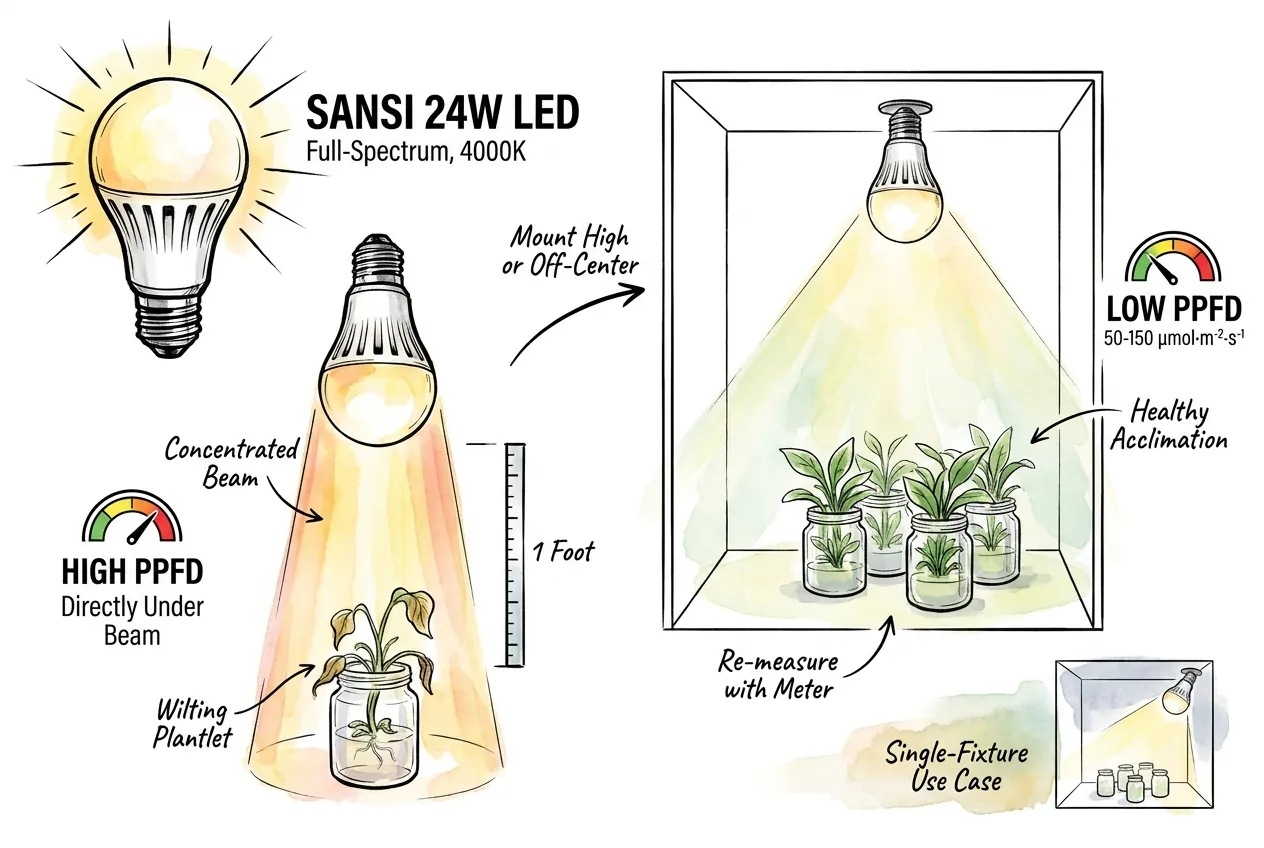
Pick a modest full-spectrum LED you can back off, and verify at leaf height with a meter, because a strong bulb concentrates light.
The SANSI PAR25 is a concentrated screw-in point source. It can exceed a tender plantlet’s target when mounted close, so raise it or place it off-center and measure at leaf height. A center reading is not a canopy map, so check more than one point in the chamber.
SANSI PAR25 24W is a single-socket light for a small acclimation area. Set the distance from the plant and verify the result with a meter, because the bulb label alone does not establish a safe PPFD.
Use case
Light a small chamber from one socket, mounted well back so the beam spreads to a low measured level.
Honest tradeoff
It is a concentrated point source, not even coverage, and anyone already running a dimmable shelf light should just adjust that instead.
The Barrina T5 Grow Lights (8-pack) are the diffuse option for an entire tray. Use only as many bars as the area needs and mount them high enough to keep PPFD low at the leaves.
Barrina T5 bars suit even coverage over a tray, if you actually need that much light area.
Use case
Spread soft light across a batch of plantlets on a shelf, using a subset of the bars.
Limitations
It is more fixture than a couple of plantlets need, and the bars do not tell you the light reaching a particular leaf. Use only the number of bars the tray needs and measure at leaf height.
Point source versus diffuse strip at a glance
| Feature | SANSI PAR25 24W bulb | Barrina T5 bars (8-pack) |
|---|---|---|
| Output shape | Concentrated point source | Broad, diffuse, even |
| Setup priority | Mount high or off-center, then measure at leaf height | Use only the bars the tray needs, then measure at leaf height |
| Best for | One socket over a small chamber | A whole tray of plantlets |
| Must back off | Yes, mount high or off-center | Easy to keep low already |
Photoinhibition during acclimatization of micropropagated Spathiphyllum Petite plantlets
Effects of Quantum Flux Density on Photosynthesis and Chloroplast Ultrastructure in Tissue-Cultured Plantlets of Liquidambar styraciflua
Enhancing Acclimatization of Micropropagated Pistachio Through Optimization of Light Spectrum and Vapor Pressure Deficit
Do I need a hygrometer, and is automation worth it?
Buy an accurate hygrometer, yes. Skip the humidistat and humidifier for a handful of plantlets.
Acclimation is a controlled RH ramp-down, and you cannot ramp what you cannot measure. Cheap analog dials are often inaccurate and can drift well off true, so a digital sensor is worth the small cost.
Bear in mind that even good consumer sensors lose accuracy near saturation.
What accuracy and features do I need?
Aim for a few percent RH accuracy and logging or min/max memory to catch the overnight dip you would otherwise sleep through.
No consumer sensor at this price resolves a 90% versus 95% difference precisely, so read the trend rather than a single decimal.
The SensorPush HT.w climate sensor suits repeat batches where you need to review how humidity changed after each vent adjustment. It can reveal an overnight drop in a leaky chamber, but it is not waterproof and consumer sensors are approximate near saturation.
The SensorPush HT.w suits repeat batches and trend logging.
Use case
Run repeat batches and scroll back to see which night a vent went too far. It is not waterproof, so keep it clear of condensation drip.
Honest tradeoff
It needs the app and Bluetooth, costs more than a dial hygrometer, and is least accurate at the top of the RH range you care about.
Govee H5075 is a budget option for a small batch when you mainly need a trend graph and an alert. Like the SensorPush, keep it away from condensation and treat very high-humidity readings as approximate.
The Govee H5075 is a reasonable budget monitor.
Use case
For a one-time flask, set a low-RH alert and let it warn you. Keep it away from condensation.
Honest tradeoff
Bluetooth only, so you read and sync it from a nearby phone.
Put the sensor inside the chamber at leaf height, clear of wet substrate and condensation, and only widen the vent once the reading has held and the plants look turgid.
When is a humidistat and humidifier actually worth it?
Mainly at scale, and only inside a dedicated enclosure such as a propagation tent or chamber, not by humidifying an occupied room.
A sealed box holds high RH passively off the moisture in the substrate, so small batches rarely need automation.
The Inkbird IHC-200 Humidistat can control humidity in a dedicated propagation enclosure when you have enough plantlets to justify automation. Test the controller settings and the whole setup before trusting it with a valuable batch.
The Levoit Classic 300S Humidifier can provide the moisture source for that enclosure, not for an occupied room. Keep high humidity confined to a sealed space, manage condensation and cleaning, and confirm that the unit restarts safely after a power interruption before putting it in a control loop.
Who should not buy automation
For a handful of plantlets in a sealed box, a hygrometer plus manual lid-cracking does the same job for a fraction of the cost.
Automation earns its place only with a sealed propagation tent or chamber where you can manage air exchange, condensate, and cleaning.
One possible pair is the Inkbird IHC-200 humidistat driving the Levoit Classic 300S humidifier.
Treat this as a starting point to test, not a validated combination, since the humidifier’s power-cycle behavior with an external controller is not confirmed.
Use case
Hold RH inside a sealed propagation tent or chamber, not an open room.
Limitations
It adds cost, refills, daily water changes, and regular cleaning for a job a sealed box does for free at small scale, and it must stay inside an enclosure to avoid room condensation and mold.
SensorPush HT.w Wireless Thermometer/Hygrometer product page
Govee Bluetooth Hygrometer Thermometer H5075 product page
Inkbird IHC-200 Humidity Controller product page
Levoit Classic 300S Smart Ultrasonic Humidifier product page
Seismomorphogenesis. A novel approach to acclimatization of tissue culture regenerated plants
How do I deflask and acclimate step by step?
A sensible order is below. Rinse agar before potting, and adjust conditions gradually rather than making several big changes at once.
The sequence is a gradual hand-off from flask to room. You re-create the flask’s high humidity and low light in a simple box, then ease those conditions down while the plant adapts, watching the plants and adjusting to your species and setup.
Step 1. Prep a clean workspace
Wipe the bench and tools with Physan 20 at label dilution, or 70% isopropyl for blades. Put on nitrile gloves so skin oils and microbes never touch wounded roots.
Step 2. Pre-moisten the substrate
Soak AAA sphagnum in clean lukewarm water and wring to damp, not dripping. Or rinse inert LECA if you prefer a lower-bioburden medium.
Step 3. Open the flask gently
Break any sealed lid slowly. Do not yank the clump.
Step 4. Remove plantlets without crushing them
Lift plantlets by the base with fine forceps or a sanitized grafting knife, never by the leaves.
Separate the clump in a bowl of lukewarm water so roots float apart instead of tearing.
Step 5. Rinse all the agar off
Swish in clean lukewarm water until no gel remains. Any leftover agar is sugar, which feeds contaminants, so this rinse matters and is easy to skip.
A brief 3% H₂O₂ dip afterward is optional and not well evidenced on tender roots, so it is not required.
Step 6. Pot into the airy medium
Nestle roots in the damp sphagnum or LECA. Keep the crown at the surface, never buried.
Step 7. Load into the chamber at high RH
Close the potted plantlets in the clear box so RH rises and transpiration demand drops sharply while the plant is still leaky. Confirm the actual RH with your hygrometer.
Step 8. Light it LOW
Position the dim full-spectrum LED to a low target at leaf height, near the low end (around 35 to 50 µmol) for tender genera.
Raise the fixture or dim it, and verify with a meter. A lux reading needs a spectrum-specific conversion to approximate PAR.
Step 9. Monitor RH and temperature
Drop the hygrometer inside the box. Read morning and night.
Step 10. Vent down gradually
Crack the lid a little wider as the plants tolerate it, watching the hygrometer and turgor, until the box is fully open and the plant handles room air.
This often takes a couple of weeks but varies by species and conditions.
For the physiology, substrate choices, and terrestrial-versus-aquatic failure diagnosis behind this shopping list, use the expert tissue culture acclimation guide. The internal references below add a second step-by-step walkthrough plus low-PPFD and humidity-chamber guidance.
Tissue Culture Plants. Acclimating and Deflasking Guide (ariumology)
Bucephalandra Tissue Culture Under Red/Blue LEDs (ariumology)
Mini Greenhouse Indoor Guide. VPD, Airflow and Grow Lights (ariumology)
Who should NOT buy each product class?
Most of these picks are skippable if you already own an equivalent, so match the kit to what you have.
Humidity chamber, when to skip
Skip it if you already own a sealed clear tote, a converted aquarium, or a vented propagator that holds high RH.
Skip the DIY box specifically if you want plug-and-play vents, since it has none.
Substrate, when to skip
Skip a fresh bag if you already have AAA-grade long-fiber sphagnum. Skip sphagnum specifically if you run a semi-hydro LECA workflow, and buy the inert medium instead, not both.
Disinfectant, when to skip
Skip Physan 20 if you already run a quat or 70% isopropyl routine for tools and surfaces. Skip copper here regardless, since a substrate drench is off-label and risky on young tissue, and the clean-water rinse plus surface disinfection carry the job.
Environment monitor, when to skip
Skip the logging SensorPush if you have a few plantlets and will eyeball a cheap min/max unit, since the budget Govee suffices. Do not skip a hygrometer altogether.
Low-intensity light, when to skip
Skip it if you already run a dimmable or low-output fixture you can position into the low band. Buying a new bulb to then run it dim is redundant.
Automation, when to skip
Skip it for a few plantlets in a sealed box, which holds high RH with no automation. It is only worth it at nursery scale inside a sealed propagation tent or chamber, never by humidifying an open room.
Clean handling, when to skip
Skip the dedicated grafting knife if you have clean fine forceps and a sanitized blade. Gloves are cheap enough that there is rarely a reason to skip them, though remember they are non-sterile and must be changed or disinfected between plants.
How do I diagnose and fix a dying plantlet?
Texture and location give useful first clues, but they are not a definitive diagnosis. The table below covers three common patterns. Other problems such as bacterial soft rot, crown rot, hyperhydricity, root injury, and nutrient, pH, or temperature disorders can look similar, so confirm before acting.
Common failure patterns and first responses
| Failure mode | What you see | Root cause | Product fix |
|---|---|---|---|
| Desiccation (likely) | Leaves crisp, translucent, papery. Plantlet wilts and dries, typically before rot | RH too low, or chamber vented too early (rule out root damage and heat) | Raise humidity in the chamber, slow the ramp, and watch the hygrometer trend |
| Rot at the base (likely) | Mushy, water-soaked, blackened stem at the medium line, sometimes white or gray fuzz | Could be damping-off (Pythium/Rhizoctonia), bacterial soft rot, or overwatering | Remove and discard affected plants, do not re-treat and reseal them. Improve sanitation, use fresh airy medium, ease off water for the rest. Identify the pathogen if losses recur |
| Pale new growth (possible light stress) | New growth washed-out white or pale-yellow, on leaves nearest the light | PPFD too high, but also check nutrition, pH, and roots | Raise or dim the light to a low measured level, then verify it at leaf height |
A quick differential. Fast whole-plant wilt with dry, translucent leaves points toward desiccation, usually a humidity or root-supply problem, though hyperhydricity and heat can look similar.
A wet, black, mushy base points toward rot, a sanitation and moisture problem, but confirm whether it is fungal, oomycete, or bacterial before treating anything.
Pale, bleached new growth under the lamp points toward light stress, though nutrient and pH problems can mimic it.
If you see all three at once, it is worth reviewing whether you vented too early, skipped the rinse, and ran the light too bright, but a single root or crown disease can also produce a mixed picture, so do not assume.
What are the maintenance and replacement intervals?
A few boring intervals keep the cheap gear working into year two.
Sphagnum
Repot when it smells sour, goes to mush, or compacts, often within a year or so depending on watering, temperature, and microbial activity, because it loses the porosity roots need.
Inert LECA does not decompose, so rinse, clean, and reuse it.
Hygrometer battery
Note the install date and swap the cell before it dies. The SensorPush runs on a coin cell for roughly a year of logging. Govee rates its AAA cells for about six months, so check each product’s spec rather than assuming a yearly swap.
Note that a fresh battery does not fix sensor calibration drift, so cross-check readings occasionally.
A dead or drifting hygrometer ruins the one measurement the ramp depends on.
Disinfectant
3% hydrogen peroxide decomposes to water and oxygen over months, faster once opened, so buy small bottles and replace by the expiry date.
To check potency, use a peroxide test strip or rely on the unopened expiry and proper storage. Do not test it on skin or a wound, since the fizz reflects tissue catalase, not concentration, and peroxide can irritate or injure human tissue.
Concentrated Physan 20 is stable, so mix working dilutions fresh each session.
When to move the plant out
Not on a fixed date, but on evidence. Good signs are holding turgor with the lid fully open, at least one new ex-vitro leaf, and no bleaching, ideally sustained over more than a single day so you know the roots are established.
Then move it to a normal shelf and begin light fertilizer at a low dose, watching pH and EC, since tender roots are salt-sensitive.
Damping-Off Diseases in the Garden (UC Statewide IPM Program)
Damping-off (Utah State University Extension)
Frequently asked buyer questions
Common objections and practical answers, so you buy only what the job needs.
Can’t I just use a Ziploc bag or takeout container?
For a couple of plantlets, honestly yes. Any sealed clear vessel that holds high RH and lets you crack it open gradually works, and a bag on a saucer is a legitimate budget chamber.
The reasons to prefer a rigid box are practical. It will not collapse onto wet leaves, where condensation touching foliage invites rot.
It is reusable, easy to disinfect, and gives a stable footprint for a hygrometer.
A bag is fine to start. A box scales and sanitizes better.
Do I really need a hygrometer, or can I wing it?
This is the one instrument worth keeping. Guessing at humidity is a common cause of loss, because you can vent too early and desiccate the plant or never vent and keep it too wet.
An inexpensive min/max digital unit is enough for most people, and logging is a nice-to-have.
Just remember these sensors are least accurate near saturation, so read the trend. The hygrometer is what turns guesswork into a schedule you can follow.
Isn’t Physan 20 overkill? Can’t I use bleach or nothing?
Physan 20 is a registered surface disinfectant used at its label dilution. It is not a cure-all, and the concentrate is corrosive, so handle it per the label rather than treating it as casually plant-safe.
You can substitute. A dilute bleach soak for reused containers, or 70% isopropyl for blades, does a similar sanitation job. Follow each product’s instructions for concentration, contact time, and rinsing.
Doing nothing is the real mistake, since tools and benches can carry inoculum, though contamination can also come from water, media, or the plants themselves.
Disinfect tools and surfaces, not the living roots.
Do I need a fancy light, or will a windowsill do?
Bright direct sun can stress an in vitro leaf much like a strong grow light, through both intensity and heat, until it acclimates.
A bright-shade windowsill or a dim full-spectrum LED at a low measured level can work, but check the actual light and watch the plants, since window exposure varies with season and orientation.
Buy a bulb only if you do not already have a controllable low light.
Rinse away all agar, keep the first setup humid and dim, then vent and brighten it gradually only when the plantlets remain firm and begin new growth.
Affiliate Disclosure
This article contains Amazon affiliate links. As an Amazon Associate I earn from qualifying purchases. If you use these links, the site may earn a commission at no extra cost to you. Product availability, price, and specifications can change. Check the current listing before buying.