
Acclimating Tissue Culture Plants: Survival Guide
How to acclimate tissue culture plants without losing them: why in-vitro clones often have a thin cuticle and poorly regulated stomata, plus a clean, airy substrate setup and a staged humidity taper you adjust by plant response rather than by the calendar.
Jordan Cole · Published 2025-12-20 · 22 min read
Key Takeaways
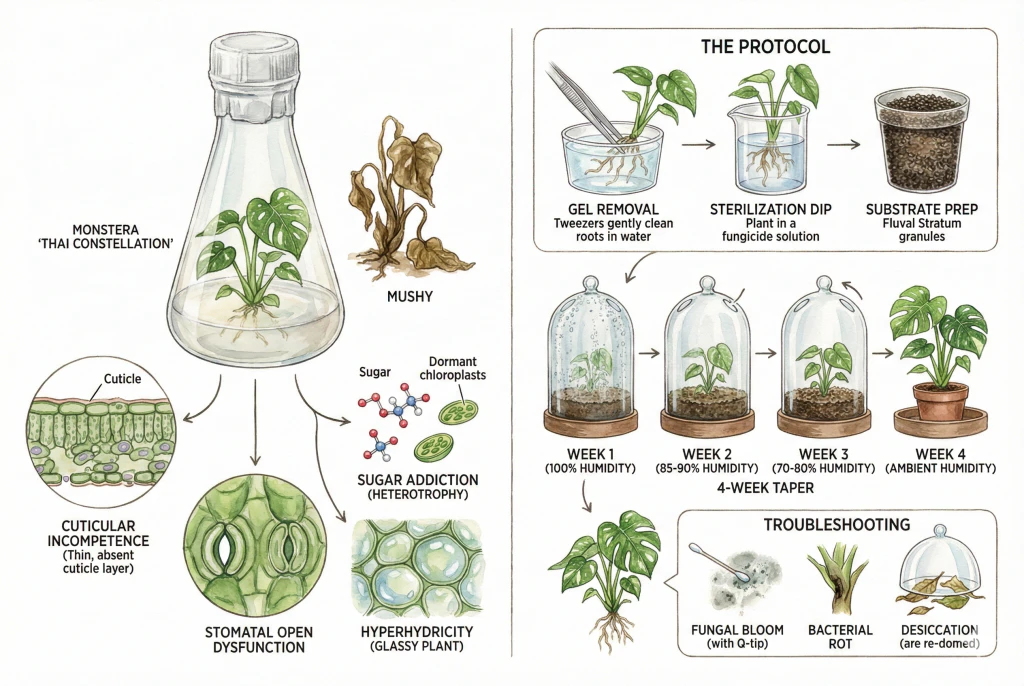
- Tissue-culture plantlets grown in a closed, high-humidity flask often develop a thin or discontinuous cuticle and stomata that respond sluggishly to drying air, so they can lose water fast when moved to typical room humidity. How badly this shows up varies a lot by species, cultivar, and how the plantlet was grown.
- Rinse the nutrient gel off the roots gently with clean water. Leftover gel and its sugars can feed contaminating microbes, so remove what you reasonably can without tearing the fragile roots. The goal is clean, not surgically spotless.
- Taper, don’t drop. Lower the humidity in small steps and let the plant’s own response, turgor, new growth, whether it wilts when uncovered, set the pace. Some plants harden off in a few weeks. Slow-growing woody species can take far longer.
- Use a clean, airy substrate that holds moisture without staying soggy, keep the crown above the line, and start under modest light. A granular volcanic aquarium soil or New Zealand sphagnum plus perlite can work, but neither substrate is sterile out of the bag.
- Match the method to the species, not just the genus. Alocasia are prone to soft rot but young plantlets may lack a developed corm. Aquatics often shed emersed leaves and regrow submersed ones, and different carnivorous plants have different water, light, and temperature needs. Follow your supplier’s protocol where you have one.
What a Tissue-Culture Plantlet Needs First
What the Transition Requires
A tissue-culture plantlet can decline quickly after unboxing if it moves straight from a sealed flask to normal room air.
The reason is straightforward. A plantlet grown inside a sealed, humid, sugar-supplemented flask is a real plant, but one adapted to conditions nothing like your living room.
It has not had to defend against dry air or rely fully on its own photosynthesis, so it needs a gradual transition rather than a hard hand-off.
Successful acclimation depends on the plantlet’s botany and on a gradual change from flask conditions to ordinary air. Responses vary by species and by how the plantlet was cultured.
I photograph every plantlet immediately after potting and keep light, vent position, watering method, and chamber placement unchanged for the first 72 hours unless a plant is in immediate danger. I use 72 hours because extension acclimation schedules commonly hold the first enclosure setting for two to three days. Daily checks still catch rapid collapse without introducing a second variable.
Each flask sibling gets a number, and I record agar removal and root condition separately. If losses cluster among damaged roots rather than one chamber zone, I know to review handling before rebuilding the environment.
The Science (Why Clones Struggle Out of the Flask)
What the Flask Changes
The flask environment changes how a plantlet handles water, gas exchange, and carbon supply.
To create these plants, labs use a process called micropropagation. They take a tiny piece of plant tissue (an explant) and place it in a vessel with a nutrient medium (typically mineral salts, vitamins, and a carbon source such as sucrose, gelled with agar (a polysaccharide gelling agent from seaweed)).
The medium’s sugars and plant growth regulators (such as auxins and cytokinins) support rapid growth in the vessel.
The result is a plant that looks complete but is adapted to the flask, not to open air.
Why Fresh Air Causes Stress
Those conditions create several predictable stresses when a plantlet meets fresh air.
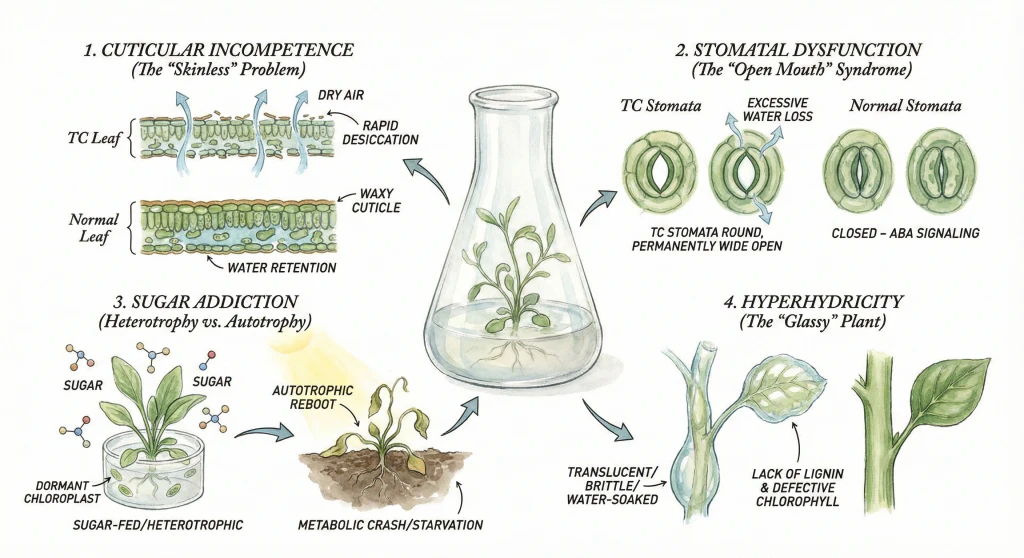
1. A Thin or Incomplete Cuticle
Why the Leaf Loses Water
In the open air, plants constantly lose water. To limit that loss, their aerial surfaces are covered by a hydrophobic cuticle built mainly from cutin and waxes. It acts like a biological raincoat.
Suberin is a related but distinct barrier polymer found mainly in roots, periderm, and wound tissue rather than in the leaf cuticle.
Inside a closed tissue-culture flask, the relative humidity is very high and the air is close to saturated.
With little drying pressure, plantlets often invest less in cuticle and wax. Leaves grown in vitro frequently have a cuticle that is thinner, chemically different, or less continuous than air-grown leaves, though the extent varies by species and culture conditions.
When such a plant is moved to typical room air (often 40-50% humidity), water can evaporate through the surface faster than usual, which is one reason edges dry out and crisp.
2. Poorly Regulated Stomata
Why Stomata Need Time to Adjust
Plants exchange gas through microscopic pores called stomata. Each pore is bordered by two guard cells that change shape to open and close it. Guard-cell shape differs among plant groups (kidney-shaped in many species, dumbbell-shaped in grasses).
In a well-adapted plant, dry air helps trigger stomatal closure, a response in which the hormone abscisic acid (ABA) plays a key role by driving ion and turgor changes in the guard cells.
Plantlets grown under constant high humidity often have stomata that close more slowly or incompletely when the air dries.
How pronounced this is depends on the species and the culture environment. It is not a simple, universal broken switch.
So a freshly de-flasked plantlet may combine a thin cuticle with sluggish stomata, losing water faster than its still-developing roots can replace it.
That combination is a common cause of rapid wilting.
Acclimation and hardening of a slow-growing woody species emblematic to western North America from in vitro plantlets
3. Limited Photosynthesis in the Flask
What Changes Outside the Flask
Well-adapted plants are largely autotrophic. They use light and CO2 to make their own food.
In conventional culture, plantlets often grow mixotrophically. They take up sugar from the medium while also photosynthesizing to some degree.
Photosynthetic capacity in the vessel is commonly limited by low CO2, low light, and poor gas exchange rather than by the plant being unable to photosynthesize at all.
Depending on the medium and how the vessel is ventilated, cultures can range from more heterotrophic to fully photoautotrophic.
So a green plantlet is not necessarily not working. Its photosynthesis may simply be underused in the flask and need to ramp up outside it.
Leaf loss after de-flasking is usually a combination of stresses, sudden changes in water balance, light, and temperature, plus still-developing roots and any contamination, not a single event where the plant simply ran out of sugar.
Checking your supplier’s notes on the medium, ventilation, light, and species can help you anticipate how much a given batch will struggle.
Photoautotrophic and mixotrophic micropropagation
4. The Glassy Plant (Hyperhydricity)
Recognize Hyperhydricity Before Hardening
Sometimes you will see plantlets that look translucent, brittle, or water-soaked. This is hyperhydricity (formerly called vitrification), a physiological disorder linked to several interacting factors in culture (high humidity and low gas exchange, water availability, oxidative stress, excess ammonium, growth-regulator levels, and the vessel and gelling agent, with genotype also playing a role).
Affected tissue is typically bloated with water and can show reduced lignification, abnormal stomata, and altered chlorophyll, though the exact phenotype varies.
Hyperhydric plantlets tend to be fragile and more prone to rot.
If a plant looks markedly glassy, treat it as a harder case. Acclimate it separately from your normal plantlets and consider asking the seller or lab, since severe hyperhydricity often traces back to the culture conditions.
Hyperhydricity in Plant Tissue Culture
Building Your Acclimation Lab
Pushing a plantlet straight into ordinary potting mix is risky. Potting mixes carry a live microbial community, and a freshly de-flasked plantlet has little established defense against opportunistic organisms.
Not every microbe is a pathogen, so a microbial community is not the same as a disease burden.
Choose a Clean, Airy Medium
Use a transition medium that holds moisture without staying soggy.
1. The Substrate
Choose Air Over Compaction
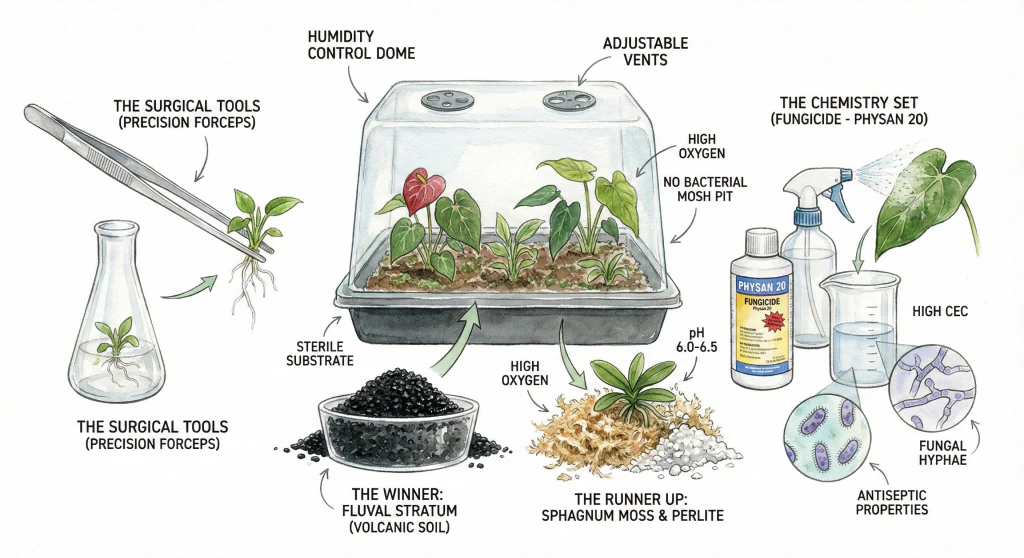
Aim for a medium that is clean, airy, and holds moisture without staying soggy. A common choice is a granular volcanic aquarium soil. Long-fiber sphagnum with perlite is another.
Neither is sterile out of the bag, so think of these as clean and unused rather than sterilized.
Volcanic aquarium substrate is a porous granular material that can leave air gaps around fragile roots. Its use for houseplant acclimation is outside its aquarium purpose, and it is not sterile.
Choose it for a clean, airy starting medium, not for a promised pH, nutrient supply, or rot-prevention claim.
Straight from the bag it is unused, but it is not sterile. Rinsing off dust does not pasteurize it.
Fluval Plant and Shrimp Stratum suits a plantlet that needs a light granular medium with air space around its roots. It is a poor choice if you need a sterile medium or a proven rot treatment.
For epiphytes such as Philodendron and Anthurium, loosely packed sphagnum with perlite provides more moisture buffer. The best balance depends on the plantlet, pot, and room, so do not treat one ratio as universal.
NZ sphagnum moss suits plantlets that dry too fast in a granular medium. Fluff it rather than packing it, and do not rely on it to be sterile or decay-proof.
2. The Chamber (Humidity Control)
Use Vents as a Tapering Tool
You want an enclosure that holds humidity but lets you reduce it in steps. A rigid dome with adjustable vents works well, and is easier to control than a plastic bag that can collapse onto the leaves.
The vents are what make the gradual taper below possible.
Vents change airflow, the main lever for hardening a plantlet. A seed-tray dome does not set a precise humidity level and may be too short for upright plants.
MIXC Seedling Trays suit small plantlets that fit comfortably below a vented dome. Skip them for vertical aroids that will outgrow the enclosure quickly, and watch the plant’s response rather than assuming a vent position equals a humidity number.
3. The Tools
Handle Plantlets Without Crushing Them
Handling plantlets with clean tools beats using bare fingers, which carry oils and microbes and are clumsy at this scale.
Long tweezers or forceps help you reach into a vessel and tease roots apart. For tiny, fragile plantlets, smooth fine-tipped forceps that match the plant’s size are gentler than a long tool with a serrated tip.
Curved Aquarium Tweezers suit a deeper vessel or sturdier plantlet that is hard to reach. They are a poor fit for delicate de-flasking, where the long, serrated tip can crush tissue. Use smaller smooth-tipped forceps for tiny plantlets instead.
4. An Optional Disinfectant
Use Chemicals Only Within the Label
Some growers use a registered disinfectant on tools and surfaces, and in some cases on plants, to reduce surface contamination.
This is optional, not a required step, and a routine of dipping every plantlet is not something the label or the biology supports.
Physan 20 Disinfectant is a registered quaternary-ammonium disinfectant, not a universal de-flasking treatment. Use it only when your supplier’s protocol or the current label covers the plantlet and purpose.
Follow that label’s dilution, contact time, PPE, and disposal directions exactly. A surface treatment cannot sterilize a plant or remove internal contamination.
Physan Safety
The concentrate can cause severe skin burns and eye damage and is very toxic to aquatic life. Wear the protection named on the current label and SDS, keep it away from aquariums, and dispose of it exactly as directed.
Use this product only within its current plant label. Clean tools and a clean workspace are the safer default when a plantlet treatment is not specifically covered.
Step-by-Step Acclimation
A Staged Workflow
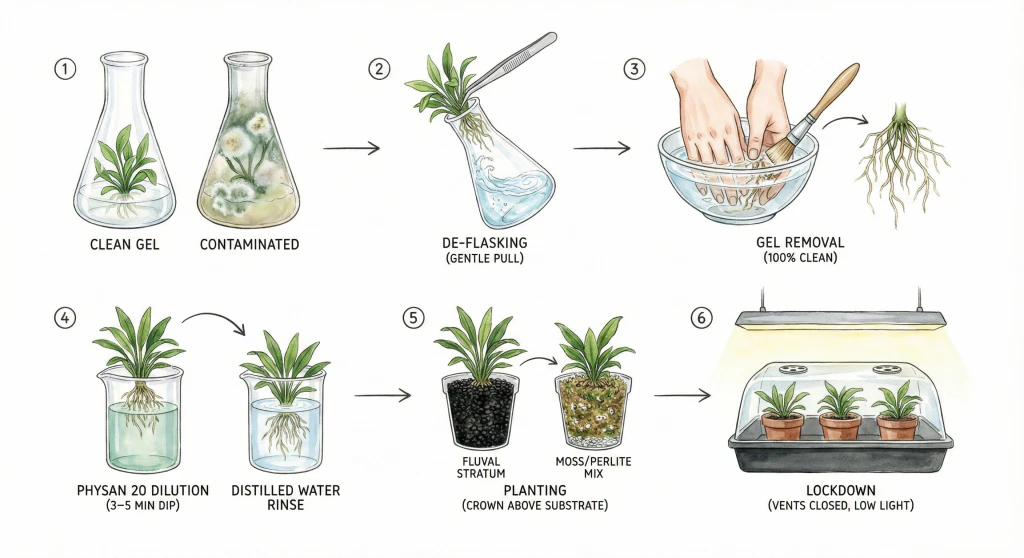
Acclimation works best as a staged workflow that begins with inspection and ends with gradual exposure to ambient air.
Step 1. The Inspection
Reject or Isolate Suspicious Cups
Before you open the container, look at the gel. If it is clear, that is a good sign.
If it is cloudy or has white or green fuzz, suspect contamination.
If you suspect contamination, do not simply open it and hope. The organisms may already be inside the tissue, and opening it in your home can spread spores.
A better order is to photograph it, keep it sealed and isolated, and contact the seller or lab about replacement, return, or disposal.
If you do proceed, wear gloves, work on a surface you can disinfect, and clean up tools and waste afterward. If the vessel looks clean, you have more time to work carefully.
Step 2. De-flasking
Open the Vessel Carefully
Open the lid. If the plants are stuck, pour a little clean water into the jar and swirl it to loosen the gel mass.
Use your tweezers to hold the base of the plant clump, such as the rhizome or callus, rather than the leaves. Pull gently. If it resists, use a clean spoon to ease it out.
Step 3. Removing the Gel
Rinse Without Damaging Roots
Rinse the nutrient gel off the roots. Note that the gel is not pure sugar. Agar is the gelling agent, and the sugars and nutrients are dissolved in the medium.
The reason to remove it is that leftover medium can feed contaminating microbes, not that agar itself is poisonous.
Submerge the roots in a bowl of lukewarm water (about 20-25°C). Cold water can shock the roots and hot water can damage them.
Loosen the gel gently under the water, using a soft paintbrush for tight crevices. Let stubborn gel soak a few minutes to soften rather than forcing it.
Aim to get the roots reasonably clean rather than obsessing over a perfect, speck-free result you cannot verify by eye.
Work gently and try not to break roots. Not all in-vitro roots are throwaway water roots, and damaging them further reduces the plant’s already-limited water uptake, so preserve as many intact roots as you can.
Step 4. An Optional Disinfectant Dip
The BEST Method for Acclimating Tissue Culture Plants (2026) by the channel Plants in Jars. A general how-to demonstration, not a substitute for product labels or plant-physiology sources. Verify chemical steps against the label.
This dip is optional. If you choose to use a disinfectant, follow the product label rather than sterilizing the plant. A dip controls specified surface organisms. It does not make the plant sterile.
Use only the dilution, target plants, and contact time on the current label. Wear the required PPE and rinse afterward only when the label directs it.
For plants not covered by the label, including many aroids, aquatics, and carnivores, use your supplier’s or a professional’s protocol instead of improvising a dip.
Step 5. The Planting
Set the Crown at the Surface
Rinse your substrate lightly to remove dust. If you are using moss and perlite, hydrate the moss and squeeze it out until it is like a damp sponge, not dripping.
Fill your small pot or tray cell, and use tweezers to bury the roots, but keep the crown (where stems meet roots) above the substrate line. Burying the crown is a common cause of stem rot.
Tap the pot gently to settle the substrate. Do not pack it down. You want it to stay airy.
Step 6. Into the Dome
Start With Modest Light
Place the pots into your tray and put the humidity dome on.
Start with the vents closed or nearly closed. Place the tray under a grow light at a modest intensity to start (many growers begin around 50-80 PPFD). The plant is stressed and does not need high light yet.
Bear in mind that a PPFD figure alone does not tell you the daily light integral without the photoperiod and species in mind, so treat it as a starting point, not a rule.
The Taper (A Staged Humidity Reduction)
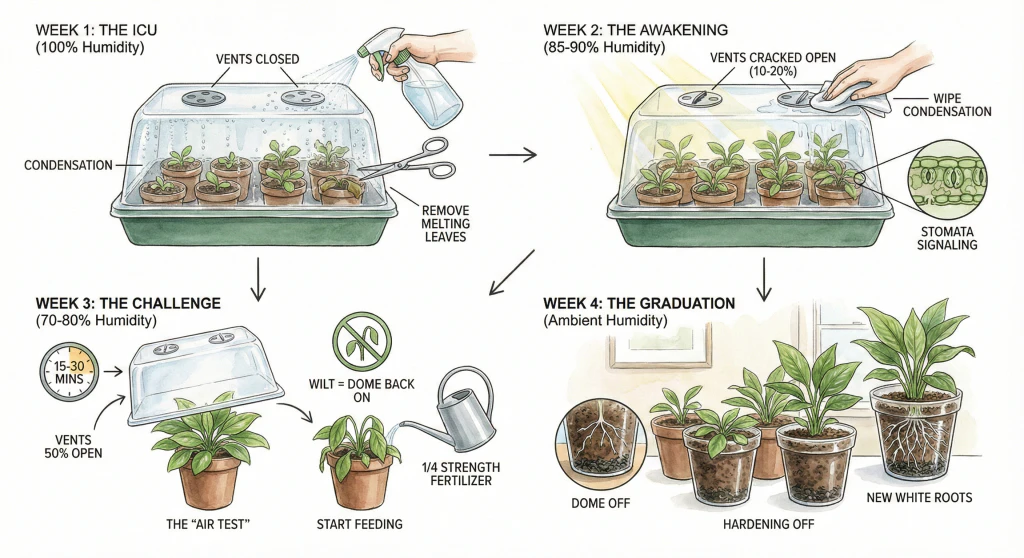
This is where patience pays off. The aim is to help the plant tolerate drier air by gradually raising the vapor pressure deficit (VPD) (the drying power of the air).
Because VPD depends on leaf and air temperature as well as humidity, and because domes leak and rooms differ, use a calibrated hygrometer and the plant’s response to guide you rather than assuming a vent setting equals a specific humidity.
This staged rhythm is only an example. Some plants move faster and some, notably slow-growing woody species, much slower, so treat the week numbers as a rough guide, not a guarantee.
Advance a stage when the plant tolerates the current one (stays turgid, shows new growth), and step back if it does not.
Stage 1. Highest Humidity
Keep the Plant Turgid
Start with the vents closed or nearly closed to keep humidity high and reduce water loss while the plant settles in. Note that a closed dome does not truly stop all transpiration, and a fully saturated, condensation-heavy enclosure with little air exchange can raise disease risk, so do not assume closed means safe.
Check daily. Some condensation on the walls is normal. If the dome is very dry, mist the dome walls rather than the plant, since persistently wet leaves can invite rot.
Watch the leaves. Note that some in-vitro leaves will yellow or drop as a normal part of the transition. That is not necessarily infection.
If a leaf actually turns to mush, remove it with clean scissors for hygiene. Just be aware that trimming one leaf will not stop the spread if a pathogen has already reached the crown or vascular tissue.
Stage 2. Slightly Lower Humidity
Open Vents Gradually
Crack the vents open a little to let a small amount of drier air in. The idea is to introduce mild drying stress so the plant begins to regulate water loss.
Wipe condensation off the dome once a day to let in more light, and nudge the light intensity up if the plants look healthy.
Stage 3. Moderate Humidity
Test Uncovered Time
Open the vents further so the air inside is noticeably drier. This encourages the plant to build up its cuticle and wax as it senses the change.
Once a day, take the dome off for a short period (start with 15-30 minutes) and watch closely. If the plant wilts, re-cover it immediately. It is not ready.
If it stays turgid, extend the uncovered time gradually.
Stage 4. Ambient Humidity
Confirm New Growth Before Removing the Dome
Work toward leaving the dome off. Keep it off during the day, and set it back loosely at night if your home is very dry, until the plant holds up without it.
New white roots pushing into the substrate are a good sign the plant is establishing. They do not by themselves prove the plant is fully autotrophic (that would require measuring how it acquires carbon) but together with firm leaves and fresh growth they suggest it is settling in.
Species-Specific Nuances
Use Species-Level Guidance
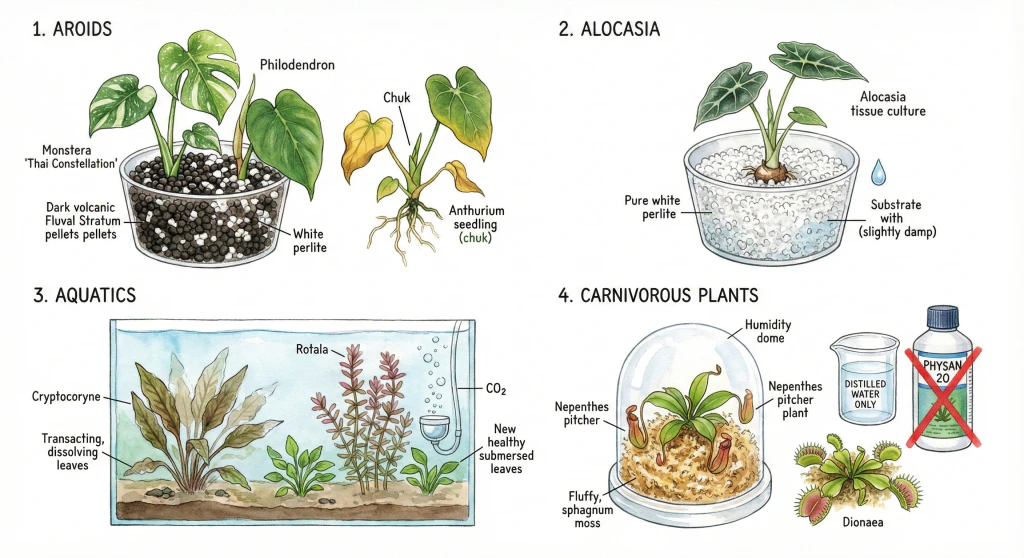
Acclimation speed and failure modes differ across plants, so use species-level and supplier guidance rather than one rule per genus. These starting points are not absolutes.
1. Aroids (Monstera, Philodendron, Anthurium)
These are often relatively forgiving, but the stem can rot if kept too wet. An airy mix, for example the substrate cut with extra perlite, helps drainage.
Anthuriums can drop many original leaves during the transition. As long as the growth point and roots are healthy the plant can recover, so do not discard it just because it has gone bald.
2. Alocasia
Alocasia are widely reported to be prone to soft rot in culture, so err toward damp, not wet. Bear in mind that a young plantlet may not yet have a developed corm to store water, so do not assume it can be treated like a succulent.
An airy, well-draining mix is sensible, but a blanket rule to avoid moss entirely is too broad. Published Alocasia acclimation work has reported high survival on peat-based mixes. For instance, an Alocasia longiloba study found a topsoil and peat-moss mix gave about 97% survival at six weeks, and other Alocasia studies report good results with peat-plus-perlite blends.
So test what works for your species rather than banning moss outright.
3. Aquatics (Cryptocoryne, Bucephalandra, Rotala)
If you submerse these, expect some melt as the plant transitions.
These plants are grown in gel in vitro, and their in-vitro leaves are not simply emersed air leaves.
Submerged, older leaves are often poorly suited to the new conditions, and the plant sheds or breaks them down while pushing out new submersed growth.
How much melt occurs, and how fast, depends on the species, its culture state, and your water, light, and nutrients.
Added CO2 can help some aquatics transition, but it is not a guaranteed melt-stopper, and dosing CO2 changes pH and gas exchange and can harm fish and invertebrates.
If you inject CO2, monitor pH and livestock and adjust carefully. Do not just target a number.
Meanwhile, siphon out decayed tissue so it does not foul the water, leave healthy roots in place, and give new growth time to appear.
4. Carnivorous Plants (Nepenthes, Dionaea, and others)
How to Acclimate Tissue Culture Plants by the channel Plants in Jars. This is a general acclimation how-to, not a carnivorous-plant-specific reference. It does not establish the water, substrate, or timing specifics below.
Carnivorous plants are generally sensitive to minerals, so use low-mineral water (distilled is common, but suitable rainwater or melted snow, or other water meeting a low-mineral standard, can also work) and avoid mineral-rich or fertilized substrates.
Do not treat all carnivores as one group, though. Genera differ in substrate, light, temperature, and dormancy.
The U.S. Botanic Garden, for example, describes open, long-fiber sphagnum-based mixes for Nepenthes and sphagnum or peat/sand mixes for bog carnivores, and notes that Nepenthes vary between cooler-growing highland and warmer lowland types, while temperate species such as Dionaea need a winter dormancy. Look up your specific plant’s needs, and follow any supplier protocol, rather than applying a single carnivorous-plant routine.
Cultivating Carnivorous Plants. U.S. Botanic Garden
Common Failures
Read Symptoms as Clues
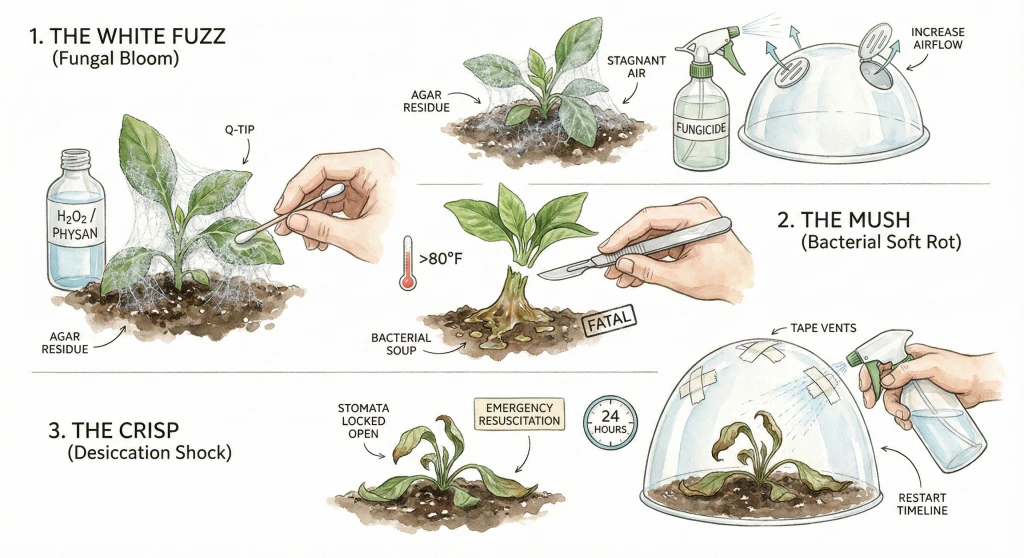
Most symptoms have more than one possible cause. Use these observations to narrow the cause rather than confirming a pathogen by eye, which generally needs microscopy, culturing, or supplier input.
Problem 1. White Webbing
A fine white web appears, often overnight. Leftover medium can feed such growth, but a white web alone does not identify the organism. It could be Botrytis, Penicillium, another fungus, an airborne saprophyte, or growth on contaminated substrate.
Start by isolating the plant, improving airflow (stagnant, saturated air favors mold), reviewing your hygiene and tools, and checking the substrate.
If you want to treat the affected spot, note that household 3% hydrogen peroxide applied undiluted to soft plantlet tissue can cause leaf scorch or root damage, so only use a dilution and contact time you have validated on that species, and spot-test first rather than dosing the whole plant.
Isolation, airflow, and clean tools matter more than reaching for an oxidizer.
Problem 2. Mushy Stem
The stem base turns translucent, brown, slimy, and foul-smelling. That is consistent with bacterial soft rot, but you cannot confirm a specific genus by eye. Soft rot is caused by several bacteria (in current classification these include Pectobacterium and Dickeya, formerly grouped under Erwinia), and wounding, low oxygen, and constant wetness all contribute.
Heat can make it worse, but it is not the sole trigger.
Soft rot is often hard to reverse once it reaches the crown. You can try cutting well above the affected area and re-rooting a clean top, but it may already be systemic.
Isolate the plant, remove and dispose of rotted tissue, correct the conditions (lower temperature, less standing water, better airflow), and clean your tools.
Problem 3. Crispy Edges and Collapse
Leaf edges curl and brown and the plant flags. Rapid exposure to dry air is one likely cause, but so are root injury, chemical burn, strong light or heat, salt buildup, or disease, so consider the recent history before deciding.
If dry-air shock is likely, mist the plant, re-cover it, and close the vents. Give it a day or two. If it recovers, back up a stage in the taper and go slower.
If it does not recover, that does not by itself prove irreversible vascular collapse, but a plant that stays fully collapsed with browning tissue after re-doming is often beyond saving, so weigh whether to keep trying or discard and disinfect.
The payoff
| Symptom | Likely factors to consider | First steps |
|---|---|---|
| White webbing | Various fungi/saprophytes. Leftover medium. Contaminated substrate | Isolate, improve airflow, check hygiene. Spot-treat only with a validated dilution. |
| Brown mushy stem | Bacterial soft rot (several genera). Wounding, low oxygen, constant wetness, heat | Isolate, remove rotted tissue, cool and dry out, clean tools. Re-rooting a clean top may fail. |
| Crispy leaf edges / collapse | Dry-air shock, but also root injury, burn, strong light/heat, salts, disease | Re-dome and mist, if dry-air shock, slow the taper. |
| Yellowing leaves | Several causes (nutrition, root problems, normal in-vitro leaf turnover, disease) | Check roots and recent conditions before acting. |
| Melting (aquatic) | Emersed-to-submersed transition | Remove decayed tissue, keep healthy roots, adjust light/CO2 carefully, wait for new growth. |
Acclimating tissue-culture plants rewards patience and observation. The key is to work with the plant’s biology and let its responses guide your pace.
The payoff can be real. Tissue culture can give access to material that is otherwise hard to find and, for some plants, at a lower cost than a mature specimen.
Just be careful with virus-free, pest-free claims. Clean lab culture reduces surface pests and contamination, but it does not automatically eliminate viruses, viroids, or endogenous microbes (that requires clean mother stock, meristem/shoot-tip culture, and indexing or testing).
Treat a virus-indexed claim with a lab certificate as different from a claim that plants were produced under clean conditions, and do not assume pristine material without documentation.
Taper, Do Not Drop Humidity
Reduce humidity gradually, keep your tools and workspace clean, and rinse the medium off the roots.
Keep the Core Acclimation Sequence
Rinse the nutrient gel off the roots gently, keep everything clean (a disinfectant is optional and label-bound, not a universal sterilizing step), plant into a clean, airy substrate such as volcanic aquarium soil or moss-and-perlite, use a vented dome, and taper the humidity in stages by the plant’s response rather than a fixed calendar.
Affiliate Disclosure
This article contains Amazon affiliate links. As an Amazon Associate I earn from qualifying purchases. If you use these links, the site may earn a commission at no extra cost to you. Product availability, price, and specifications can change. Check the current listing before buying.