
Hoya Soil to Pon Transition: Step-by-Step Guide
Move a Hoya from soil to Pon without stripping healthy roots. Learn initial top-watering, reservoir timing, stem support, flushing, and feeding.
Priya Patel · Published 2026-02-04 · 13 min read
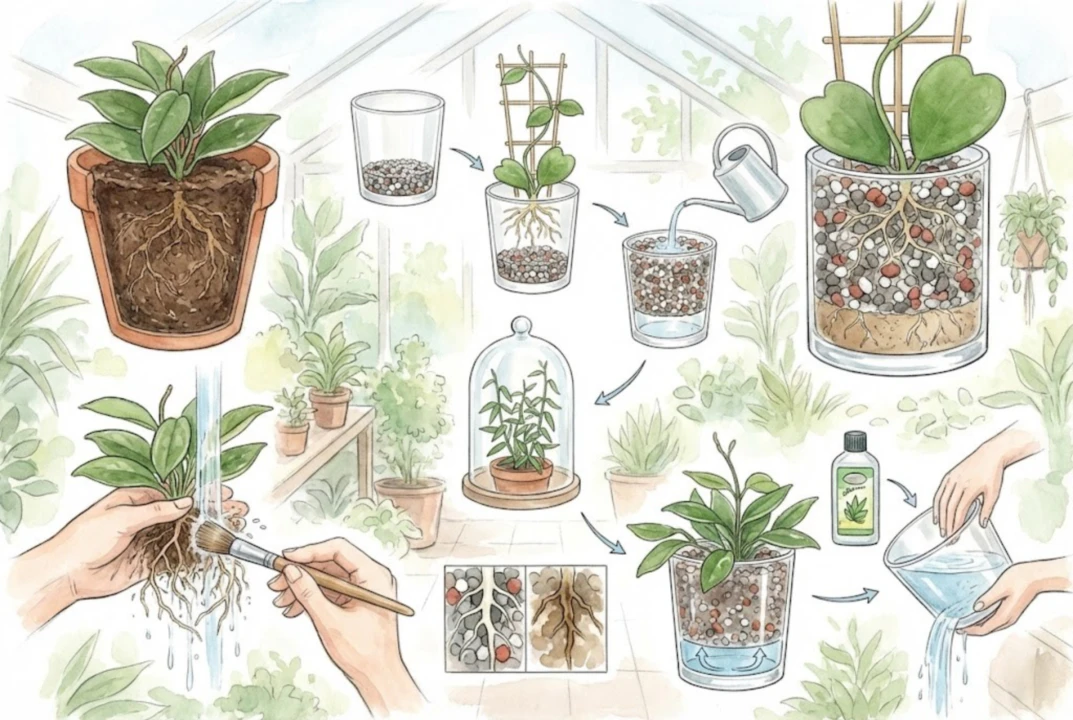
Key Takeaways
- Pon is an airy inorganic mix of zeolite, pumice, and lava. Its high drainage and volume stability lower the risk of the saturated, oxygen-starved root zone that dense soil can create, but no substrate prevents rot on its own.
- Loosen and remove most of the old mix gently. A healthy rootball does not need to be scrubbed clean to 100%. Work only to the point where you can seat the plant in Pon without shredding fine roots.
- Delay the reservoir at first. Top-water and let the plant establish before relying on standing water, so young roots reach the moisture zone before it fills. Judge this by substrate moisture rather than a fixed calendar.
- Stabilize the top-heavy stem with a soft tie or trellis. This keeps it from rocking while roots set. Adjust humidity and airflow to the individual plant’s condition rather than to a fixed rule.
- Maintain the system with periodic flushes. Pon can wick minerals and fertilizer salts to the surface, so flush when deposits build up and reassess feeding as the pre-charge, roughly 6–8 months, tapers off.
Many Hoyas are epiphytes whose roots value air as much as water, so a dense, poorly draining mix that stays wet can put them at risk of a saturated, low-oxygen root zone.
Semi-hydroponics is one way to give those roots more air. It is a reasonable option, not the only viable one. Airy bark, coir, or a fast-draining potting mix can work well too.
Why should I switch to Pon?
How Pon Changes the Root Zone
A common failure mode for Hoyas kept in dense mixes is root rot, which tends to follow a saturated, oxygen-starved root zone.
An airy, fast-draining substrate reduces that risk, though it does not remove it, since reservoir depth, temperature, dead roots, and watering habits still matter.
Pon is an inorganic substrate (zeolite, pumice, lava rock). Its air-to-water balance is not fixed. It shifts with the container, reservoir level, and root mass, so treat good aeration as a tendency to manage, not a guarantee.
Because it is mineral, Pon holds its structure far better than organic mix, which compacts and breaks down as it ages.
That volume stability is a real advantage, but the substrate still needs cleaning, occasional replacement, and salt management over time.
Pre-fertilized mineral substrate
A pre-fertilized, mineral substrate is a straightforward entry point. It wicks moisture through capillary action while keeping air in the root zone. Its zeolite fraction can hold and exchange some nutrients, though it does not neutralize every excess salt.
Does it make care easier?
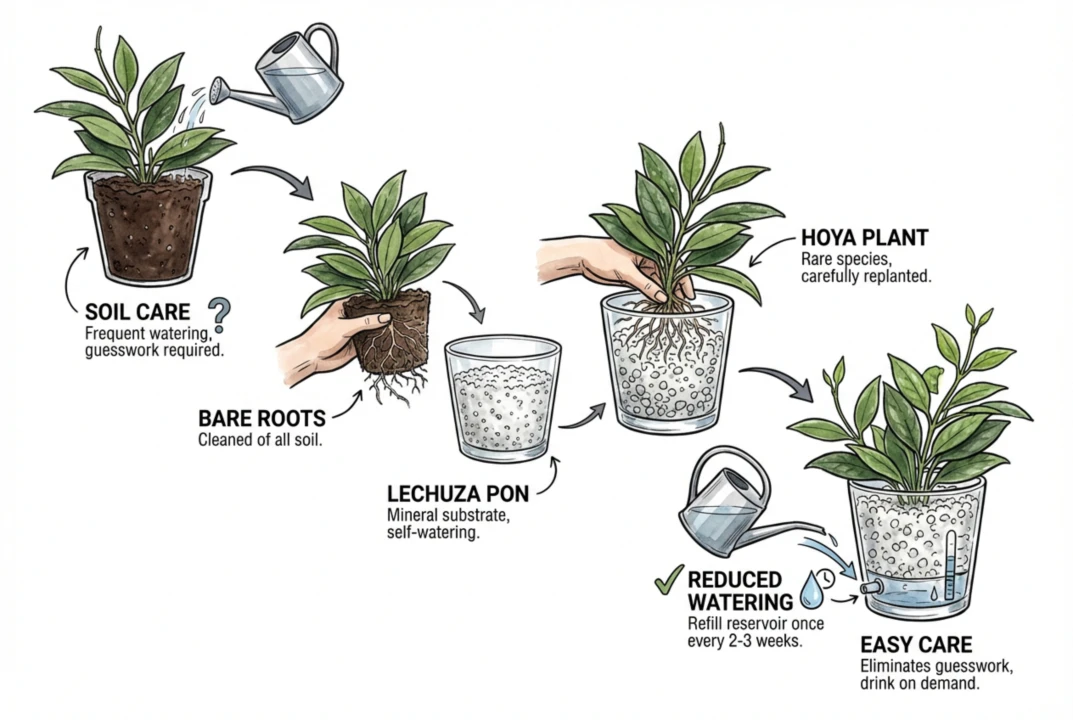
The Reservoir as a Moisture Buffer
It can lengthen the interval between waterings once a plant is established, sometimes to a couple of weeks.
The exact interval depends on pot size, root mass, light, temperature, and humidity, so treat any single number as a rough starting point.
The reservoir acts as a moisture buffer that the substrate wicks from between waterings.
It reduces, but does not eliminate, the guesswork of deciding whether the substrate is dry. Keep checking the moisture indicator, the substrate below the surface, and the plant itself.
When to Start Refilling
When the reservoir empties, do not always refill it right away. Early on, a short dry period before refilling helps roots grow down toward the water.
What about nutrients?
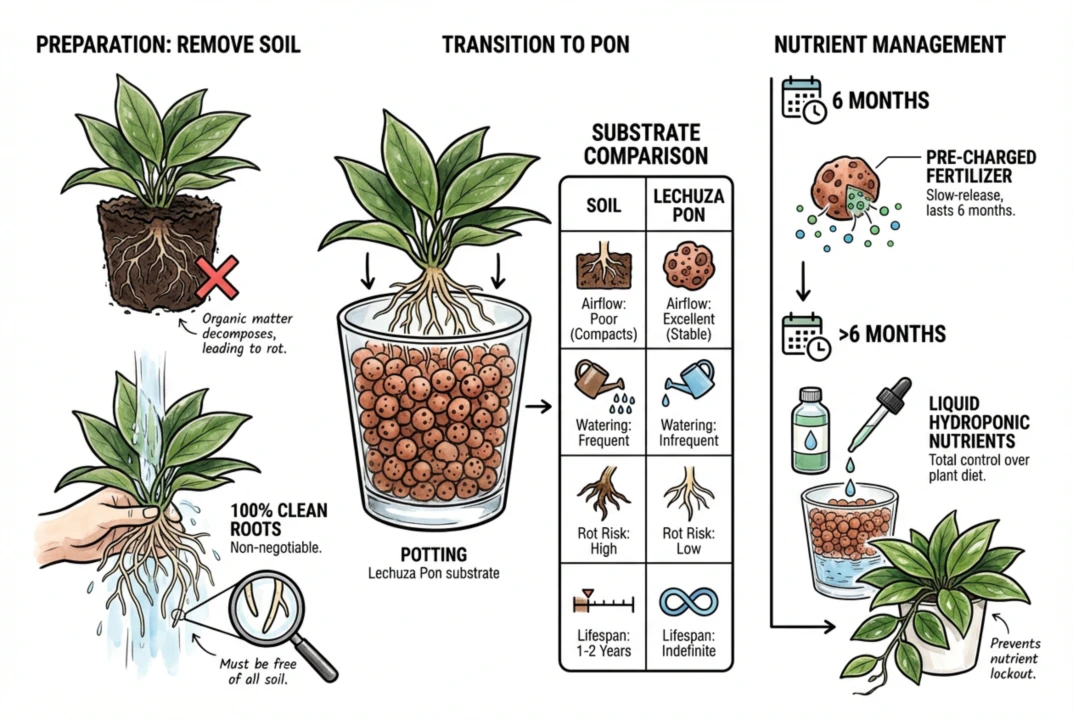
How the Pre-charge Tapers
Pon comes pre-charged with slow-release fertilizer. The manufacturer gives its pre-fertilization as roughly 6–8 months, and how long it actually lasts depends on release rate, leaching, temperature, and plant uptake. It does not end sharply on a set date.
As the charge tapers, you can start feeding with a complete liquid fertilizer. This is a choice rather than an obligation. Compatible slow-release options exist too, and it is worth checking the plant’s response rather than switching by the calendar alone.
Liquid feeding lets you adjust the dose, though the existing granules, the zeolite fraction, and ions in your tap water all contribute, so it is not literally total control.
Any medium can develop nutrient problems if pH, EC, and ion balance drift, so a mineral substrate is not automatically immune to lockout. Water quality still matters.
How do I prepare my Hoya for the transition?
How Much Old Mix Should I Remove?
Remove most of the old mix before potting in Pon, but you do not have to strip a healthy rootball to 100%.
General semi-hydro guidance notes that roots need not be completely cleared of old soil, and some residue on a healthy rootball is acceptable.
The exception is a rootball with pest or disease problems, where more thorough removal makes sense.
Leftover organic matter can decompose in wet, low-oxygen conditions, which is worth avoiding, but it does not automatically break down anaerobically, and a stray bark fragment is not by itself a guaranteed source of rot.
The practical goal is to loosen and clear enough mix to seat the plant in Pon without shredding fine roots, not to remove every last particle at any cost.
How do I clean the roots without damaging them?
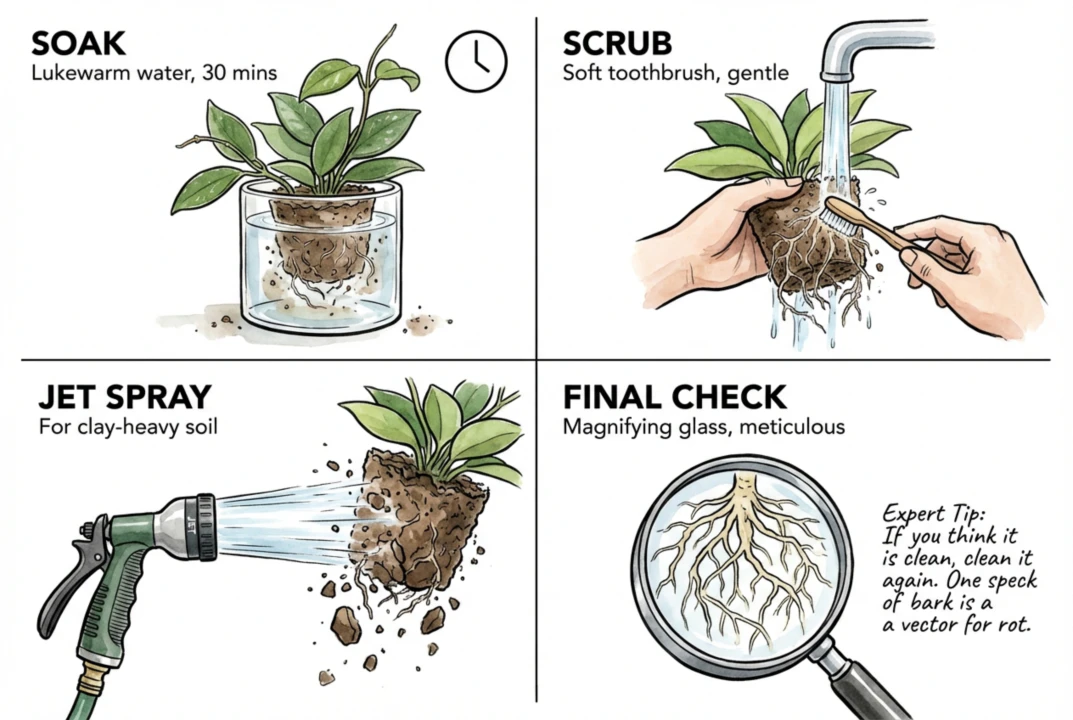
Soaking the root ball in lukewarm water can help loosen the mix. Watch the plant’s response and stop if roots look fragile or already compromised.
Let water and gentle handling do most of the work. Scrubbing every particle off with a brush can strip fine and lateral roots along with the soil, so ease off well before the roots are bare.
For a clay-heavy rootball, a low-pressure rinse is safer than a hard jet. A forceful jet can break roots and spray contaminated splash around your workspace.
Clean enough that you can seat the plant in fresh Pon. Repeatedly re-scrubbing gives diminishing returns and rising injury risk, and a single fleck of bark is not, on its own, a source of rot.
Should I sterilize the roots?
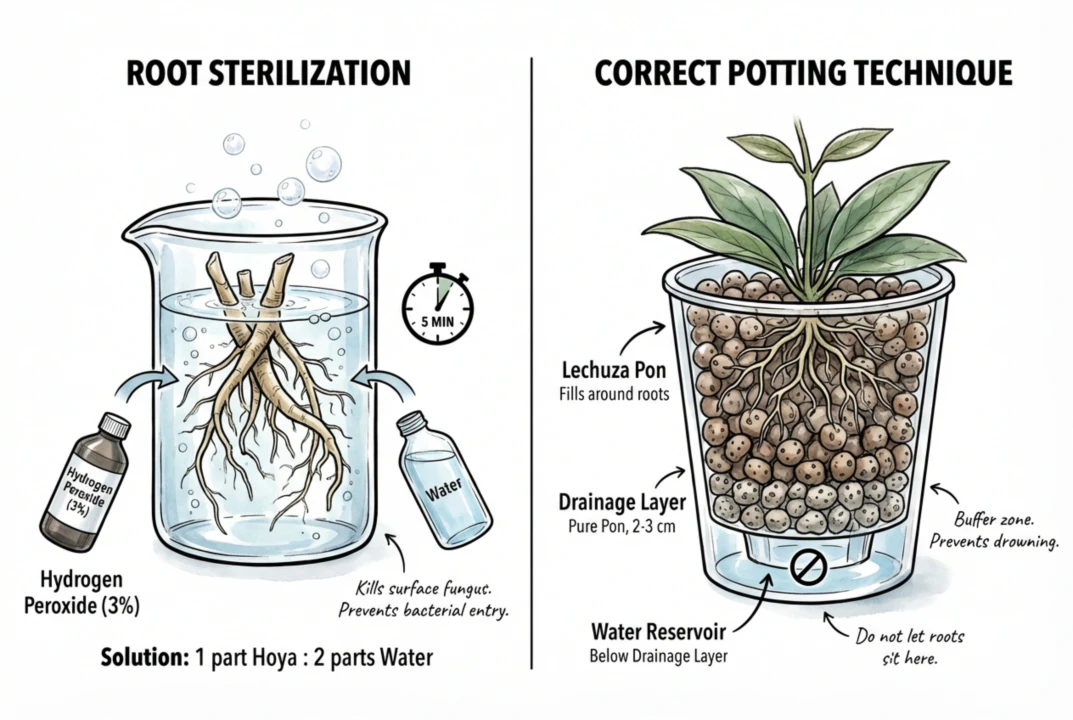
A hydrogen peroxide dip is optional, not mandatory. It is not part of standard Pon preparation and can injure roots, so do not use it as a routine substitute for clean tools and careful handling.
If you choose to use it, keep the solution dilute (household 3% peroxide is already diluted further when mixed with water), limit contact time, and rinse afterward.
Wear eye and skin protection, follow the product label, never mix it with other chemicals, and stop if roots respond badly.
Peroxide has some antimicrobial action but does not sterilize living root tissue. It can also affect healthy cells and beneficial microbes, and it will not guarantee against later infection.
For most healthy rootballs, careful handling, clean tools, a clean container, and a well-drained setup matter more than any dip.
If you suspect disease, prioritize removing clearly damaged tissue and improving the growing conditions over a chemical soak.
What is the correct potting technique?
How to Seat the Hoya in Pon
Put a layer of Pon in the bottom of the container before placing the plant, so the roots start above the reservoir rather than sitting in standing water.
How this looks depends on your planter. A reservoir-style semi-hydro pot has a separating base, a wick, and a marked reservoir with overflow, so follow that planter’s manual for water levels. A plain pot filled entirely with Pon behaves differently.
If you are still choosing between Pon and LECA or need a compatible pot and meters, use the semi-hydro conversion kit chooser before setting up the reservoir.
The point is to keep newly set roots out of constant standing water at first. Over the longer term, roots do grow down toward the moisture zone, which is expected and fine. The caution is about the initial placement, not a rule that roots must never reach the water.
How do I stabilize the plant?
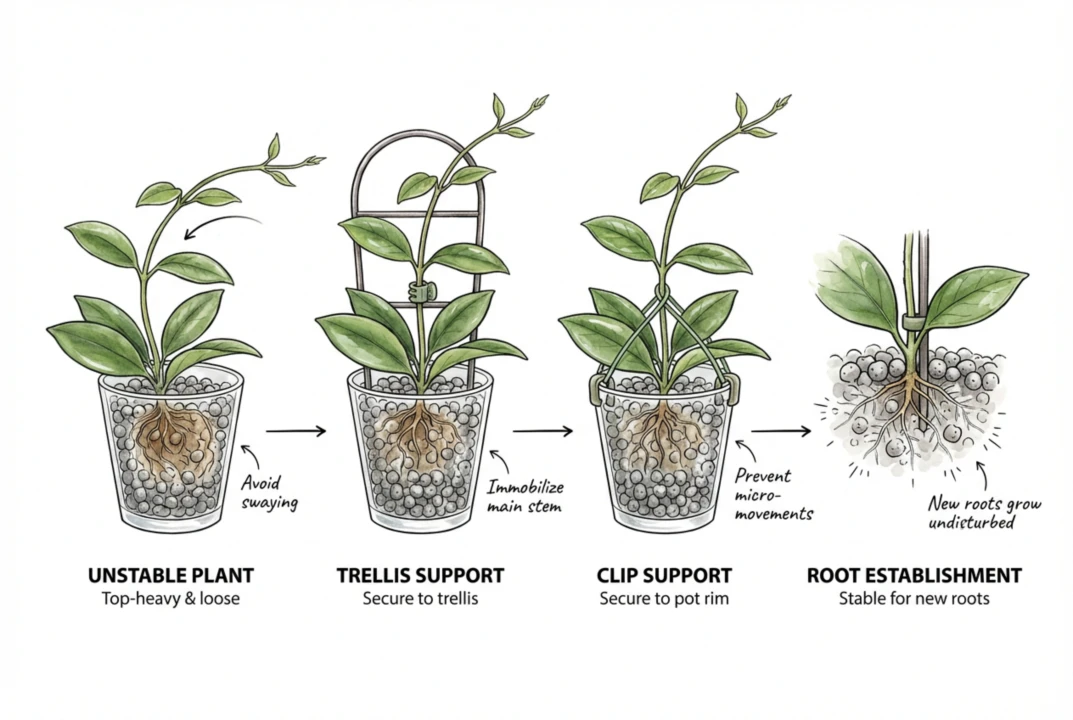
Many vining Hoyas are top-heavy, and a loose mineral aggregate anchors a fresh transplant less firmly than compacted mix does at first.
Support the main stem with a trellis or soft ties so it does not rock while the plant settles.
Leave some slack and avoid pinching the stem so the tie does not constrict or abrade it as it grows.
Repeated rocking can disturb a plant that has not rooted in yet. There isn’t Hoya-specific evidence that ordinary movement shears root hairs, but keeping the plant steady while it establishes is still a sensible precaution.
An unstable plant can be slow to establish. Watch for observable signs, wilting, leaf drop, and no new growth, rather than assigning a cause without evidence.
Should I fill the reservoir immediately?
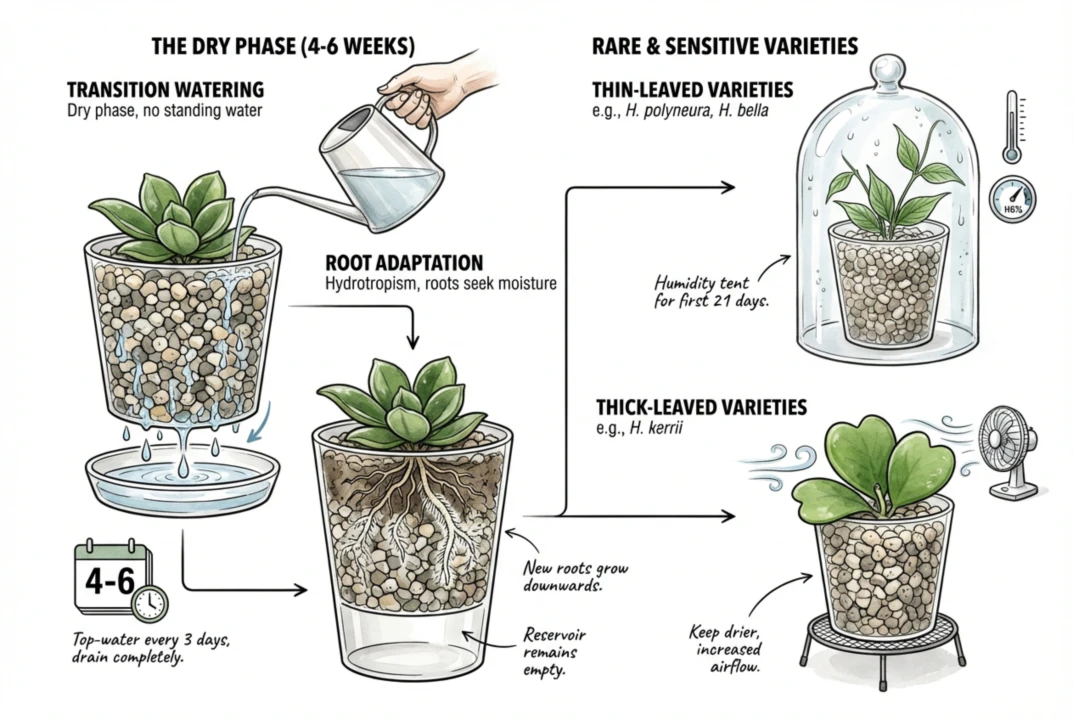
No. Hold off on relying on the reservoir at first. Top-water while roots establish, and keep the reservoir low enough that the original root ball is not left submerged. The transition time depends on root condition, temperature, growth, container design, and the planter instructions, so let the plant rather than a fixed week count set the pace.
During this period, top-water when the substrate has dried below the surface rather than on a fixed 3-day schedule. How often that is depends on pot size, temperature, and root mass.
Let the water drain freely and empty any water that collects in the reservoir before the plant is ready for it.
After the plant has settled, part-fill the reservoir and see whether the level drops while the plant remains healthy. That can show roots are using the moisture zone. For pot-sizing context before you move a plant, see the root-bound myth guide.
Keeping existing roots out of constant standing water early on reduces the chance they sit wet and decline before the plant has adjusted to the new substrate.
Before I settle the Hoya into Pon, I mark the outside of the liner at the height of the lowest original roots. During the top-watering phase, I empty standing water that would rise above that mark. A transparent liner inside the cachepot makes this check much easier than guessing through an opaque self-watering pot.
I test a shallow reservoir only after new roots enter the lower zone or the water level falls after three consecutive refills, without soft roots or a sour smell. Three refills distinguish sustained uptake from one drop caused by settling or evaporation. The mark is reset after repotting because an old fill line says nothing about the new root position.
How do I manage rare or sensitive varieties?
Match the Environment to the Plant
Adjust the environment to the individual plant’s condition rather than to leaf thickness alone. There isn’t comparative Hoya data that leaf type by itself sets humidity or rot risk.
Some thinner-leaved Hoyas, such as H. bella, can lose moisture more readily, and a plant whose roots were heavily reduced during transfer may benefit from temporary humidity support.
If you use a cloche or bag, treat it as optional and short-term. Ventilate it, watch for condensation and mold, open it gradually, and remove it as the plant recovers rather than sealing it for a fixed number of days.
Thick-leaved varieties such as H. kerrii store water in their leaves. There isn’t evidence they are especially rot-prone during a Pon transition, so there is no need to treat them as a special risk group.
Gentle air circulation can lower disease risk, but avoid aiming a fan directly at a plant to force it drier, which can desiccate or chill it.
What if I have a large collection?
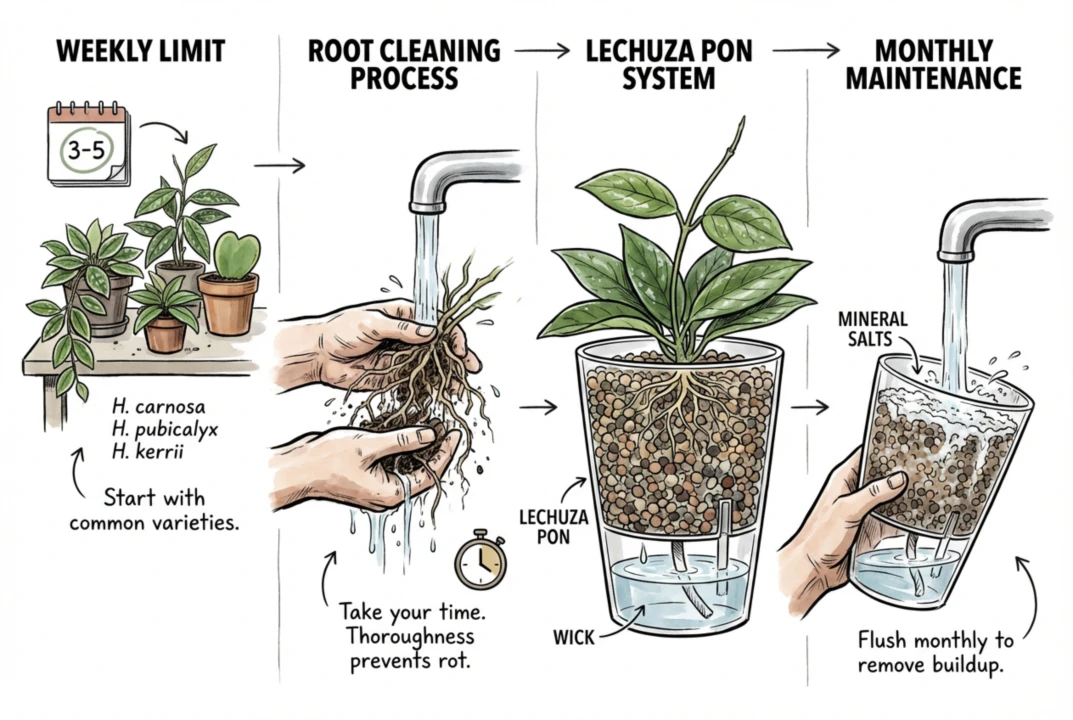
Work in small batches rather than transitioning the whole collection at once. A few plants at a time is a practical workload guide, not a biological limit. Set the number to your collection size, root complexity, and how much time you have.
Cleaning roots carefully takes time and attention, so spreading the work out helps you stay careful.
Rushing tends to mean rougher handling, which raises the risk of damaging roots.
Consider doing your most valuable plants last. Even safer, avoid transferring a thriving plant you don’t need to move, and keep a backup cutting before you start.
Practicing first on a common, forgiving variety like H. carnosa is a good idea, though results won’t transfer exactly to a different species or a plant in worse condition.
How do I maintain the system long-term?
Flush and Monitor Soluble Salts
Flushing the pot with plenty of plain water helps clear soluble-salt buildup. Once a month is a reasonable starting interval. Adjust it to your water, fertilizer, and how quickly deposits appear.
When you flush, let it drain fully, empty the reservoir, and don’t let the runoff drain onto other plants.
As water evaporates from the wicking action, minerals from tap water and fertilizer salts can crystallize as a white film on the surface Pon.
Heavy salt buildup can stress roots, but a visible surface crust does not by itself mean the root collar is burning (confirm with the actual salt level (EC) and any symptoms on the plant before acting).
What nutrients should I use?
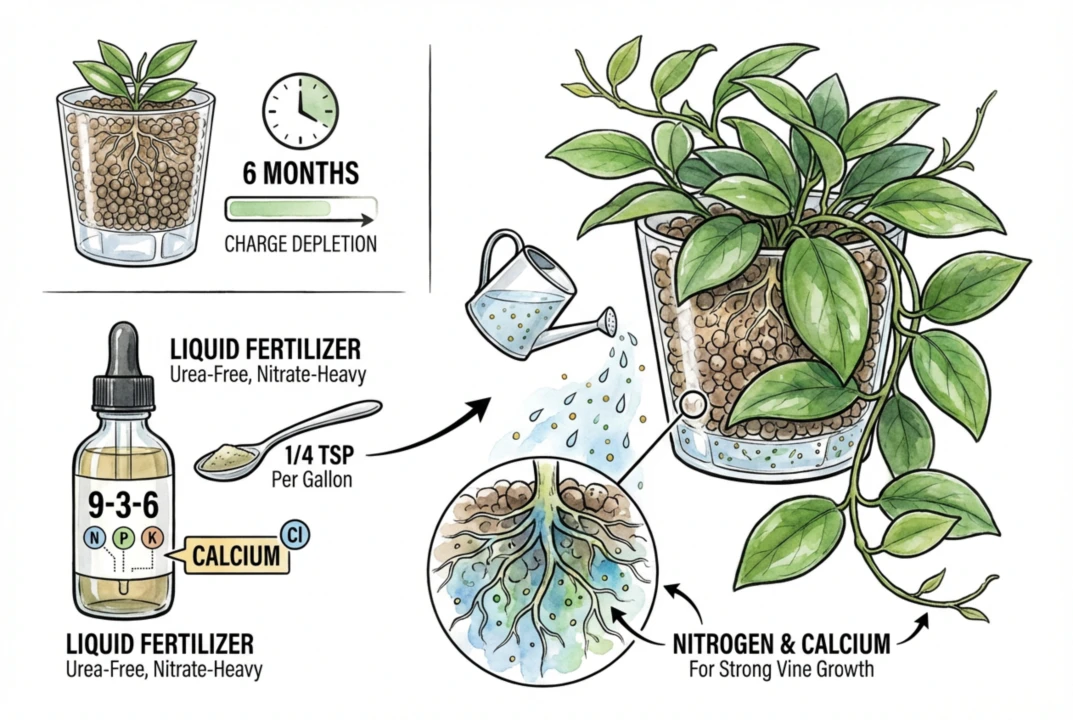
As the pre-charge tapers (makers give it as roughly 6–8 months, not a hard cutoff), a complete, urea-free liquid fertilizer with mostly nitrate nitrogen, calcium, magnesium, and micronutrients is a reasonable choice.
Use the label analysis as a starting point, then adjust to the plant’s response and the mineral load already present in the substrate.
Hoyas grow foliage but are also flowering vines, and their needs vary by species, so treat any single ratio as a general-purpose starting point rather than a proven Hoya formula.
Nitrogen and calcium are among the nutrients plants need, but a complete feed matters more than chasing any one element, and calcium problems can’t be diagnosed by eye alone.
Use the maintenance rate on the exact fertilizer label. If you feed at every watering, watch that it does not overlap heavily with the pre-charge or let salts (EC) climb, and match feeding to active growth and season.
Hoya Soil-to-Pon Troubleshooting Questions
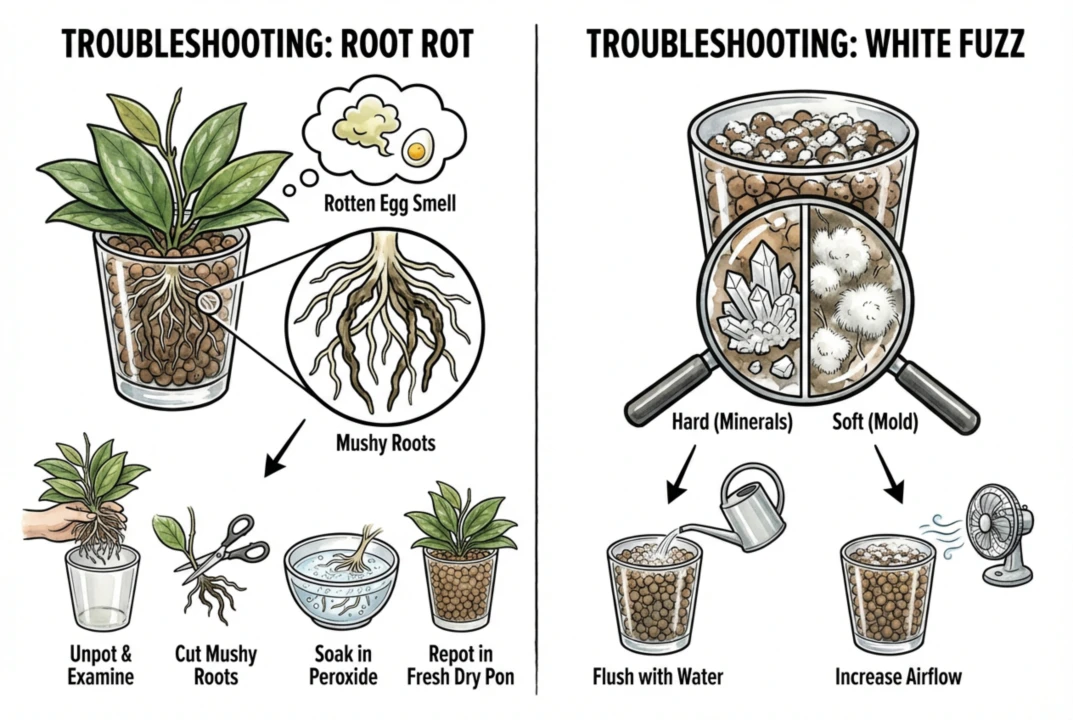
Why does my Pon reservoir smell like rotten eggs?
A rotten-egg smell points to hydrogen sulfide from an anaerobic, stagnant reservoir rather than proving root rot on its own (it isn’t elemental sulfur, which is nearly odorless).
Treat it first as a cue to check the water level, temperature, and reservoir, and to ventilate.
How can I tell whether the Hoya roots are actually rotting?
Before unpotting, look at the actual roots. Firm and pale is healthy, while mushy, discolored, or sloughing roots indicate decay. Confirm with what you see rather than acting on smell alone.
If roots are clearly dead and mushy, trim them back to firm tissue with clean, sanitized scissors, and dispose of the removed material rather than reusing it.
Repot into clean Pon suited to the remaining roots. You can clean and reuse the Pon and planter per the manufacturer’s guidance instead of always buying fresh media. For a measurement-led check of reservoir EC and oxygen, follow the semi-hydro root-rot diagnostic.
Is white material on Pon mineral residue or mold?
For a white surface deposit, try to tell minerals from mold using appearance, whether it dissolves, odor, and the state of the roots (a hard-versus-soft touch alone isn’t a reliable test).
Mineral deposits can be flushed out. Suspected mold calls for better airflow, drier surface conditions, and removing dead debris.
When should I start fertilizing a Hoya in Pon?
Complete one-part liquid feed
A convenient one-part liquid feed is practical for a mineral substrate once the pre-charge tapers. A urea-free formula with mostly-nitrate nitrogen can suit a wicking system, though no Hoya comparison shows that such a feed is inherently gentler on the root collar, and a label ratio does not prove what a given Hoya uses.
Use the dilution on your own bottle because concentrates differ and a rate from one formula should not be carried over to another. Then watch pH, EC, and the plant’s growth rather than feeding on autopilot.