
Habanada Pepper Growing Guide: Complete Care & Tips
Grow heatless Habanada peppers from seed through harvest with practical guidance on warm germination, transplanting, water, support, pest diagnosis, preservation, and food safety.
Samuel Reed · Published 2026-01-24 · 23 min read
What Makes Habanada Peppers Special
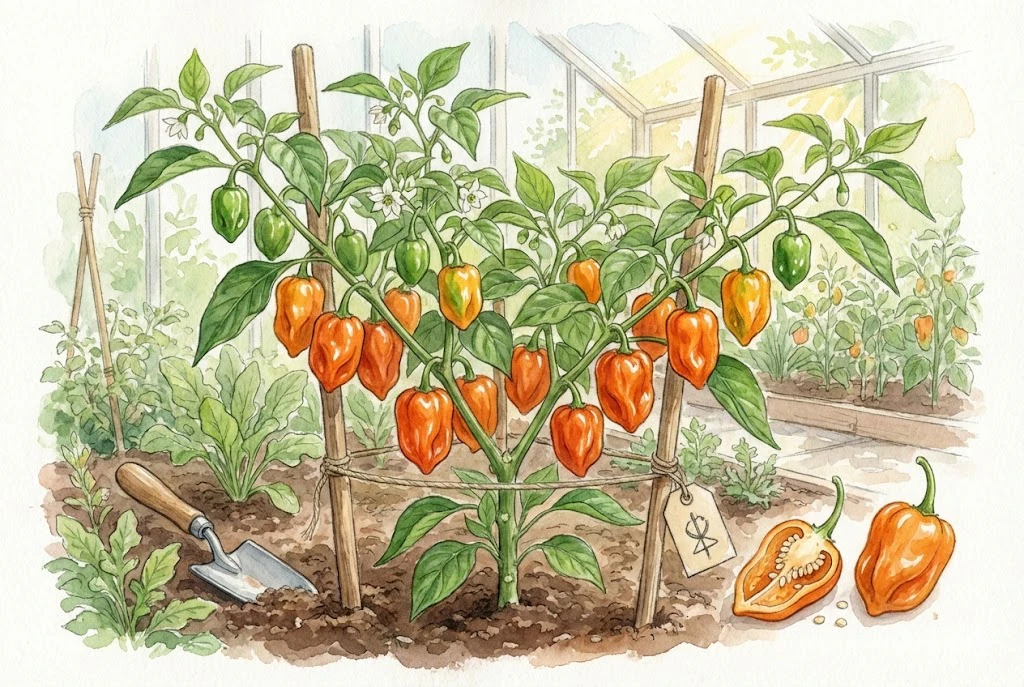
The Habanada is bred to deliver habanero flavor without capsaicin heat. It registers 0 on the Scoville scale, while traditional habaneros typically fall between about 100,000 and 350,000 units.
Habanada was developed through Cornell breeding work to keep the fruity habanero character without the burn. For home growers, the important part is to buy seed from a named source and use color, taste, and plant performance to judge the crop.
Understanding the Flavor Profile
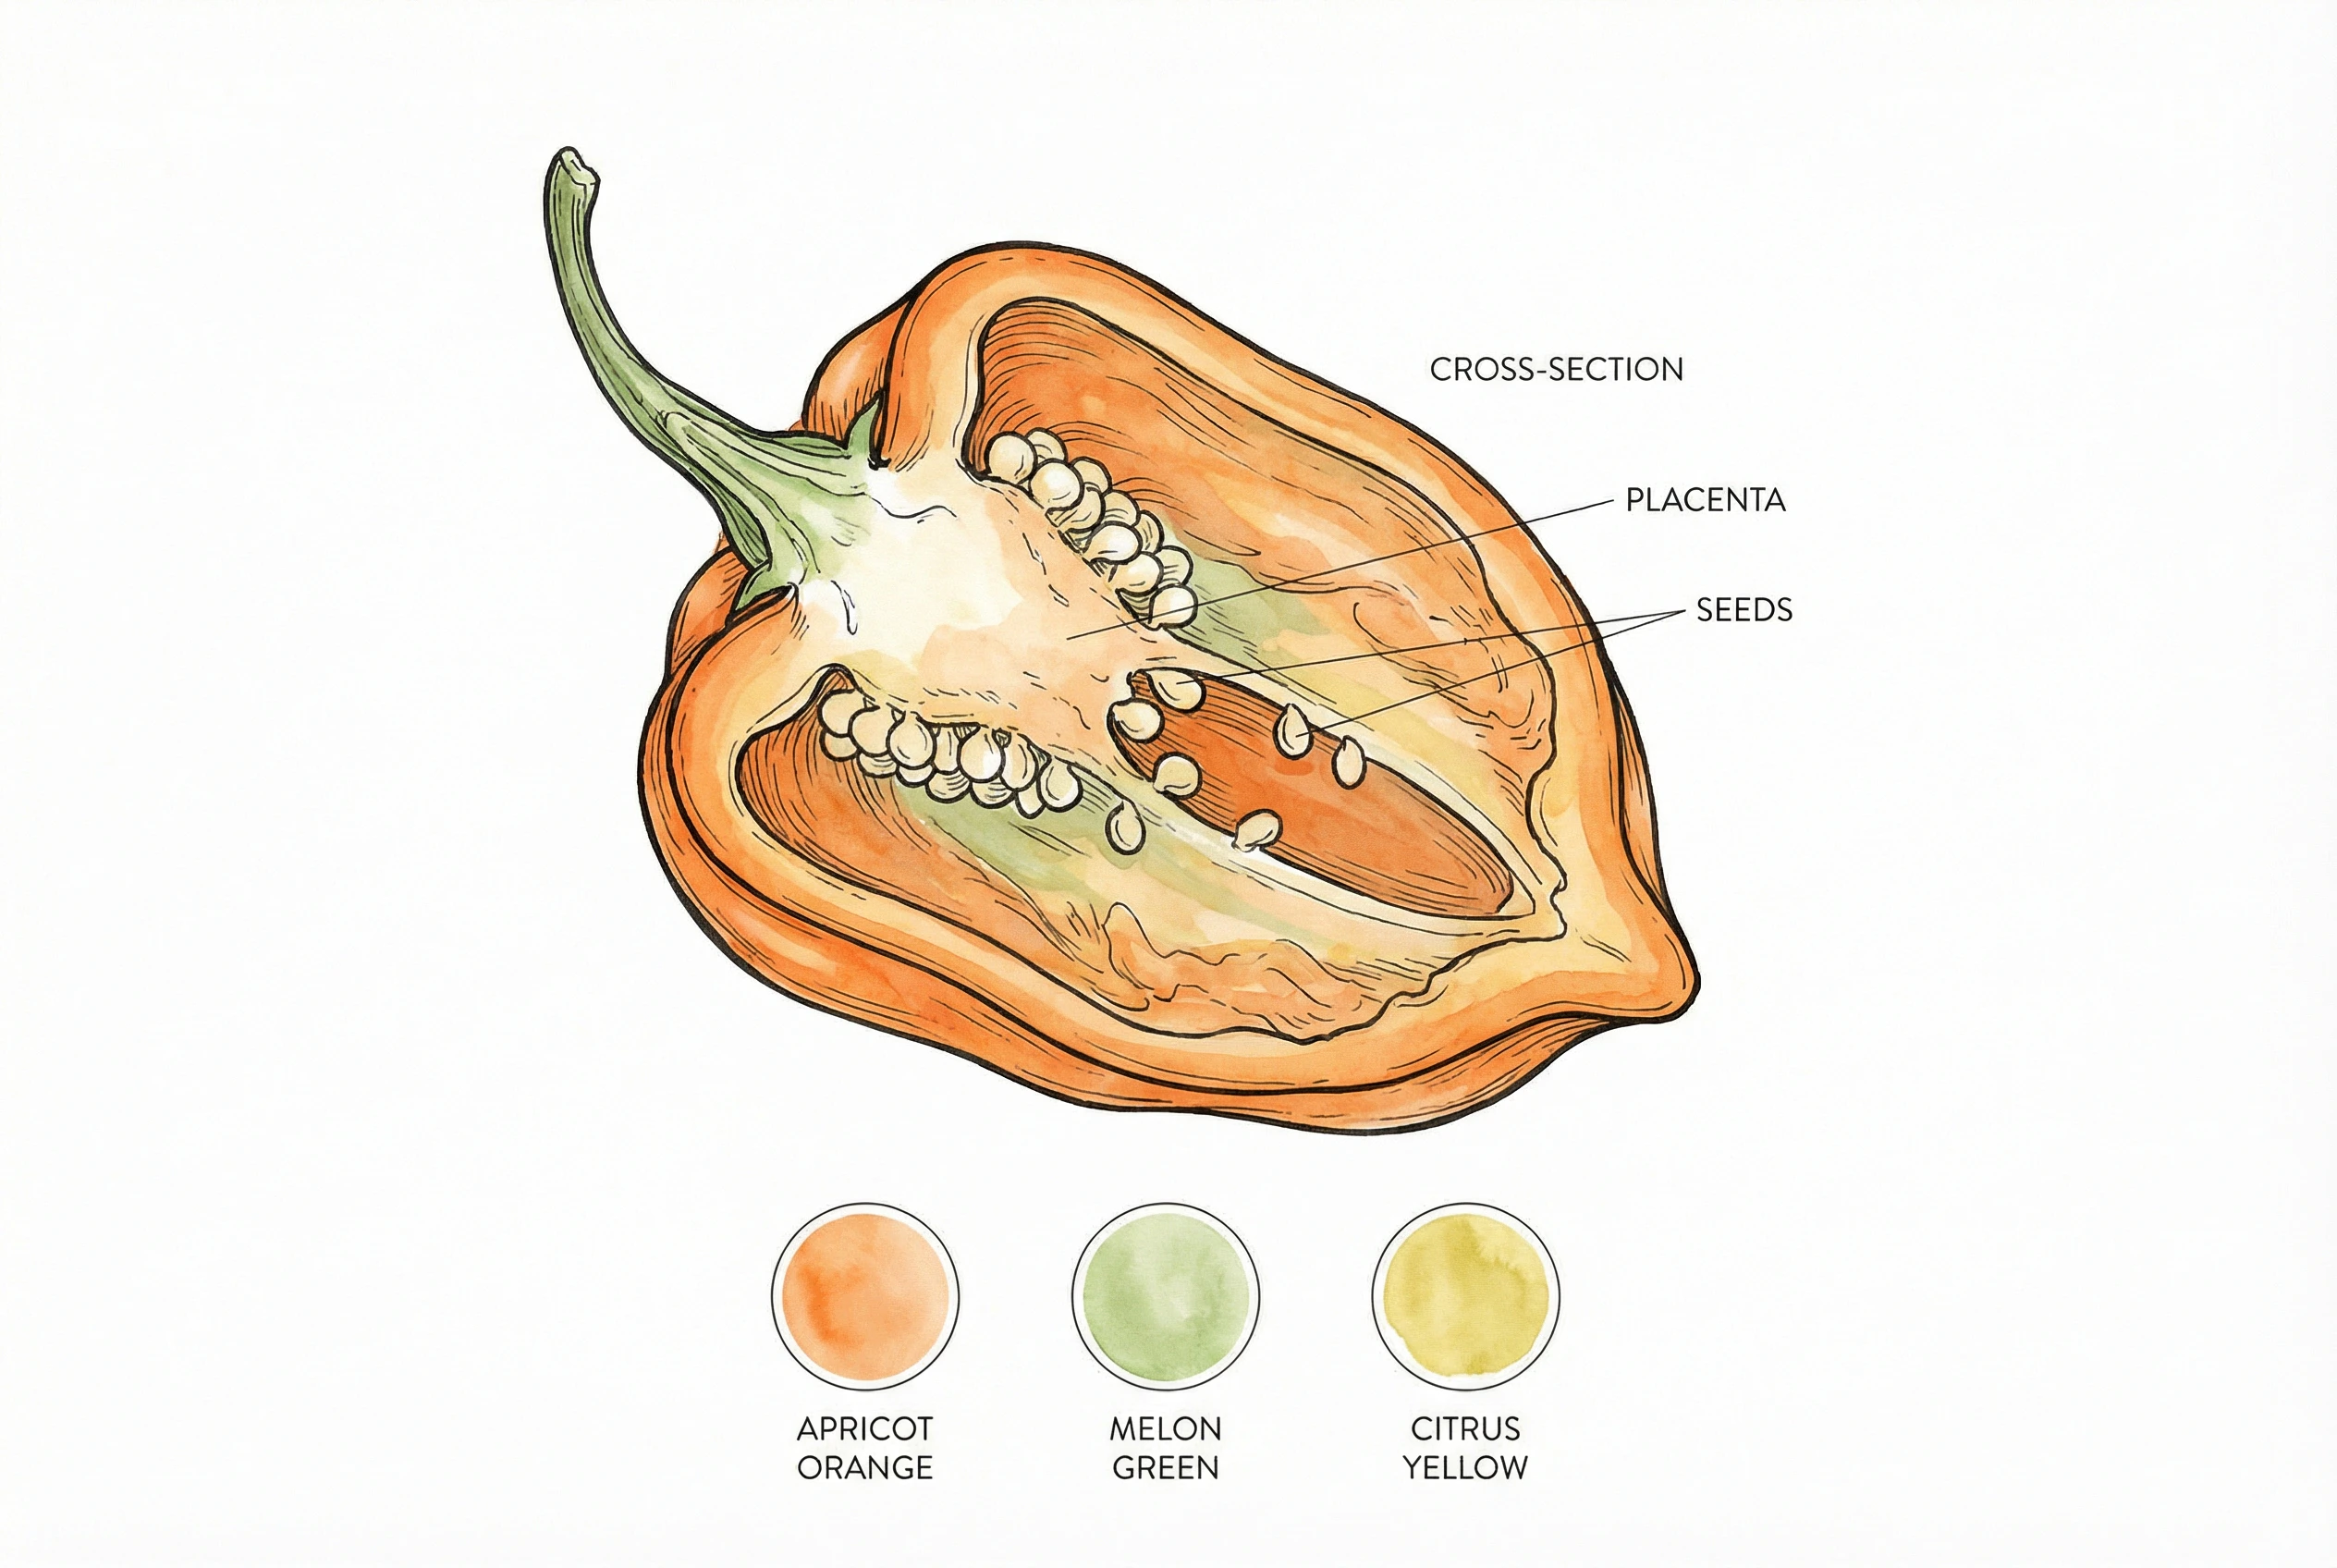
Breeder and vendor tasting notes describe fully ripe Habanadas as having apricot, melon, and citrus notes with a floral, tropical sweetness.
These are cultivar descriptions rather than a lab analysis, but they give a good sense of what to expect.
Without capsaicin heat, the aromatic notes come through more easily than they might in a hot pepper.
Because there’s no heat to overpower a dish, they can be a good fit for people who want habanero flavor without the burn, including kids and those who prefer milder food.
Individual tolerance still varies, so let your own palate be the guide.
Plant and Fruit Characteristics
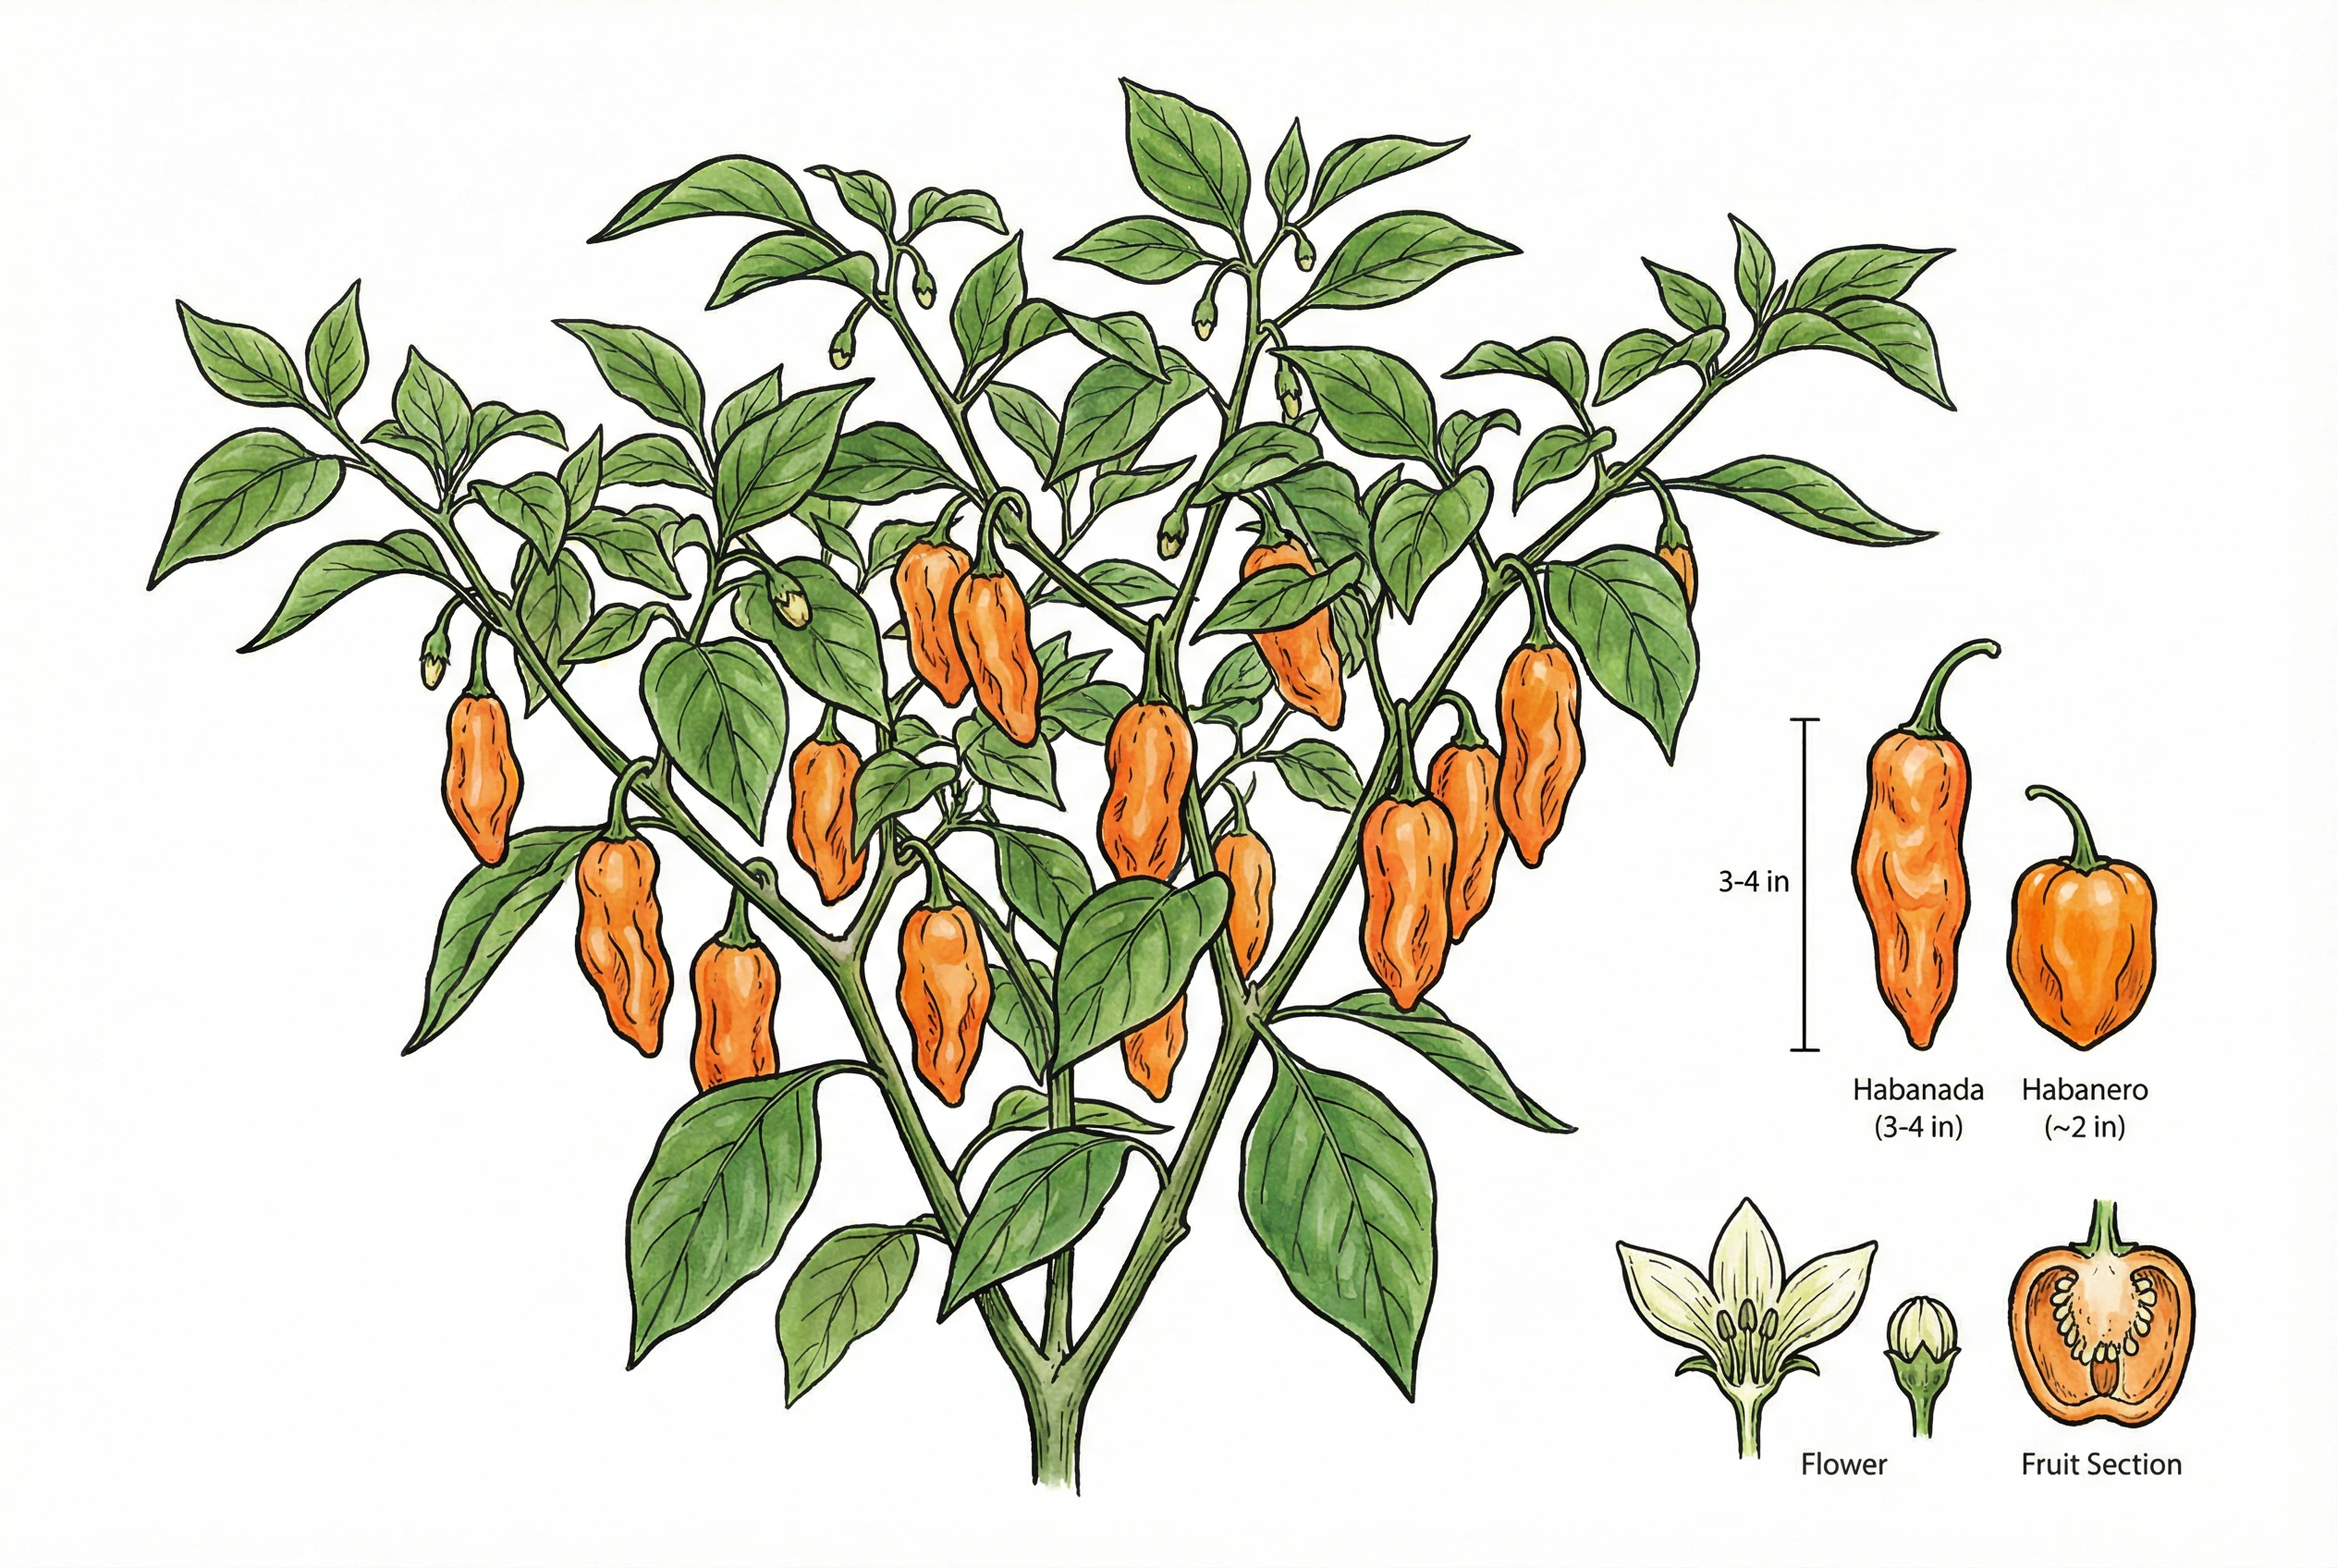
Habanada plants grow compact at 2-3 feet tall. They’re prolific producers.
Current breeder and seed-vendor listings describe the fruit as roughly 2-3 inches long, a bit larger than standard 1-2 inch habaneros.
Plants can grow in 2-3 gallon containers, which suits balconies and patios, though a larger container generally supports more consistent yields. Give the roots as much volume as your space allows.
The peppers start nearly translucent. They transition through neon yellow-green, then yellow-orange, finally maturing to deep tangerine.
Seed vendors list Habanada at roughly 70 days to green and 100 days to full orange color. Note that most catalog days-to-maturity figures are counted from transplant, not from seed, so add your 8-10 weeks of indoor start time to estimate the full calendar.
Green peppers can be picked earlier but have less of the ripe, complex flavor.
Choose Seed from a Named Source
- Row7 Seeds Habanada Pepper Seeds – Available at Row7 Seeds. A direct source for gardeners who want the named Habanada variety and may save seed.
- High Mowing Organic Habanada Seeds – Available at High Mowing. An alternative named source when its organic seed and current availability fit your garden.
Habanada. The Unmasked Habanero. Cornell Small Farms
Growing Conditions and Climate Requirements
Build the climate around measured conditions
Habanadas are heat-loving plants. They need specific conditions to thrive. Get the basics right and you’ll have a productive harvest.
Temperature Requirements
Seeds germinate best at 80-85°F soil temperature. Use a heat mat.
Germination takes 10-14 days with proper heat versus 21+ days without. Seedlings need 75°F daytime and 65°F nighttime temperatures.
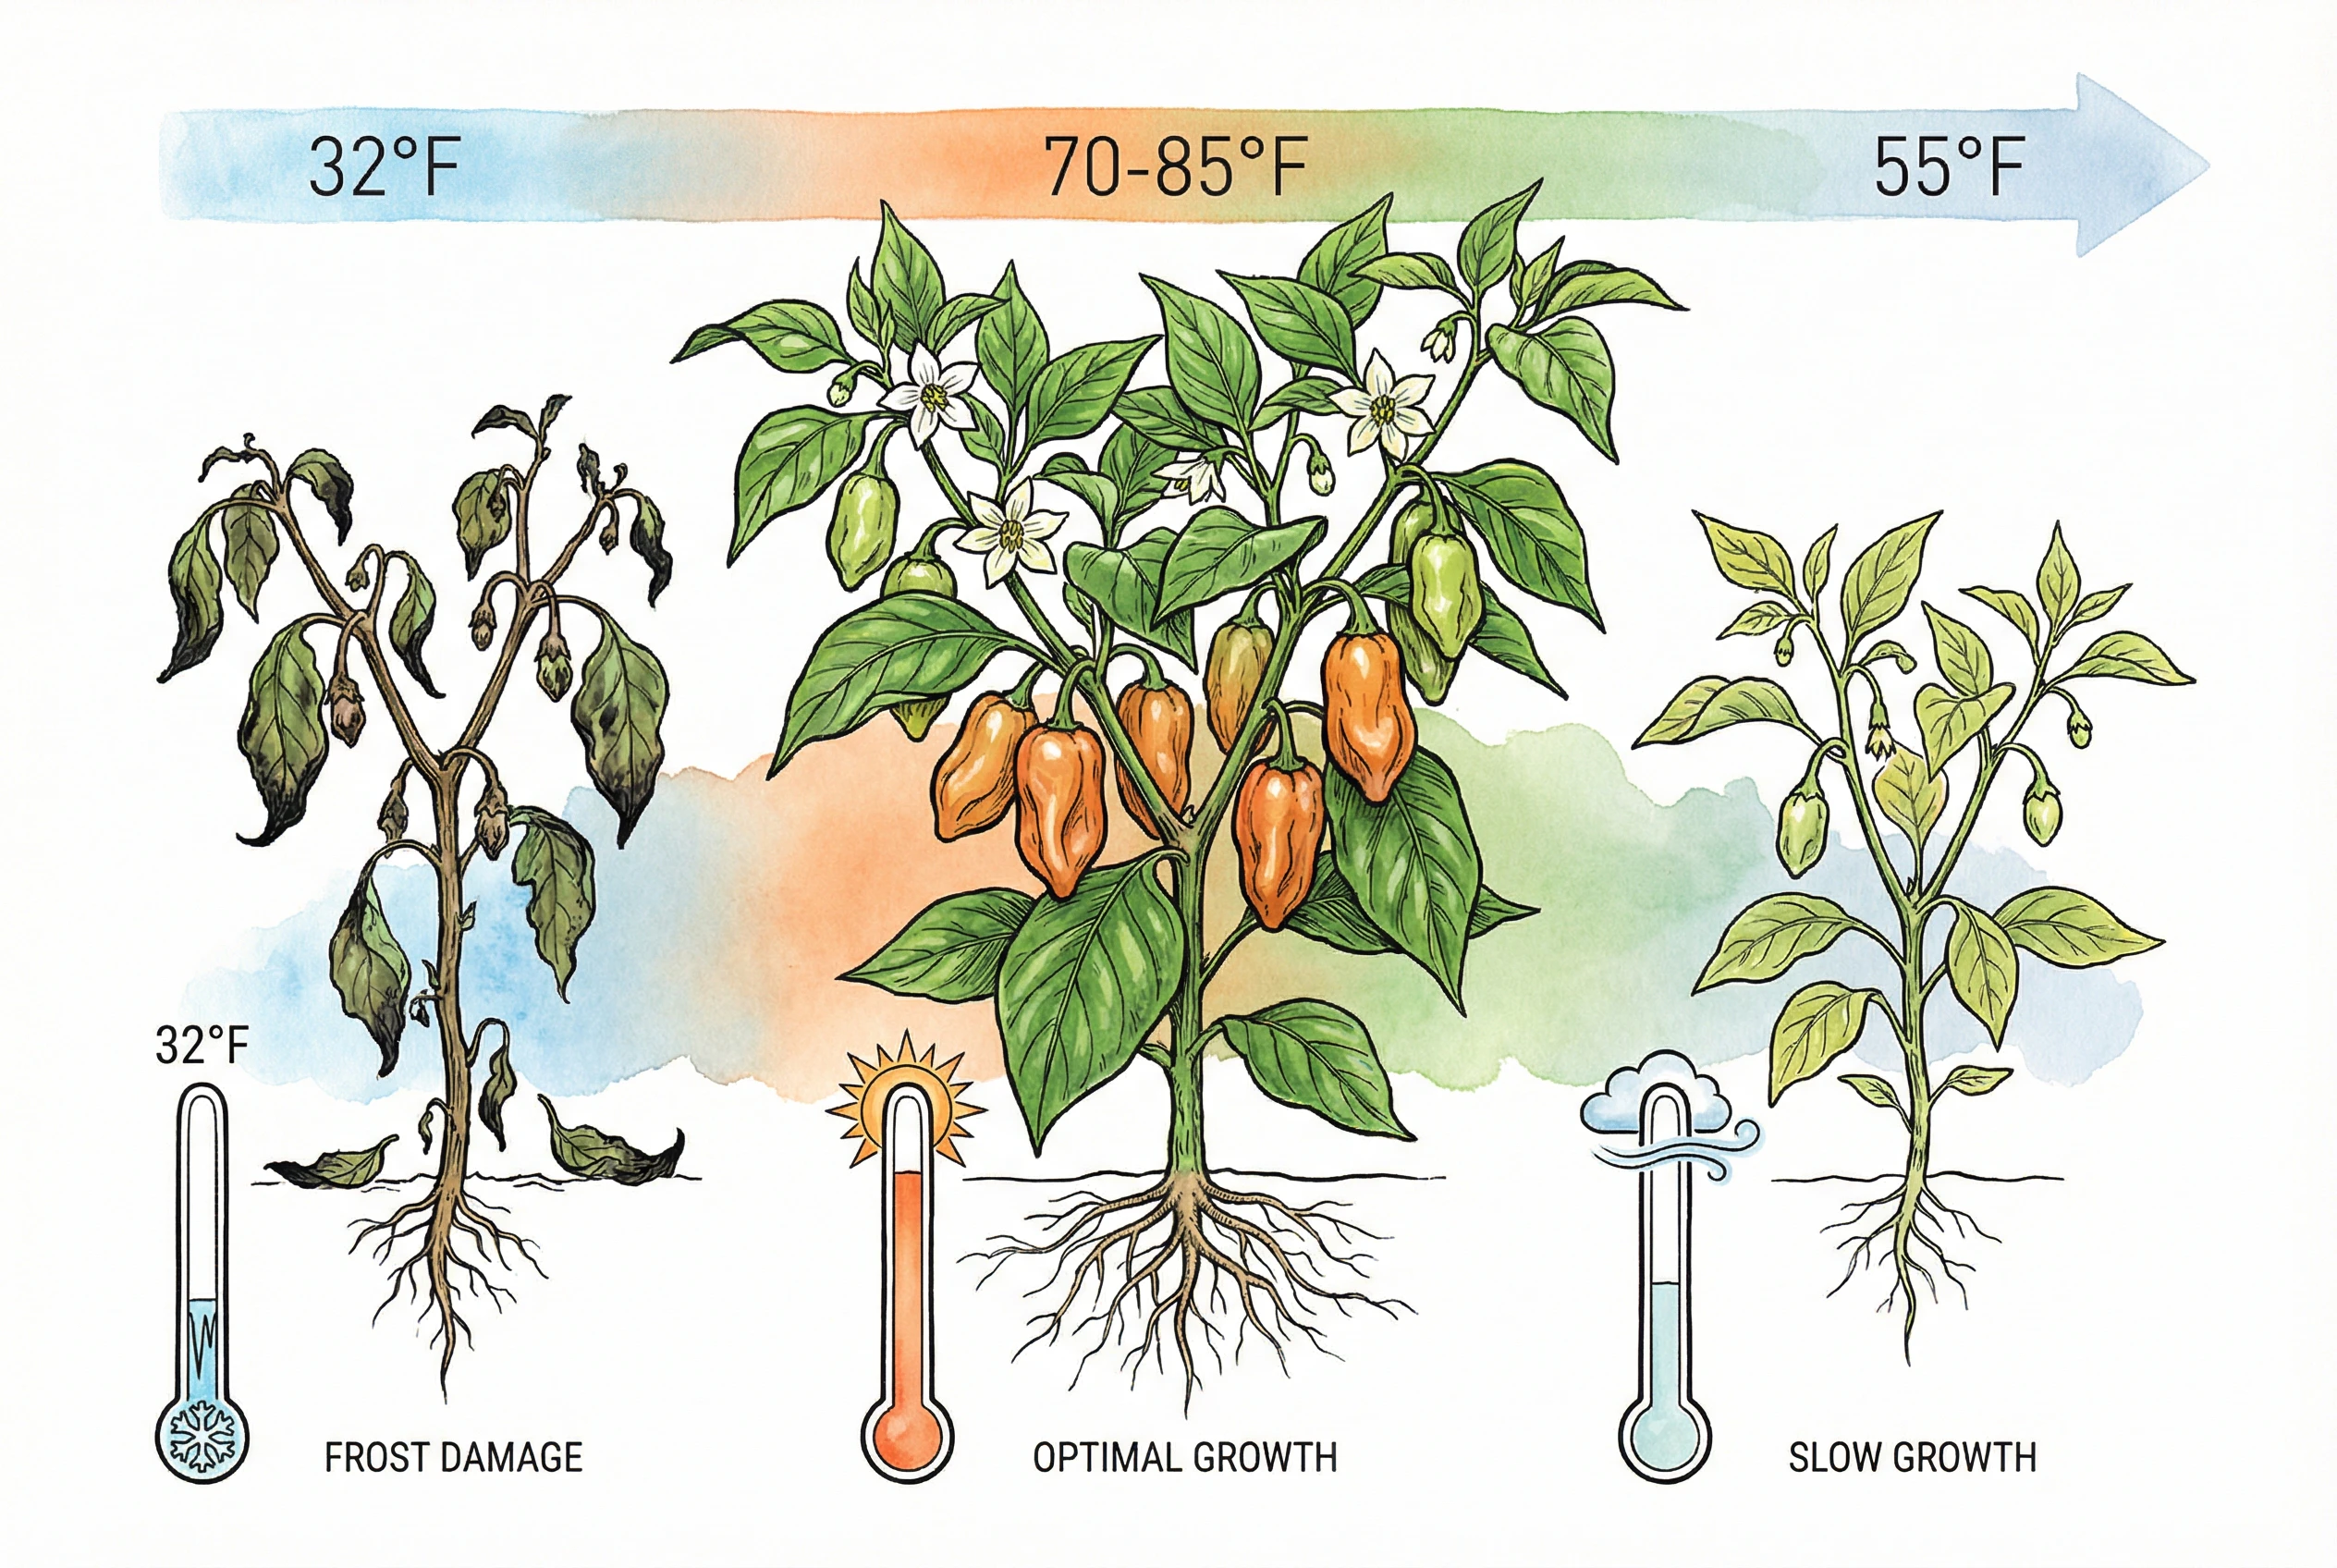
Mature plants do best between 70-85°F. Growth slows markedly below 55°F, and frost damages or kills exposed tissue, so protect or harvest before a freeze.
Transplant only after nighttime temperatures stay consistently above 55°F and soil reaches 70°F. In many climates that falls roughly 2-4 weeks after the last frost date, but let measured soil and night temperatures, not the calendar, make the call.
Sustained heat above about 95°F can trigger flower drop. Afternoon shade during heat waves may help, but treat it as a response to your conditions rather than a fixed rule.
In cold climates (zones 3-6), row covers, plastic mulch, and other season extenders can add weeks to your growing season, with the benefit depending on the material, ventilation, and soil warming.
Soil and pH Requirements
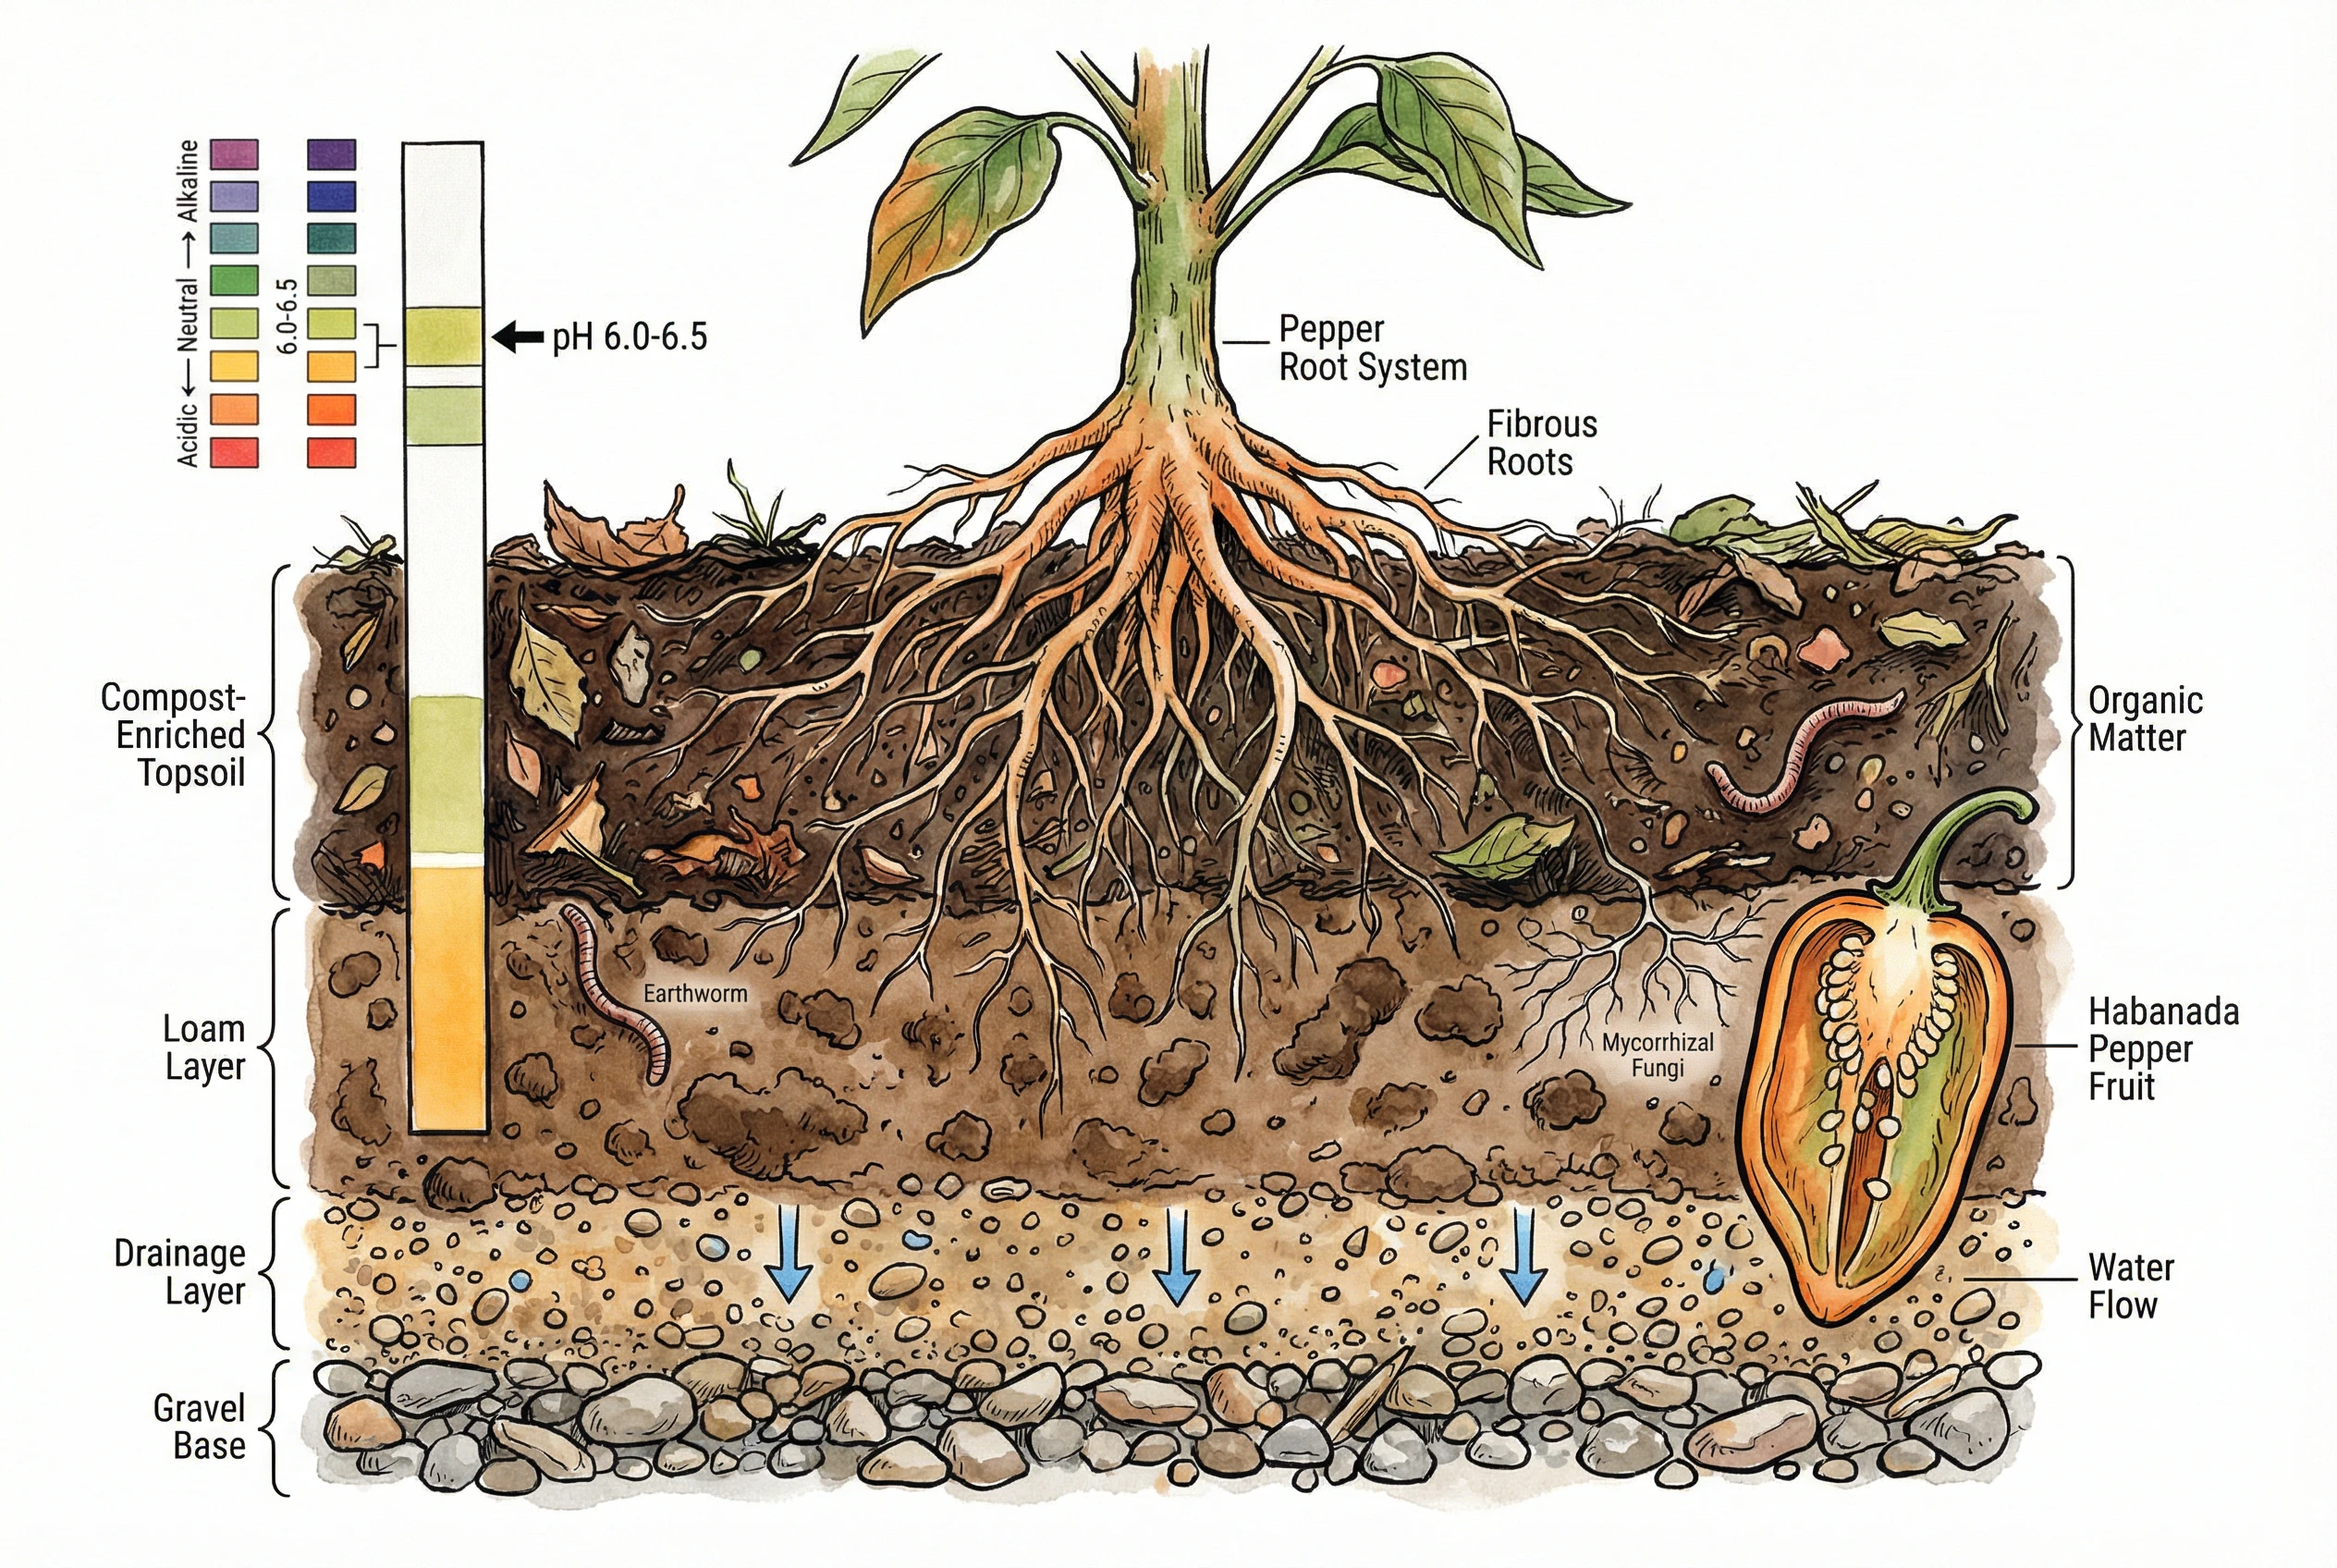
Peppers want well-drained soil in a mildly acidic to near-neutral range. Sources vary. Some extension guidance suggests about 6.5-7.0, and Row 7 lists an optimum near 6.5, so a range of roughly 6.0-7.0 is workable.
Test your soil before planting rather than assuming a single figure.
If a soil test shows the pH is too low, lime can raise it. Good calcium availability supports fruit development, but adding lime is not a standalone cure for blossom end rot, which is driven more by uneven watering and root factors (see the blossom end rot section below).
Compost can improve many soils, but match the amount to your soil texture and fertility test rather than adding a fixed 2-3 inches everywhere. Habanada was bred for lower-fertility conditions, so avoid over-enriching.
For containers, use a quality potting mix rather than garden soil.
Good drainage matters. You can get a rough sense of it by digging a hole and filling it with water, if it drains very slowly over many hours, consider raised beds or working in perlite and organic matter.
Amend gradually and re-check, since adding material to heavy clay can change how water moves in unexpected ways.
Give roots adequate volume rather than deliberately restricting them. Raised beds and, where appropriate, plastic mulch can warm soil, conserve moisture, and suppress weeds. Weigh those benefits against the cost and disposal of plastic film.
Sunlight and Water Needs
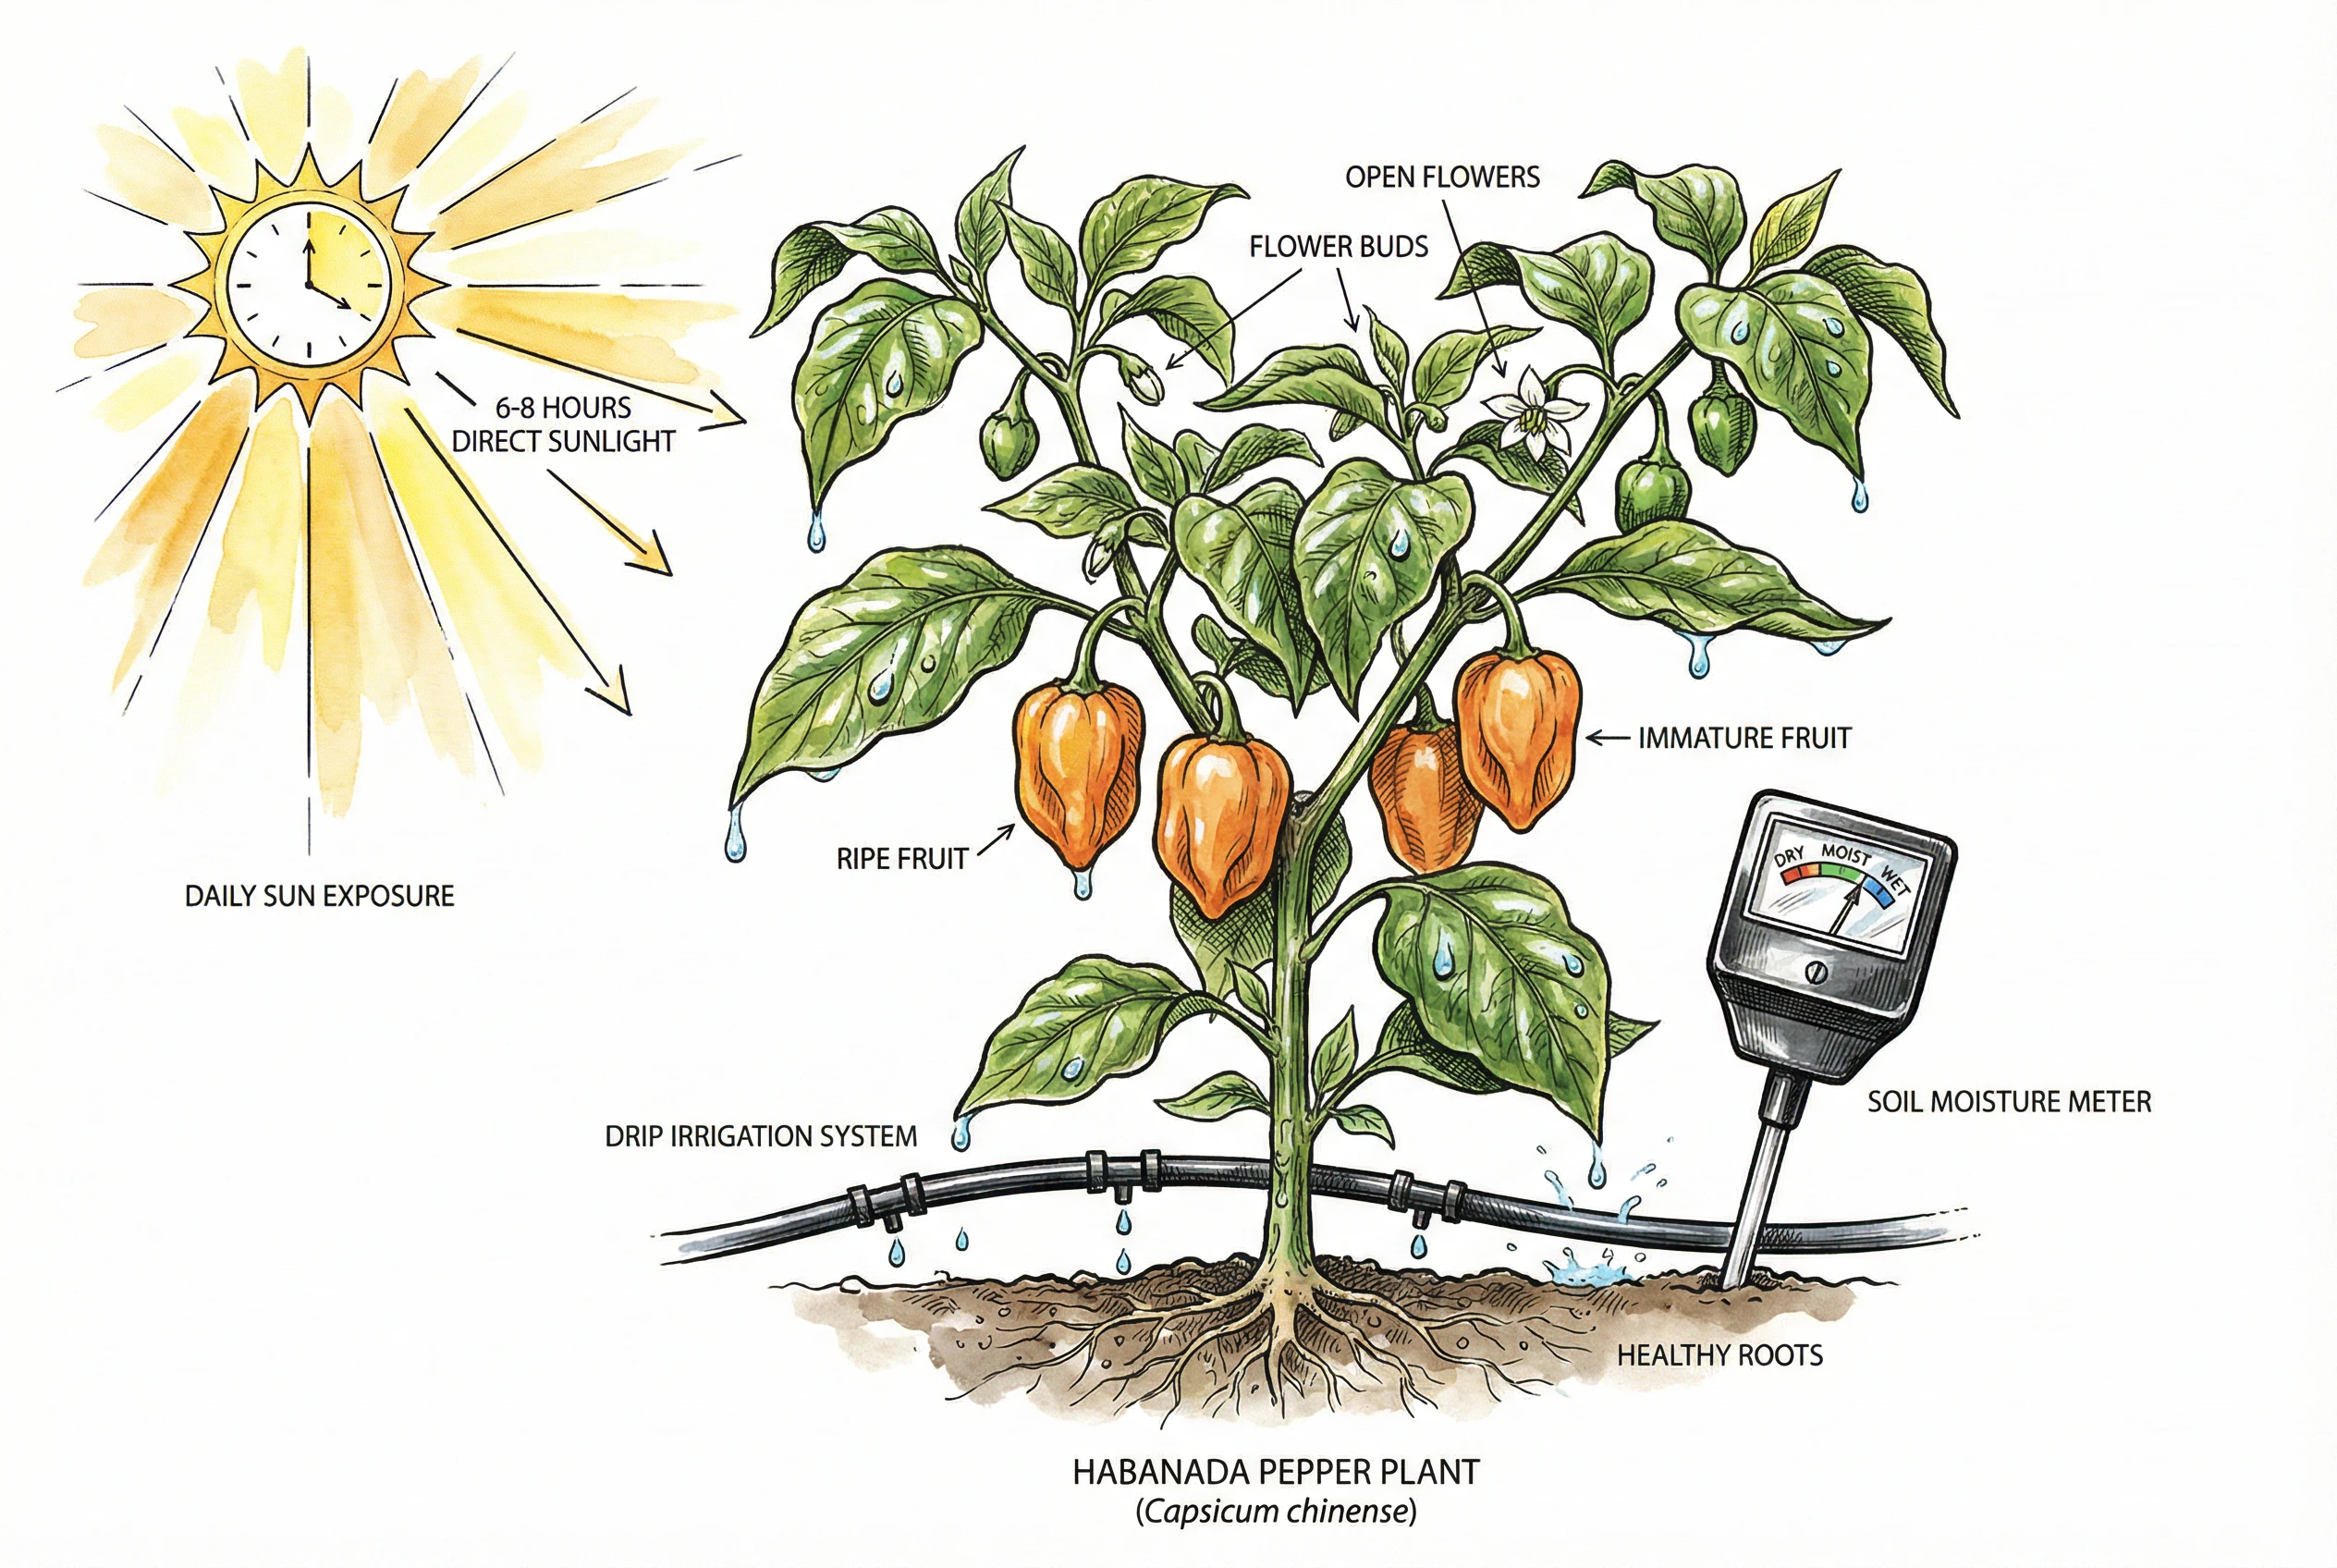
Plants need at least 6-8 hours of direct sunlight. In very hot climates some afternoon shade can actually reduce heat stress, so more light is not automatically better. Match sun exposure to your climate and how the plants respond.
Aim for roughly 1-2 inches of water per week (about 0.6-1.2 gallons per square foot), delivered deeply.
How often you water to reach that depends on your soil, container, rainfall, and the weather, so adjust rather than following a fixed weekly count.
Drip irrigation or soaker hoses help keep foliage dry, which reduces the spread of some diseases, though rain will still wet leaves at times.
Water more during extreme heat and less in cool or rainy spells. Overwatering in poorly drained soil can contribute to root problems, but drainage and soil oxygen matter as much as frequency.
Mulching with straw or plastic moderates soil temperature and helps keep moisture steady. Consistent moisture reduces the risk of blossom end rot and fruit cracking, though it does not eliminate them entirely.
Tools for Warm Starts and Cold Nights
- BN-LINK heat mat suits indoor pepper starts that need reliably warm soil. Place its thermostat probe correctly, monitor moisture, and follow the electrical instructions. It is unnecessary if the actual soil temperature is already warm enough.
- Agfabric Floating Row Cover can protect plants during cool nights and light frost. Vent it in warm weather and do not expect one fabric layer to provide the same protection in every wind or temperature event.
Growing Peppers in the Home Garden. Ohio State University Extension
Growing Peppers in Home Gardens. University of Minnesota Extension
Starting Seeds and Transplanting
Start early and transplant gradually
Success starts with proper seed starting. Because Habanada needs a long season to reach full orange color (about 100 days from transplant), most growers outside the warmest regions start seeds indoors well ahead of transplanting.
Indoor Seed Starting
Start seeds 8-10 weeks before your last frost date. For a May 15 frost date, start March 1-15.
Sow seeds about 1/4 inch deep in seed starting mix. If you sow densely, plan to thin to the strongest seedlings to avoid crowding and damping-off.
Place on a heat mat holding roughly 80-85°F soil temperature and cover with a humidity dome, then vent or remove the dome once seedlings emerge.
Germination takes about 10-14 days with steady heat. Once sprouted, provide 12-16 hours of light daily.
Grow lights are usually more reliable than a windowsill. Keep the light close enough to prevent legginess. The right distance depends on the fixture’s output and heat, so follow the lamp’s guidance and watch how the seedlings respond rather than using a single fixed number.
At the true leaf stage (about 4 weeks), transplant to 2-inch cells or 4-inch pots. Handle seedlings gently by leaves, never stems. Water with dilute fertilizer at half strength.
Hardening Off Process
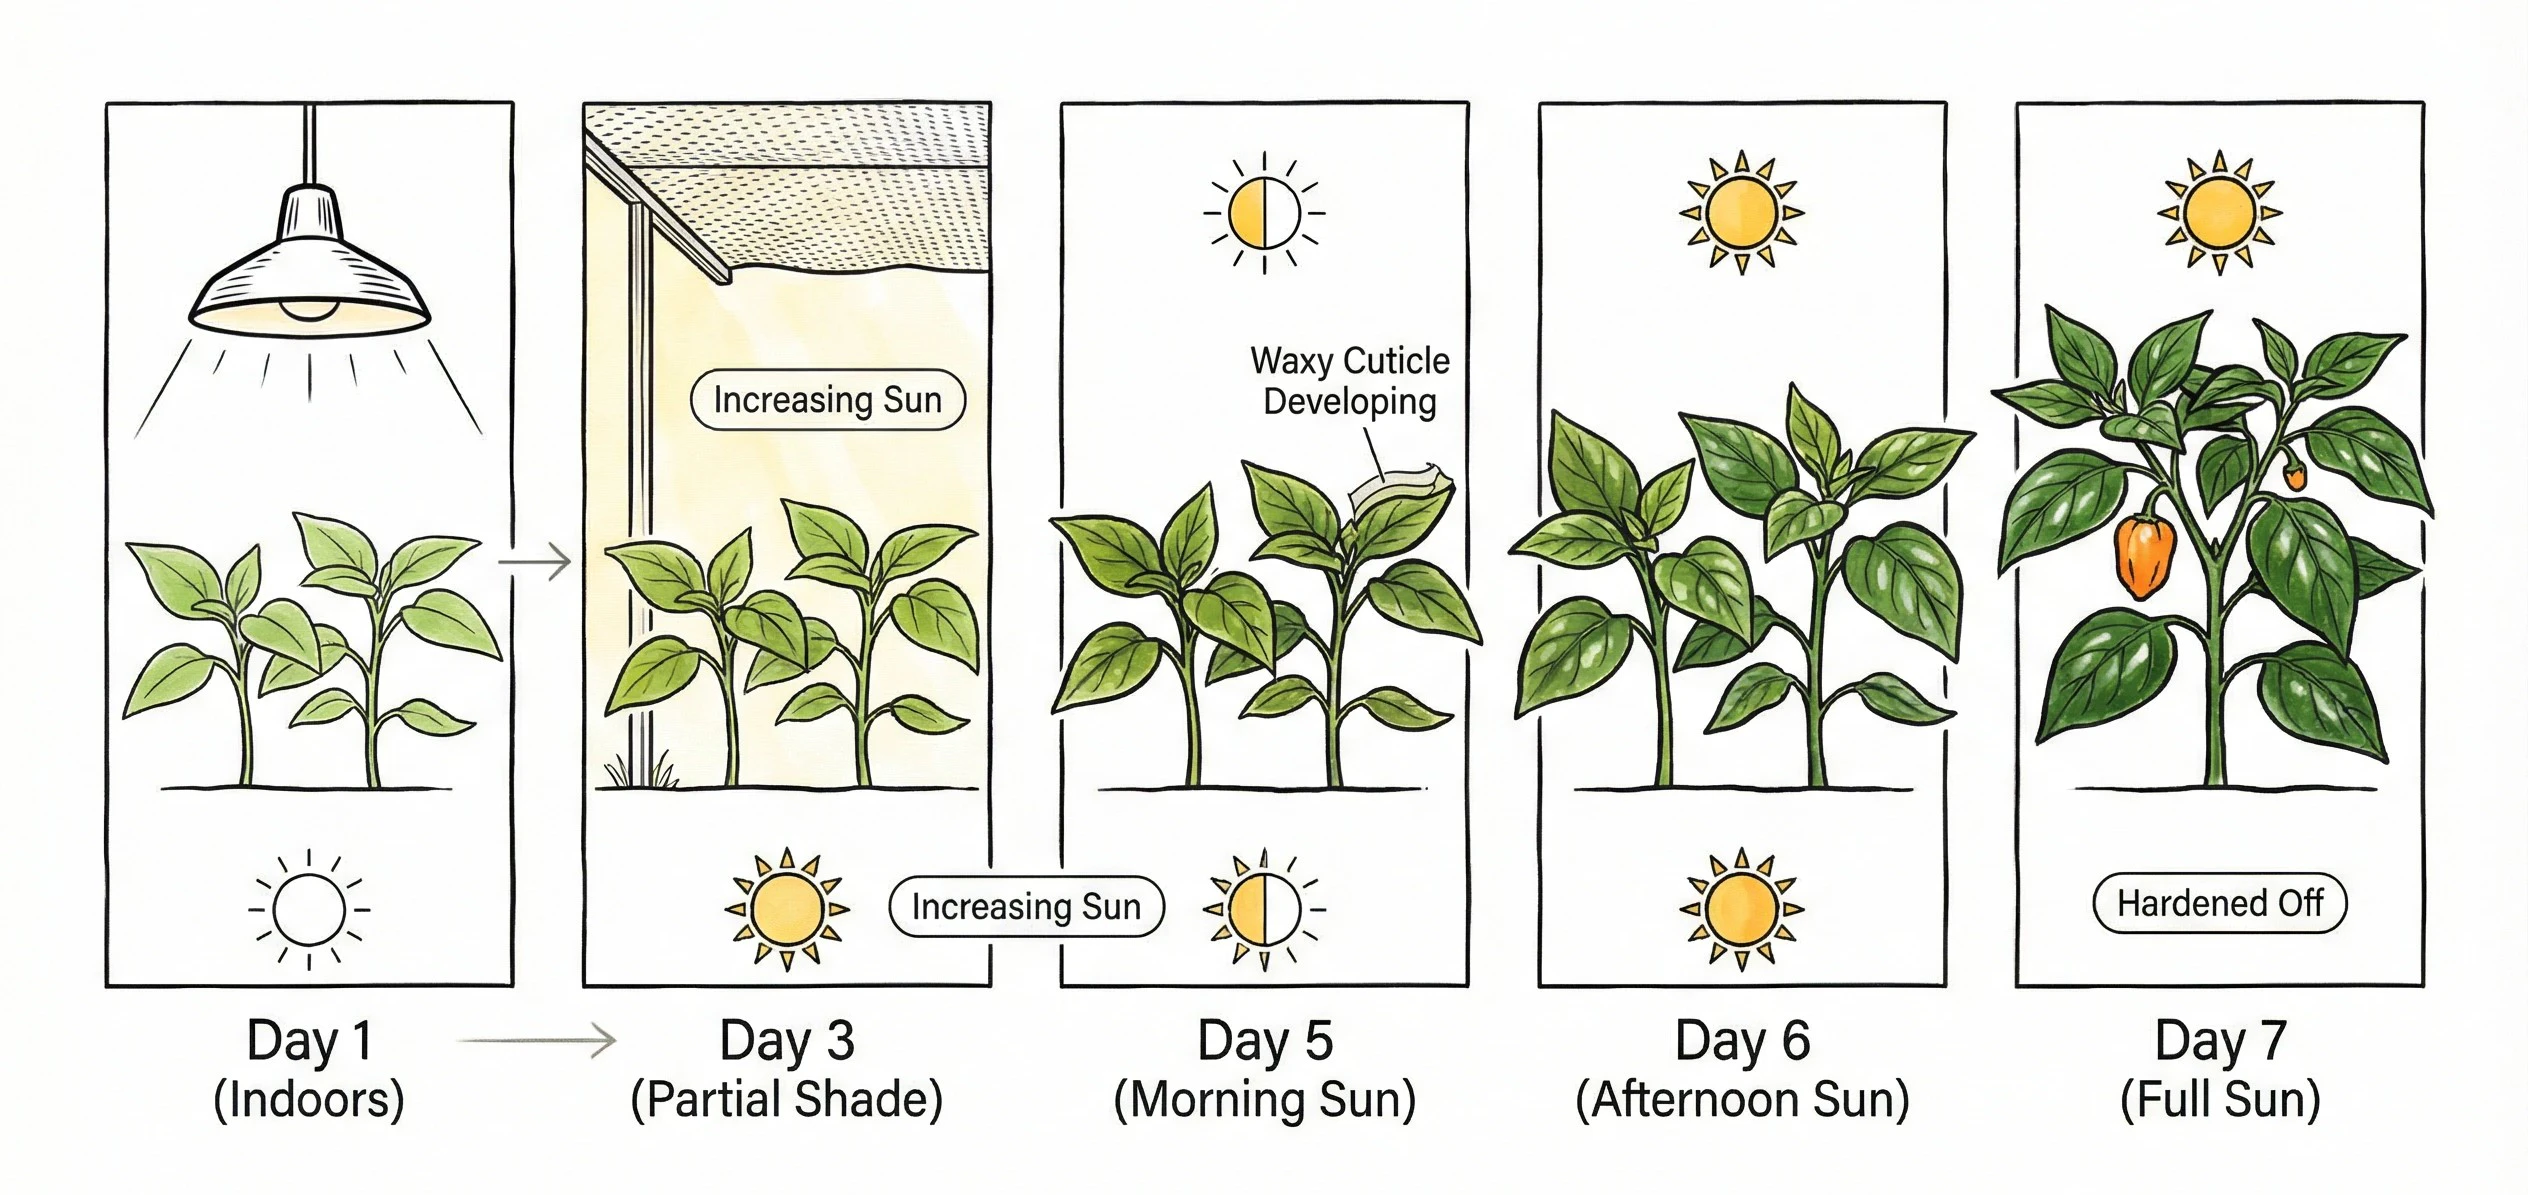
Hardening off gradually toughens leaf structure and water relations so seedlings handle outdoor sun, wind, and temperature swings.
Start roughly 7-14 days before transplanting, adjusting to the weather and how the plants look.
Move seedlings outdoors for increasing periods. Begin with 1-2 hours in morning shade.
Protect from strong wind, intense sun, and heavy rain at first, easing off as the plants adjust. A little gentle air movement can help strengthen them.
Don’t skip this step. Seedlings moved straight outside can suffer transplant shock, wilting or showing sunscald. Most recover with care, but hardening off makes the transition much smoother.
Transplanting to Garden
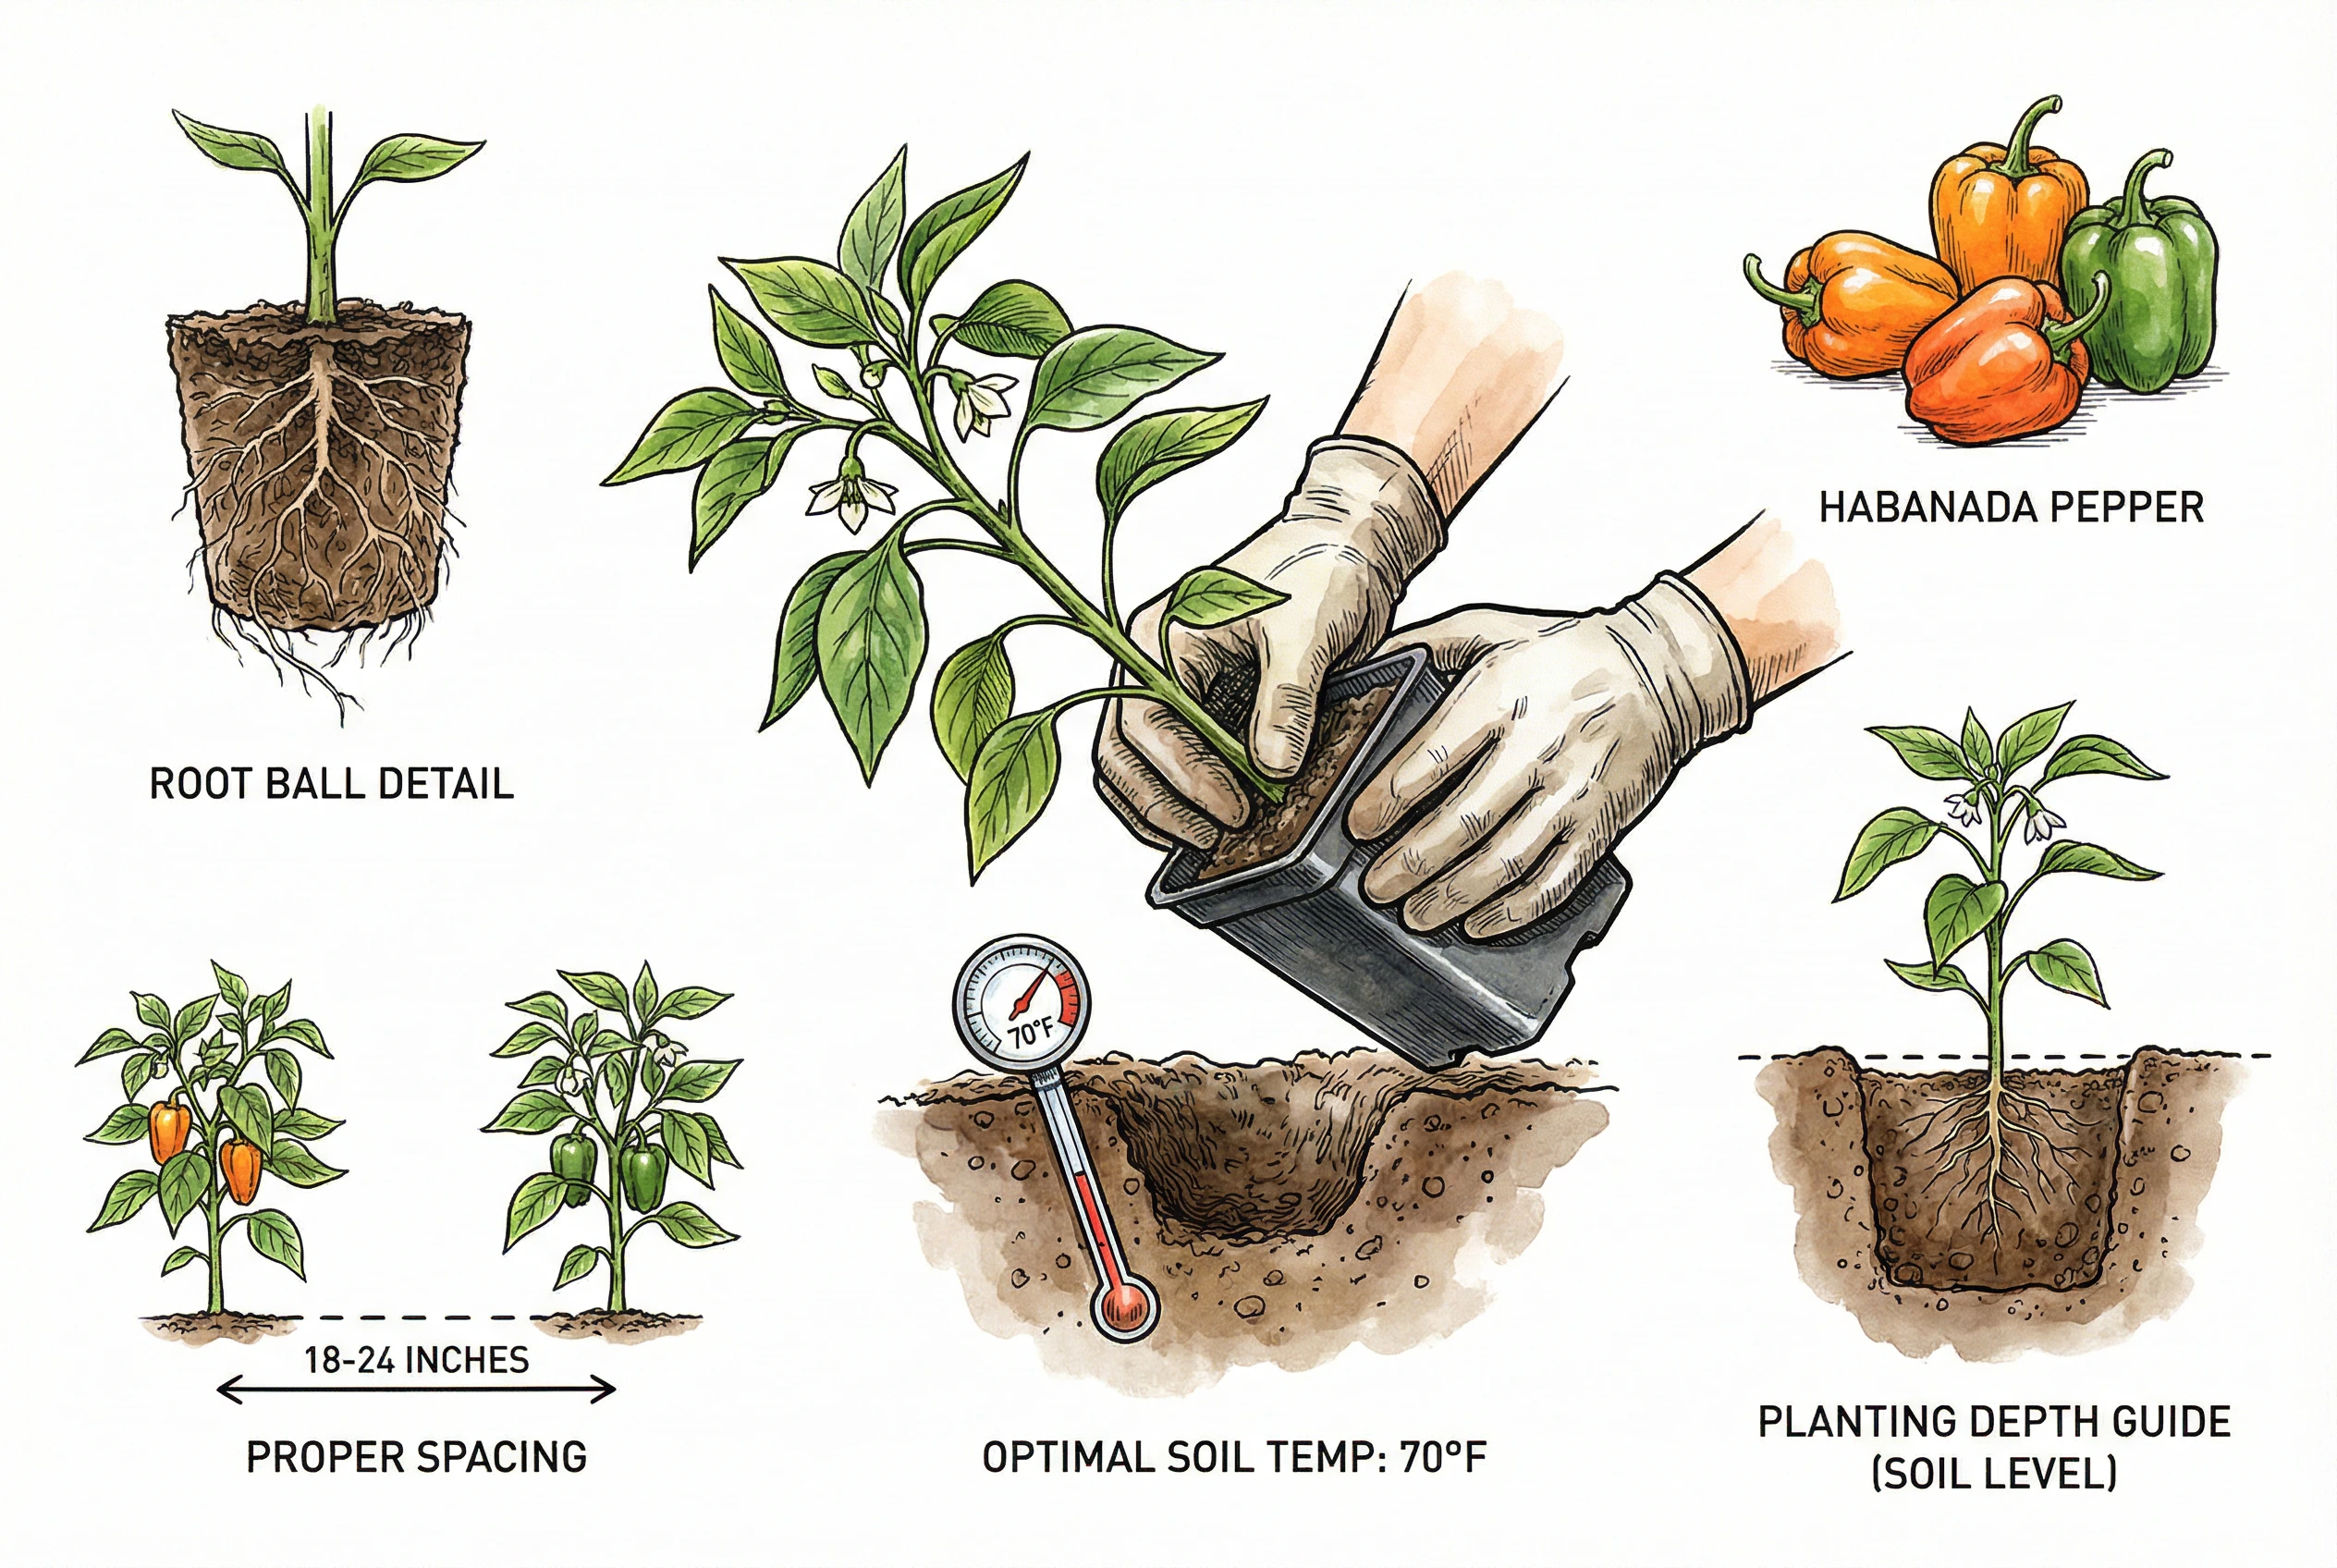
Wait until soil reaches 70°F at 4 inches deep. Use a soil thermometer.
This typically occurs 2-4 weeks after the last frost date, not on the frost date itself. In northern climates, that means late May or early June.
Transplant on cloudy days or in evening to reduce stress. Dig holes slightly larger than root balls.
Plant at the same depth as in the containers. Space plants about 18-24 inches apart, with rows roughly 24-36 inches apart depending on your source and equipment.
Good spacing improves air circulation, which helps reduce disease pressure without guaranteeing prevention.
Water thoroughly with dilute fertilizer solution. Install stakes or cages immediately. Installing supports later damages roots.
Common Seedling Problems
Leggy, weak seedlings indicate insufficient light. Move grow lights closer (2-3 inches above plants).
Increase duration to 14-16 hours daily. A small fan for gentle air movement can encourage sturdier stems.
Transplant shock shows as wilting and slow growth. Provide temporary shade for a few days and keep the soil evenly moist, watering when the top of the mix begins to dry rather than on a fixed schedule that could waterlog already-damp soil.
Recovery can take a week or two. Keep moisture even and give temporary shade while the seedlings establish rather than adding unproven transplant remedies.
Seed-Starting Equipment
- BN-LINK heat mat – reuse the linked heat mat above when soil temperature, rather than light, is slowing germination. Its controller helps only when the probe is placed and monitored correctly.
- MIXC Seedling Trays suit a small sowing that benefits from a humidity dome during germination. Vent the dome after emergence and pot seedlings up once the small cells begin to limit roots.
Supporting and Training Plants
Support before the branches load up
Habanada plants produce heavy yields on compact frames. Proper support prevents broken branches and improves harvest.
Support Structure Options
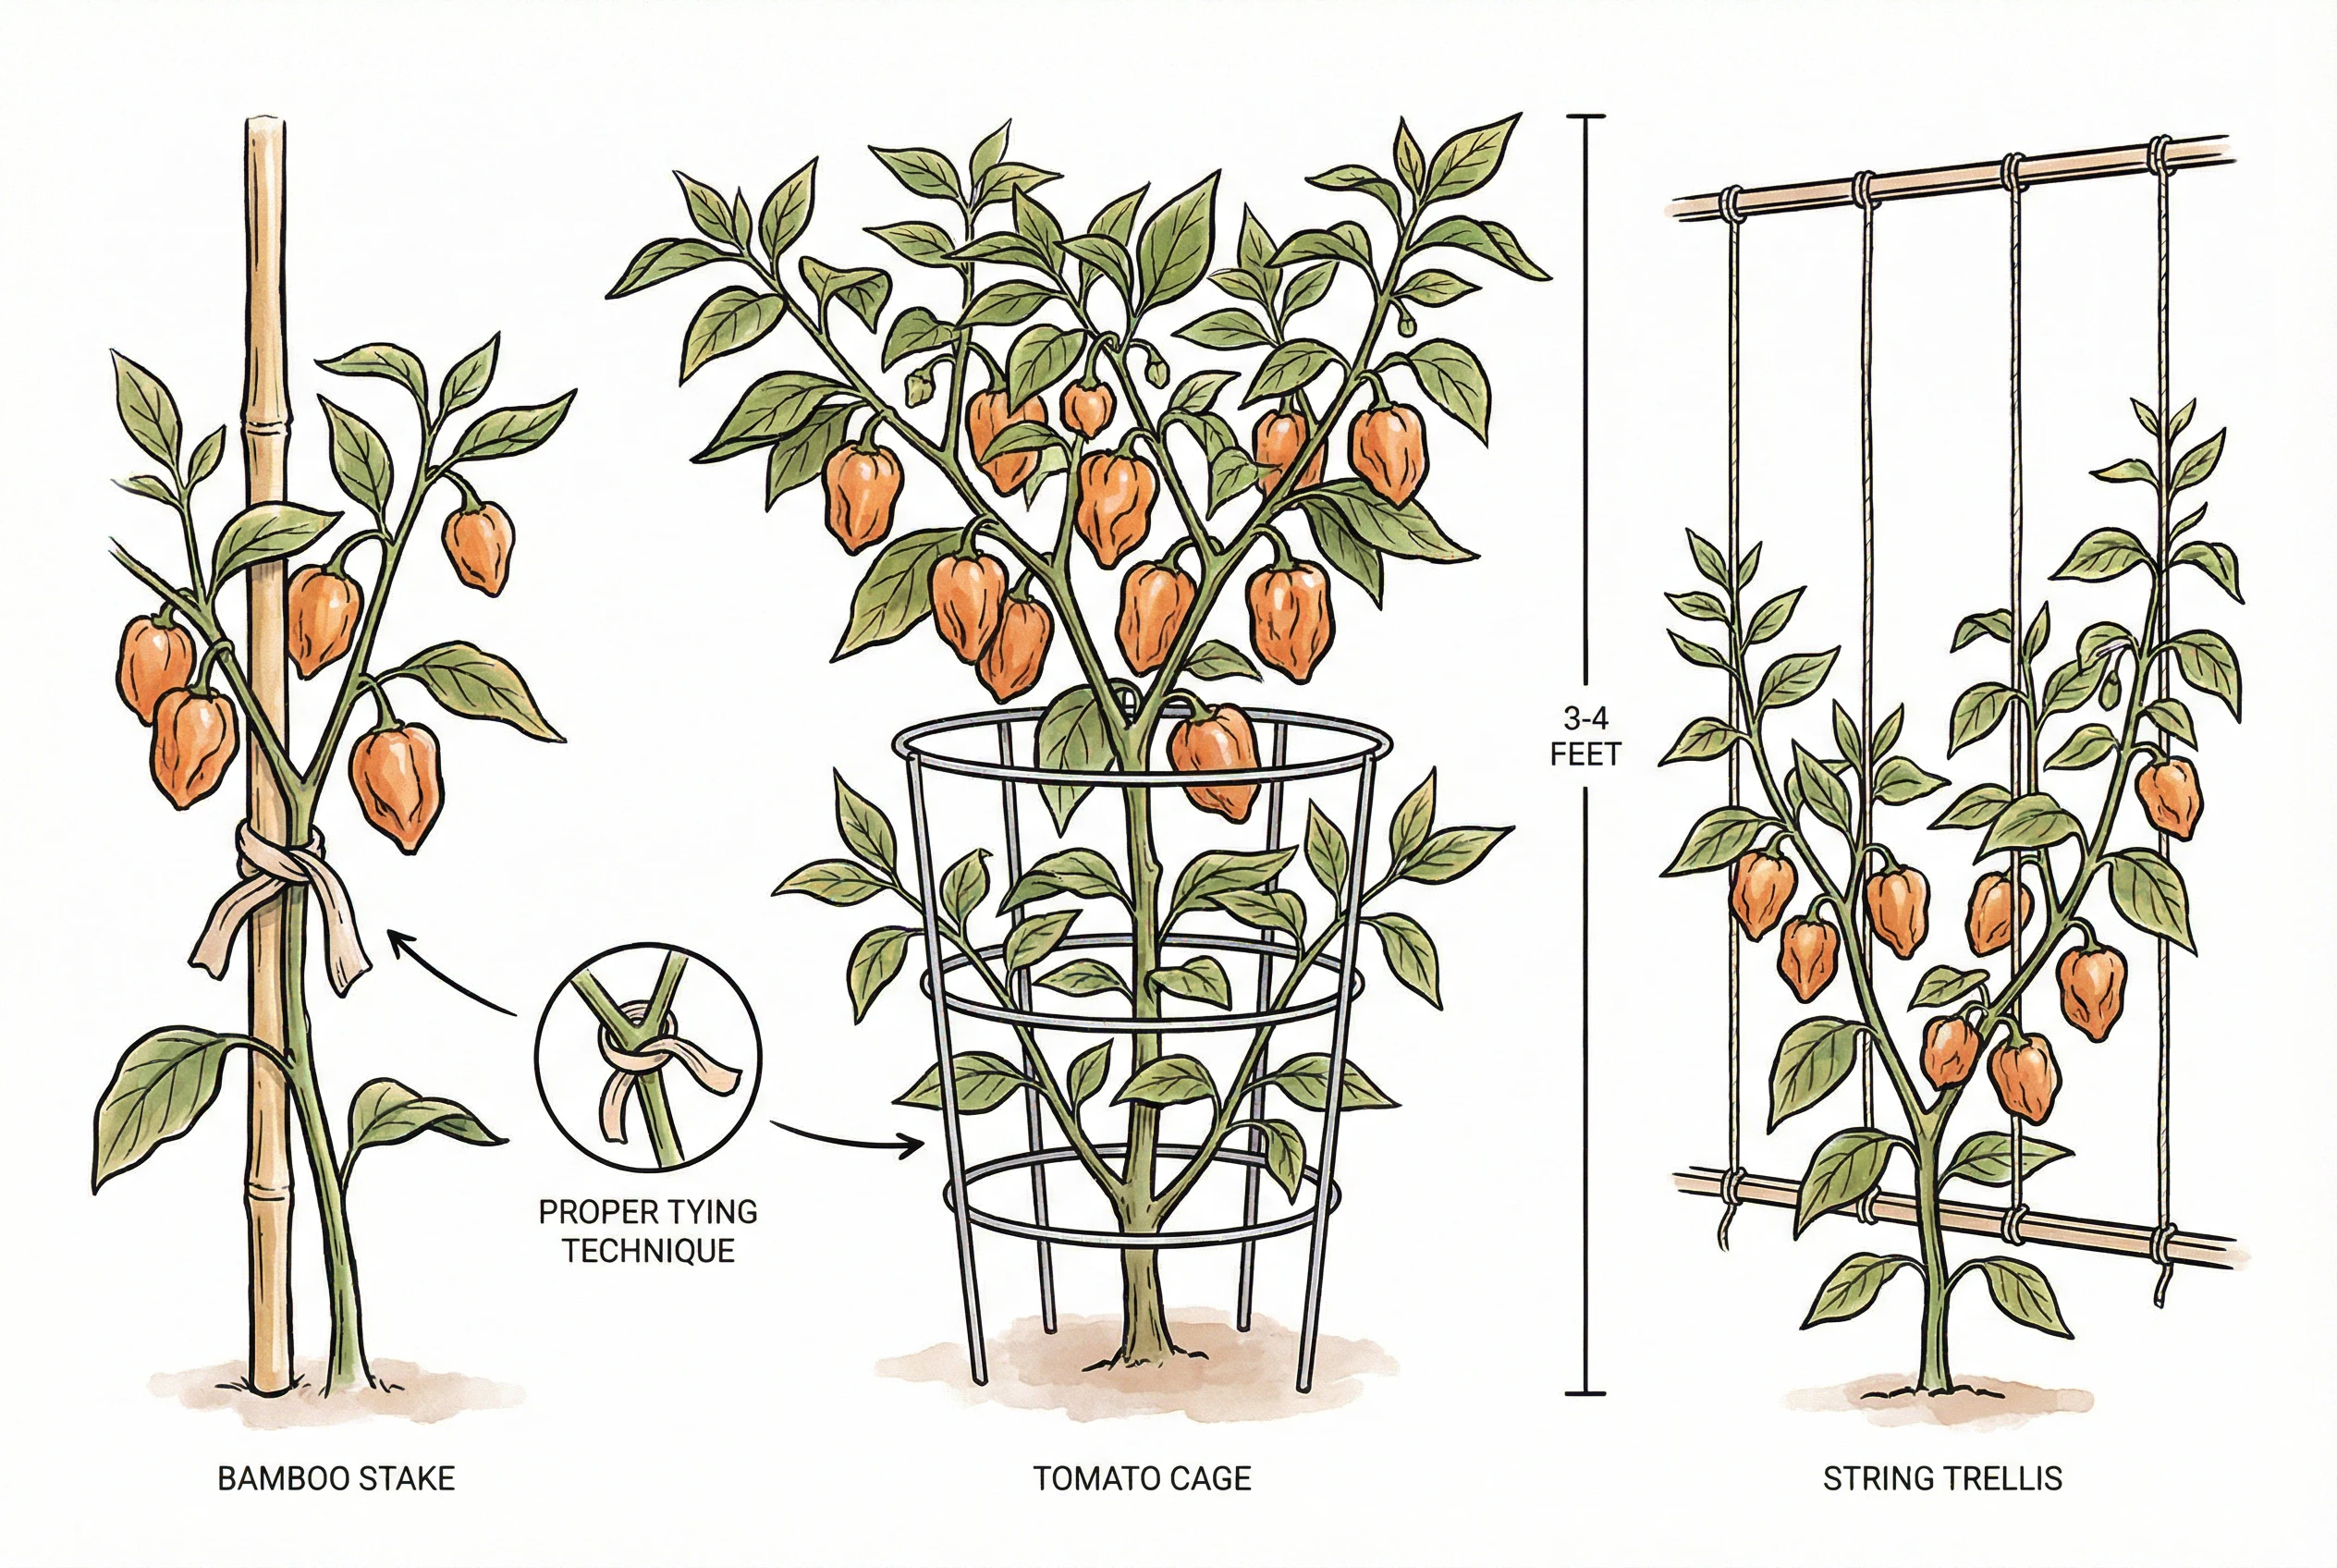
Install supports at transplanting time, never later. Driving stakes near established plants damages roots. Use 3-4 foot stakes for garden plants, 2-3 feet for containers.
Bamboo stakes work well. They’re light, sturdy, and gentle on plants. How quickly they break down depends on any coatings and on storage and disposal conditions.
Metal stakes with plastic coating last multiple seasons. Tomato cages also work well for bushy pepper plants with heavy fruit loads.
Tie the main stem to stakes using soft ties. Start at the base and work up.
Add ties every 6-8 inches as plants grow. Keep ties somewhat loose. Plants should lean against support, not be restricted by it.
Pruning and Training Techniques
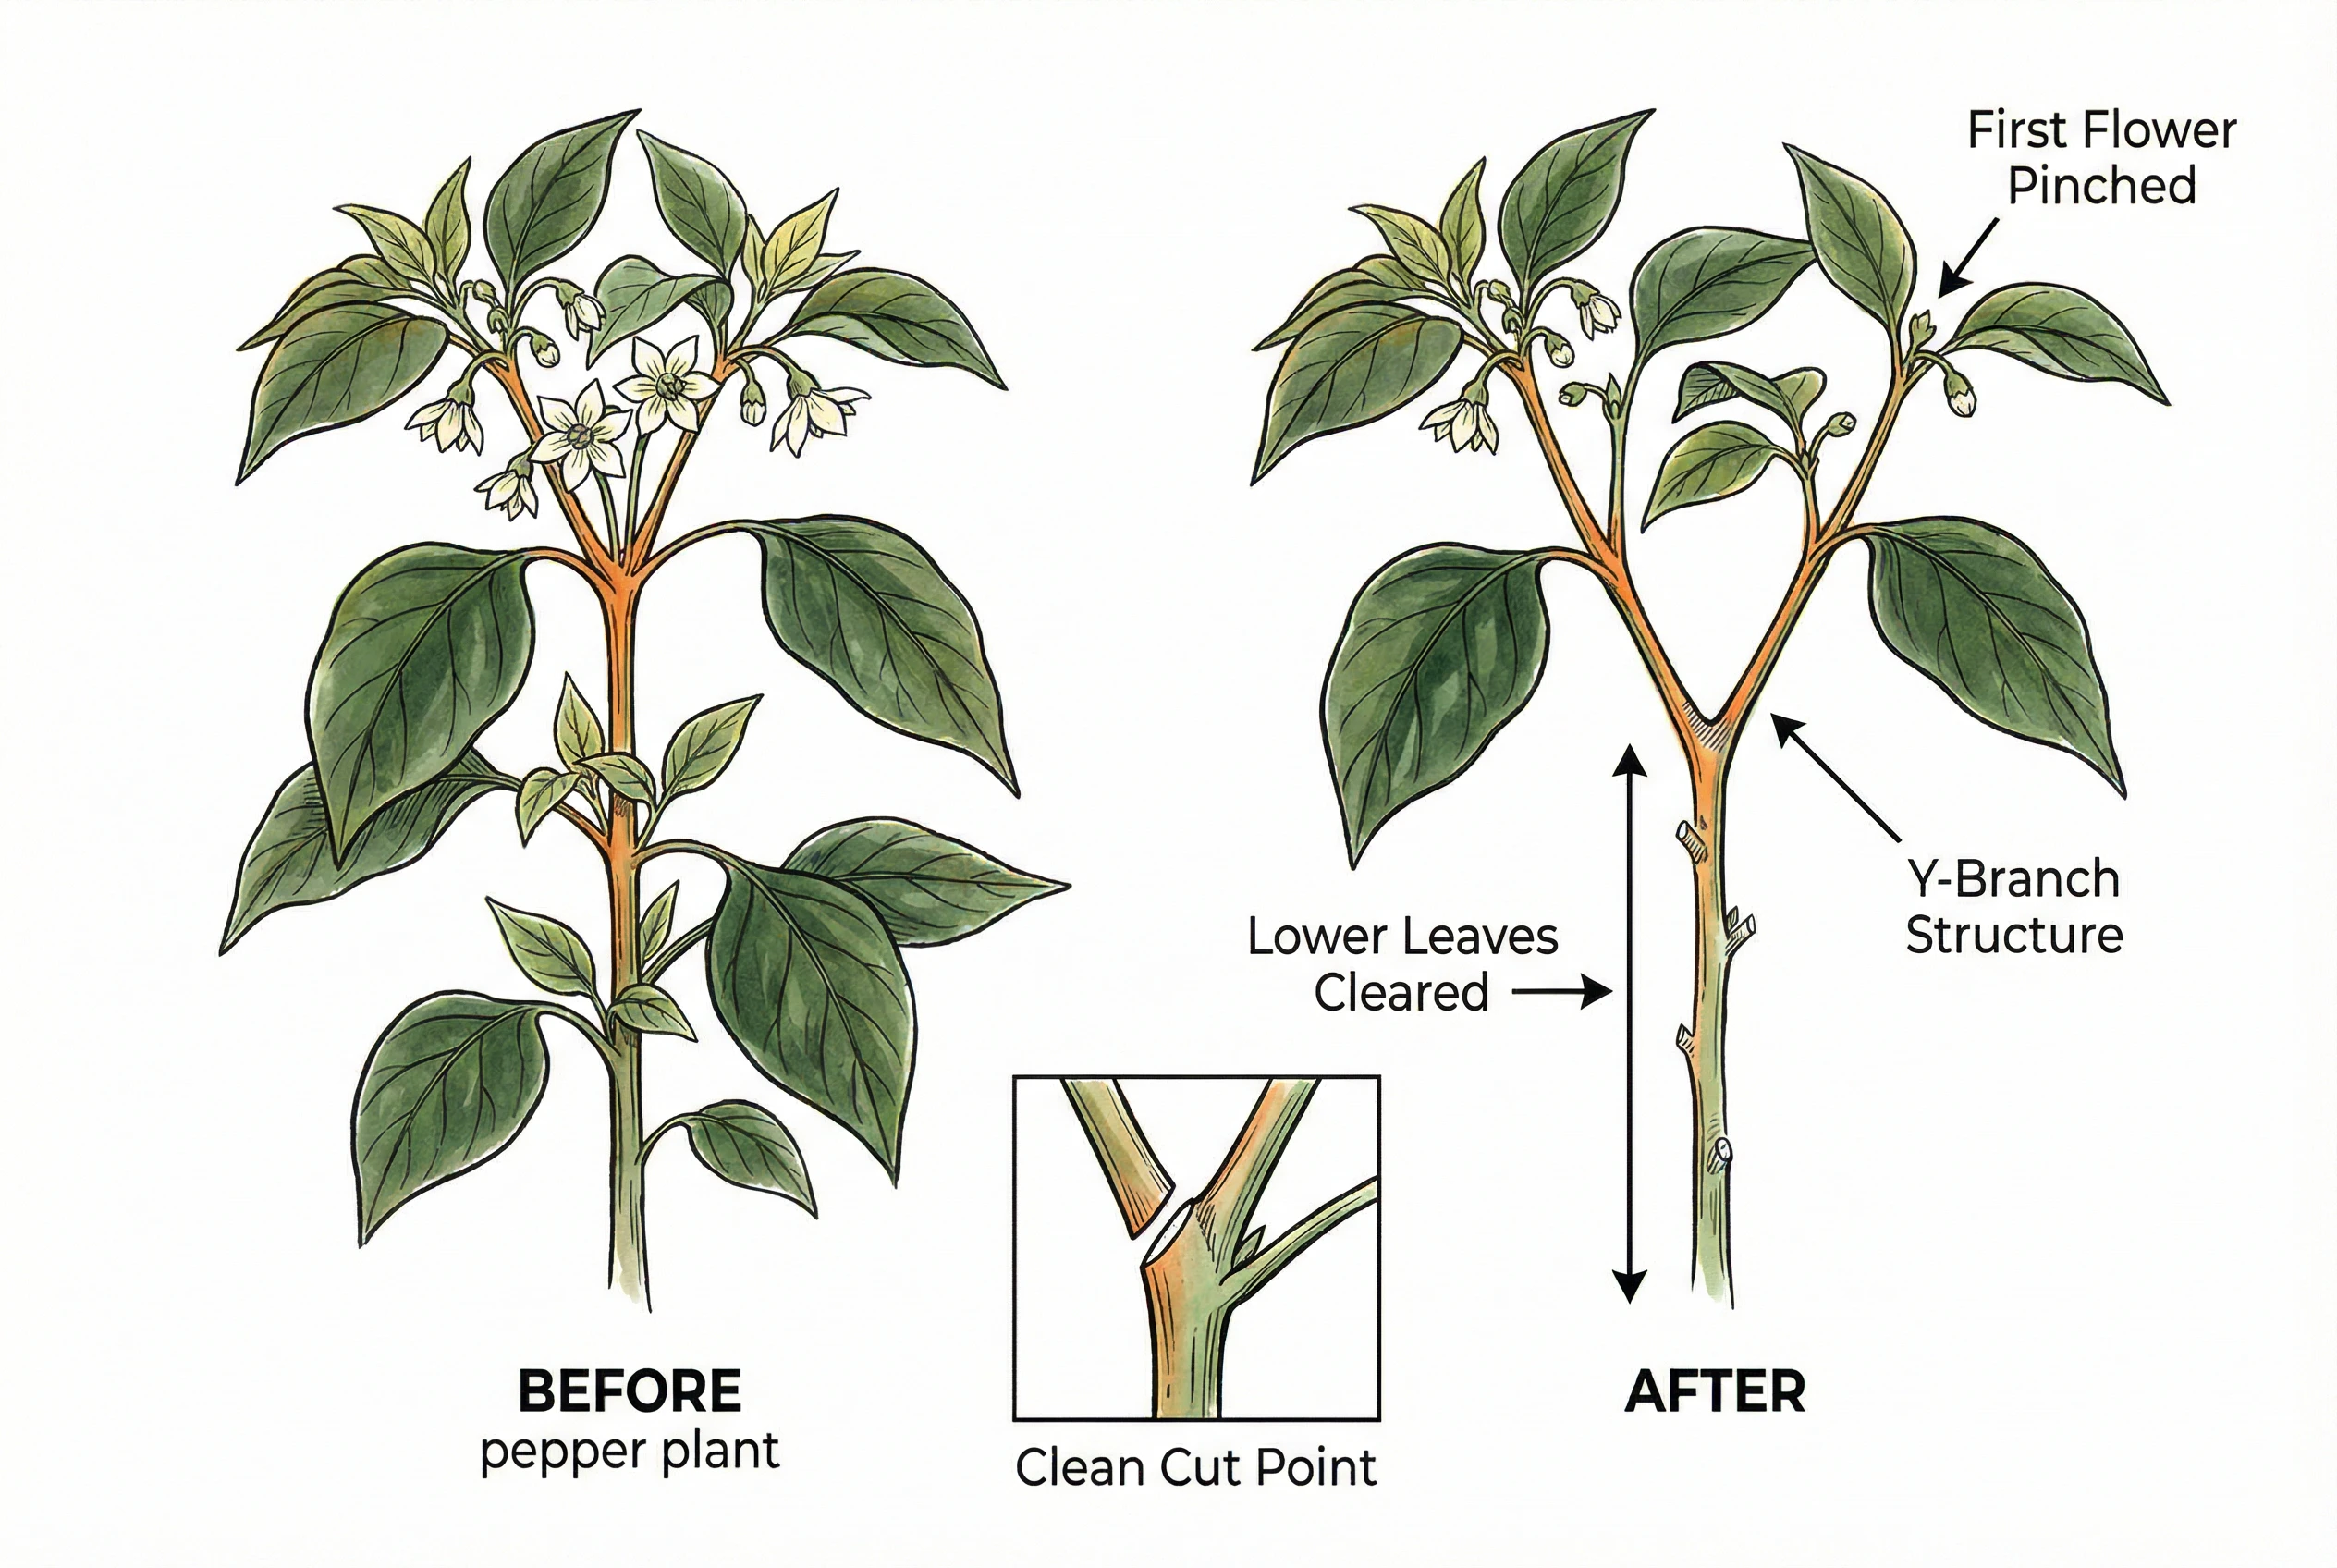
Some growers pinch off the first flowers that form at the main Y-branch to let a small transplant establish before it sets fruit.
This is optional, and it mainly helps very young plants rather than being essential.
Pinching the growing tip (topping) can encourage more branching, though whether it improves overall yield varies with the plant and conditions. Treat it as an experiment rather than a guaranteed gain.
Removing the lowest leaves that touch the soil, and keeping foliage off the ground, can reduce soil splash onto the plant.
How much you remove depends on the plant’s size and vigor. There’s no need to strip a fixed number of inches.
Training to a single stem with a few primary branches and removing suckers is used in some intensive greenhouse systems.
For garden-grown Habanada there isn’t clear evidence it maximizes production, so consider trying it on a few plants and comparing rather than adopting it as a rule.
Support and Mulch Options
- Hydrofarm Bamboo Stakes fit compact pepper plants that need support before fruit weighs down branches. Install them at transplanting and dry them before storage if you plan to reuse them.
- Grower's Solution mulch can warm spring soil, conserve moisture, and suppress weeds. Use it only when those benefits outweigh its installation, removal, and disposal work.
Preventing and Solving Common Problems
Diagnose before you spray
Watch for aphids, spider mites, pepper weevils, bacterial spot, and blossom end rot. Blossom end rot is a physiological disorder rather than an infection.
Learn the distinguishing signs and act early.
Aphid Control
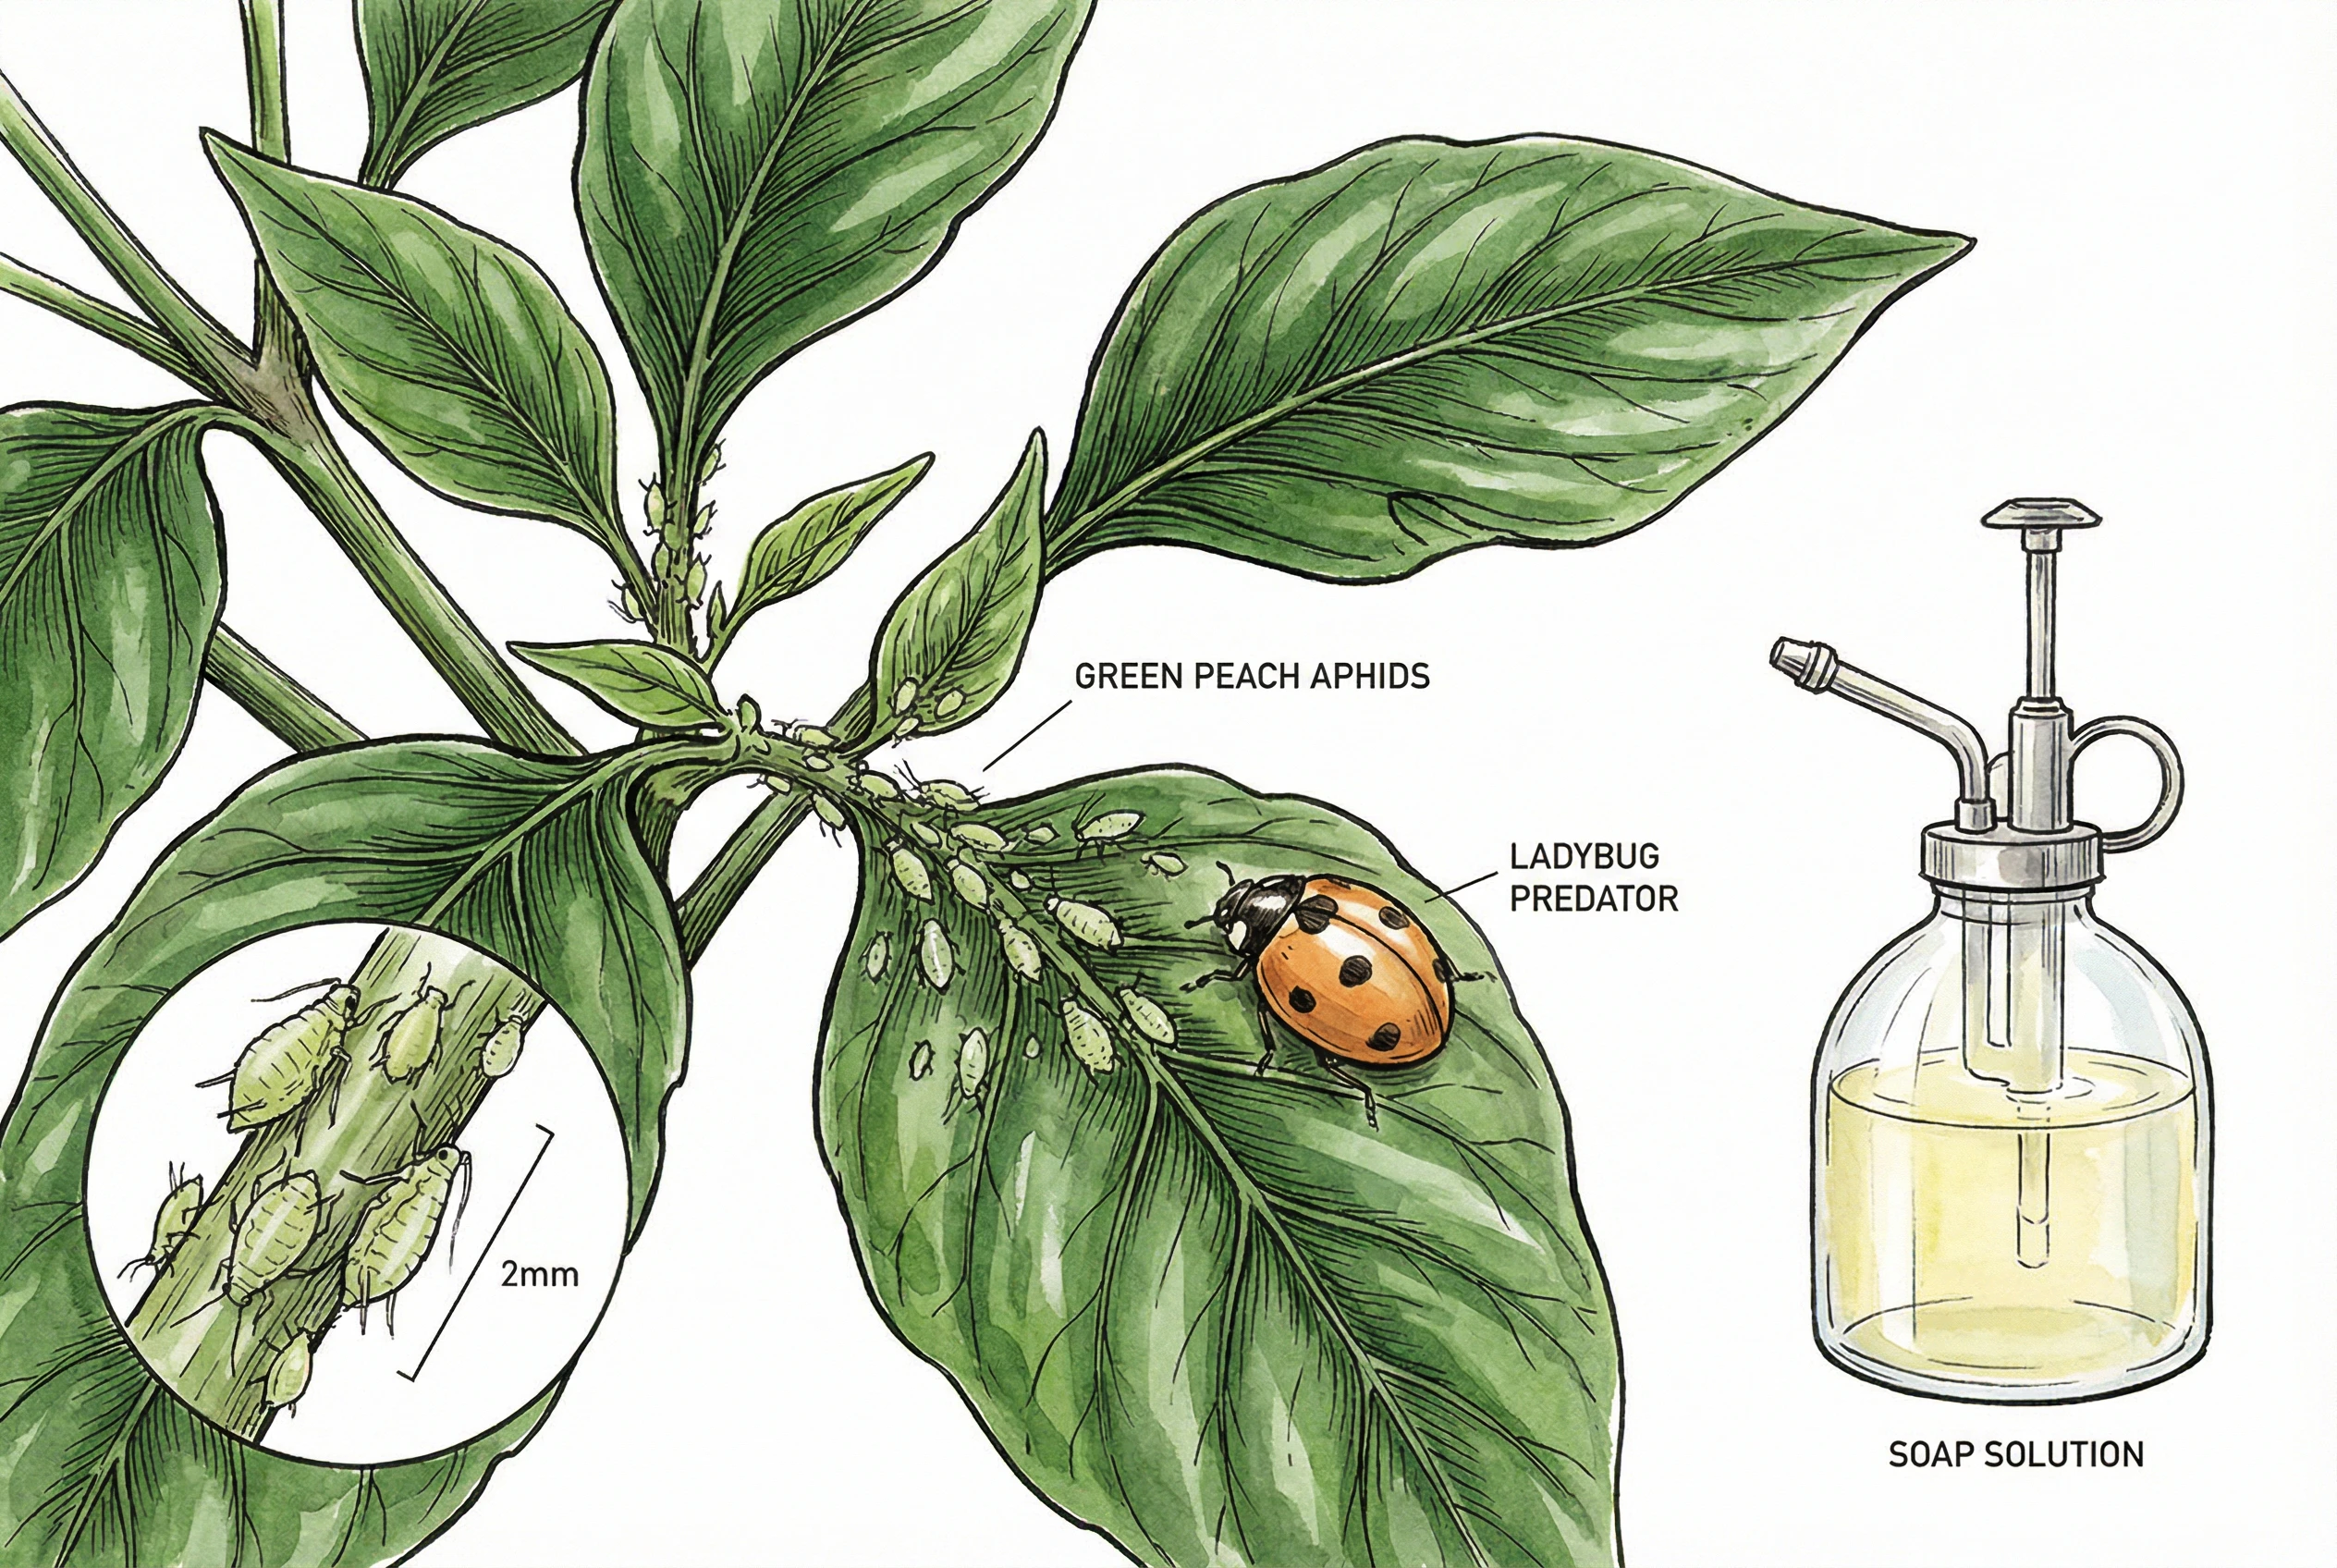
Green peach aphids appear as tiny (about 2mm) clusters on stems and leaf undersides. They suck sap, stunt growth, and secrete sticky honeydew, on which sooty mold can then grow.
Catching them early makes control much easier.
Check plants weekly, examining the undersides of new growth. At the first sign of aphids, a strong stream of water can dislodge them. Use a pressure the plant can tolerate and repeat as needed.
For established colonies, apply insecticidal soap, thoroughly coating all surfaces, following the product label for rate and timing rather than a fixed calendar, and reapply as the label and pest pressure indicate.
Avoid spraying in high heat to limit leaf burn.
Encourage natural predators. Ladybugs are effective aphid eaters. Flowering plants such as marigolds and dill can help attract beneficial insects, though results vary with the surrounding landscape.
Avoid over-fertilizing with nitrogen, which produces succulent growth that aphids love.
Spider Mite Management
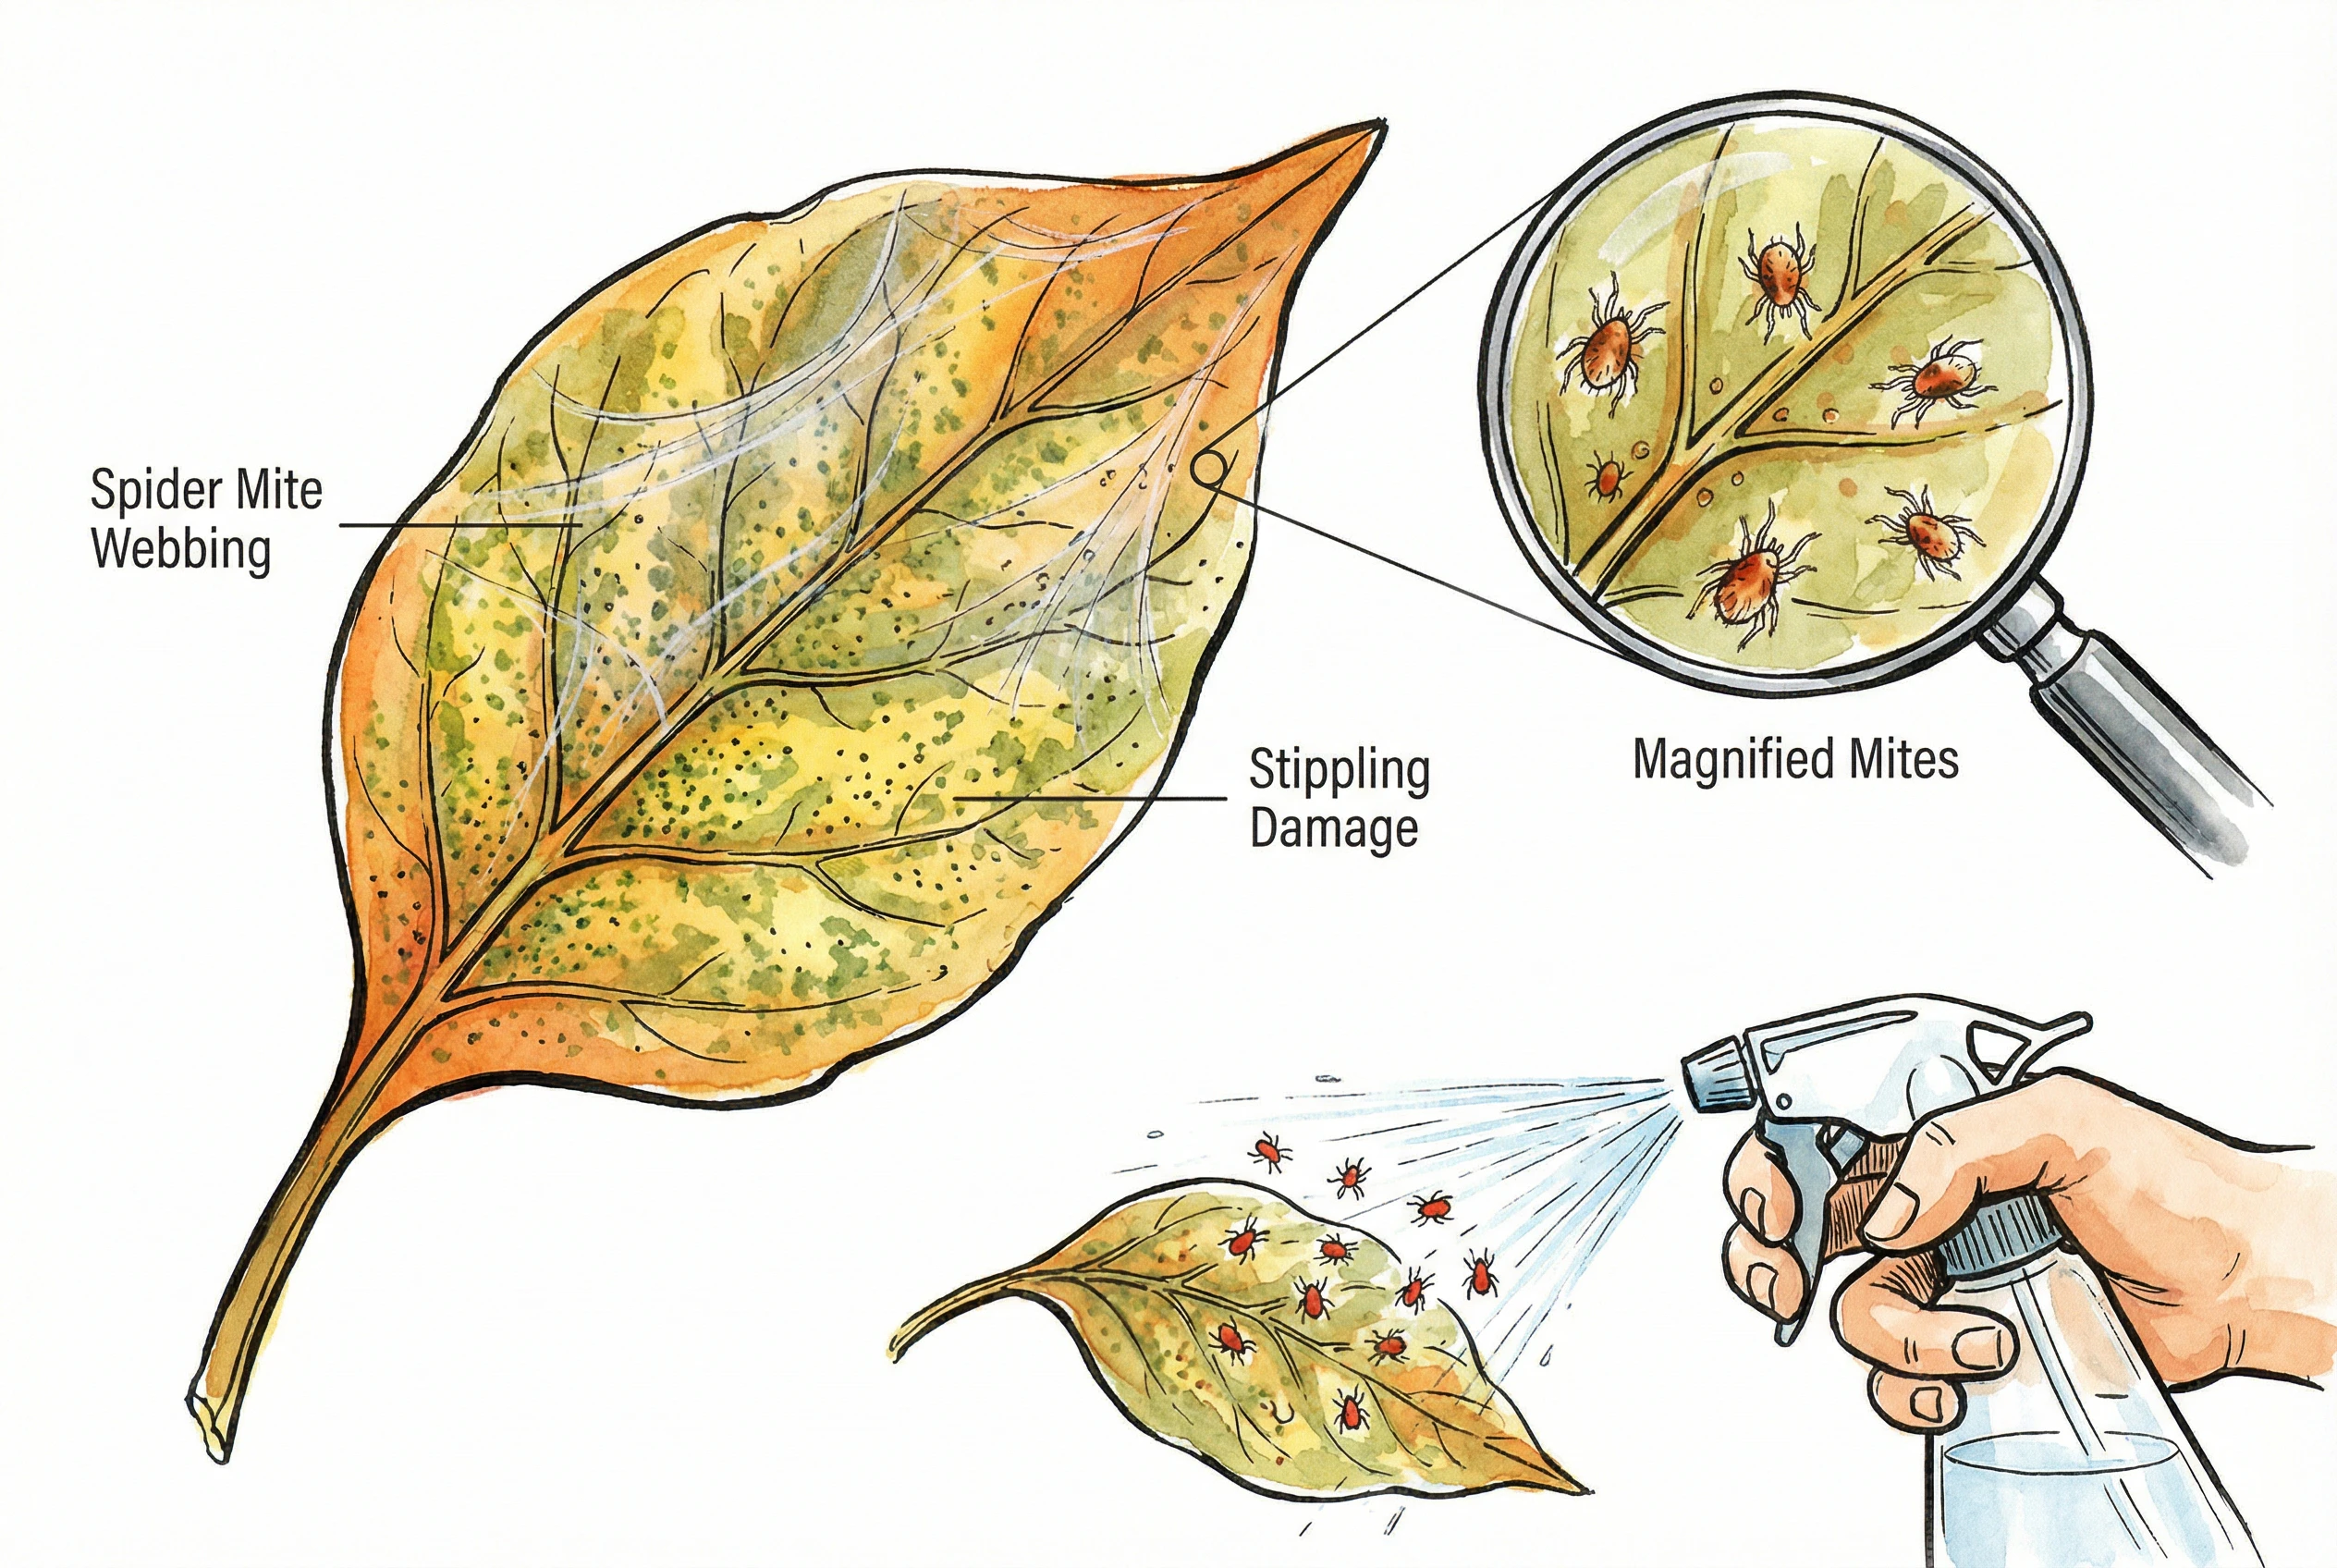
Spider mites are hard to see until populations build. Look for fine webbing on leaves and stems, yellow stippling on upper leaf surfaces, and a dusty look. A hand lens and underside checks help catch them early.
In severe cases, leaves curl and drop.
Spraying plants thoroughly with water, especially the leaf undersides, physically knocks mites off and disrupts them.
Repeated treatment with neem oil or insecticidal soap is often needed because eggs hatch over time. Follow the product label for interval and rate, and consider temperature and phytotoxicity before spraying.
Mites tend to thrive in hot, dry, dusty conditions. Rinsing foliage and reducing dust can help, but deliberately raising humidity outdoors can encourage fungal and bacterial diseases, so it’s not a reliable outdoor fix.
Predatory mites are an option in an enclosed setting, matched to the pest species and conditions.
Hornworm Detection and Removal
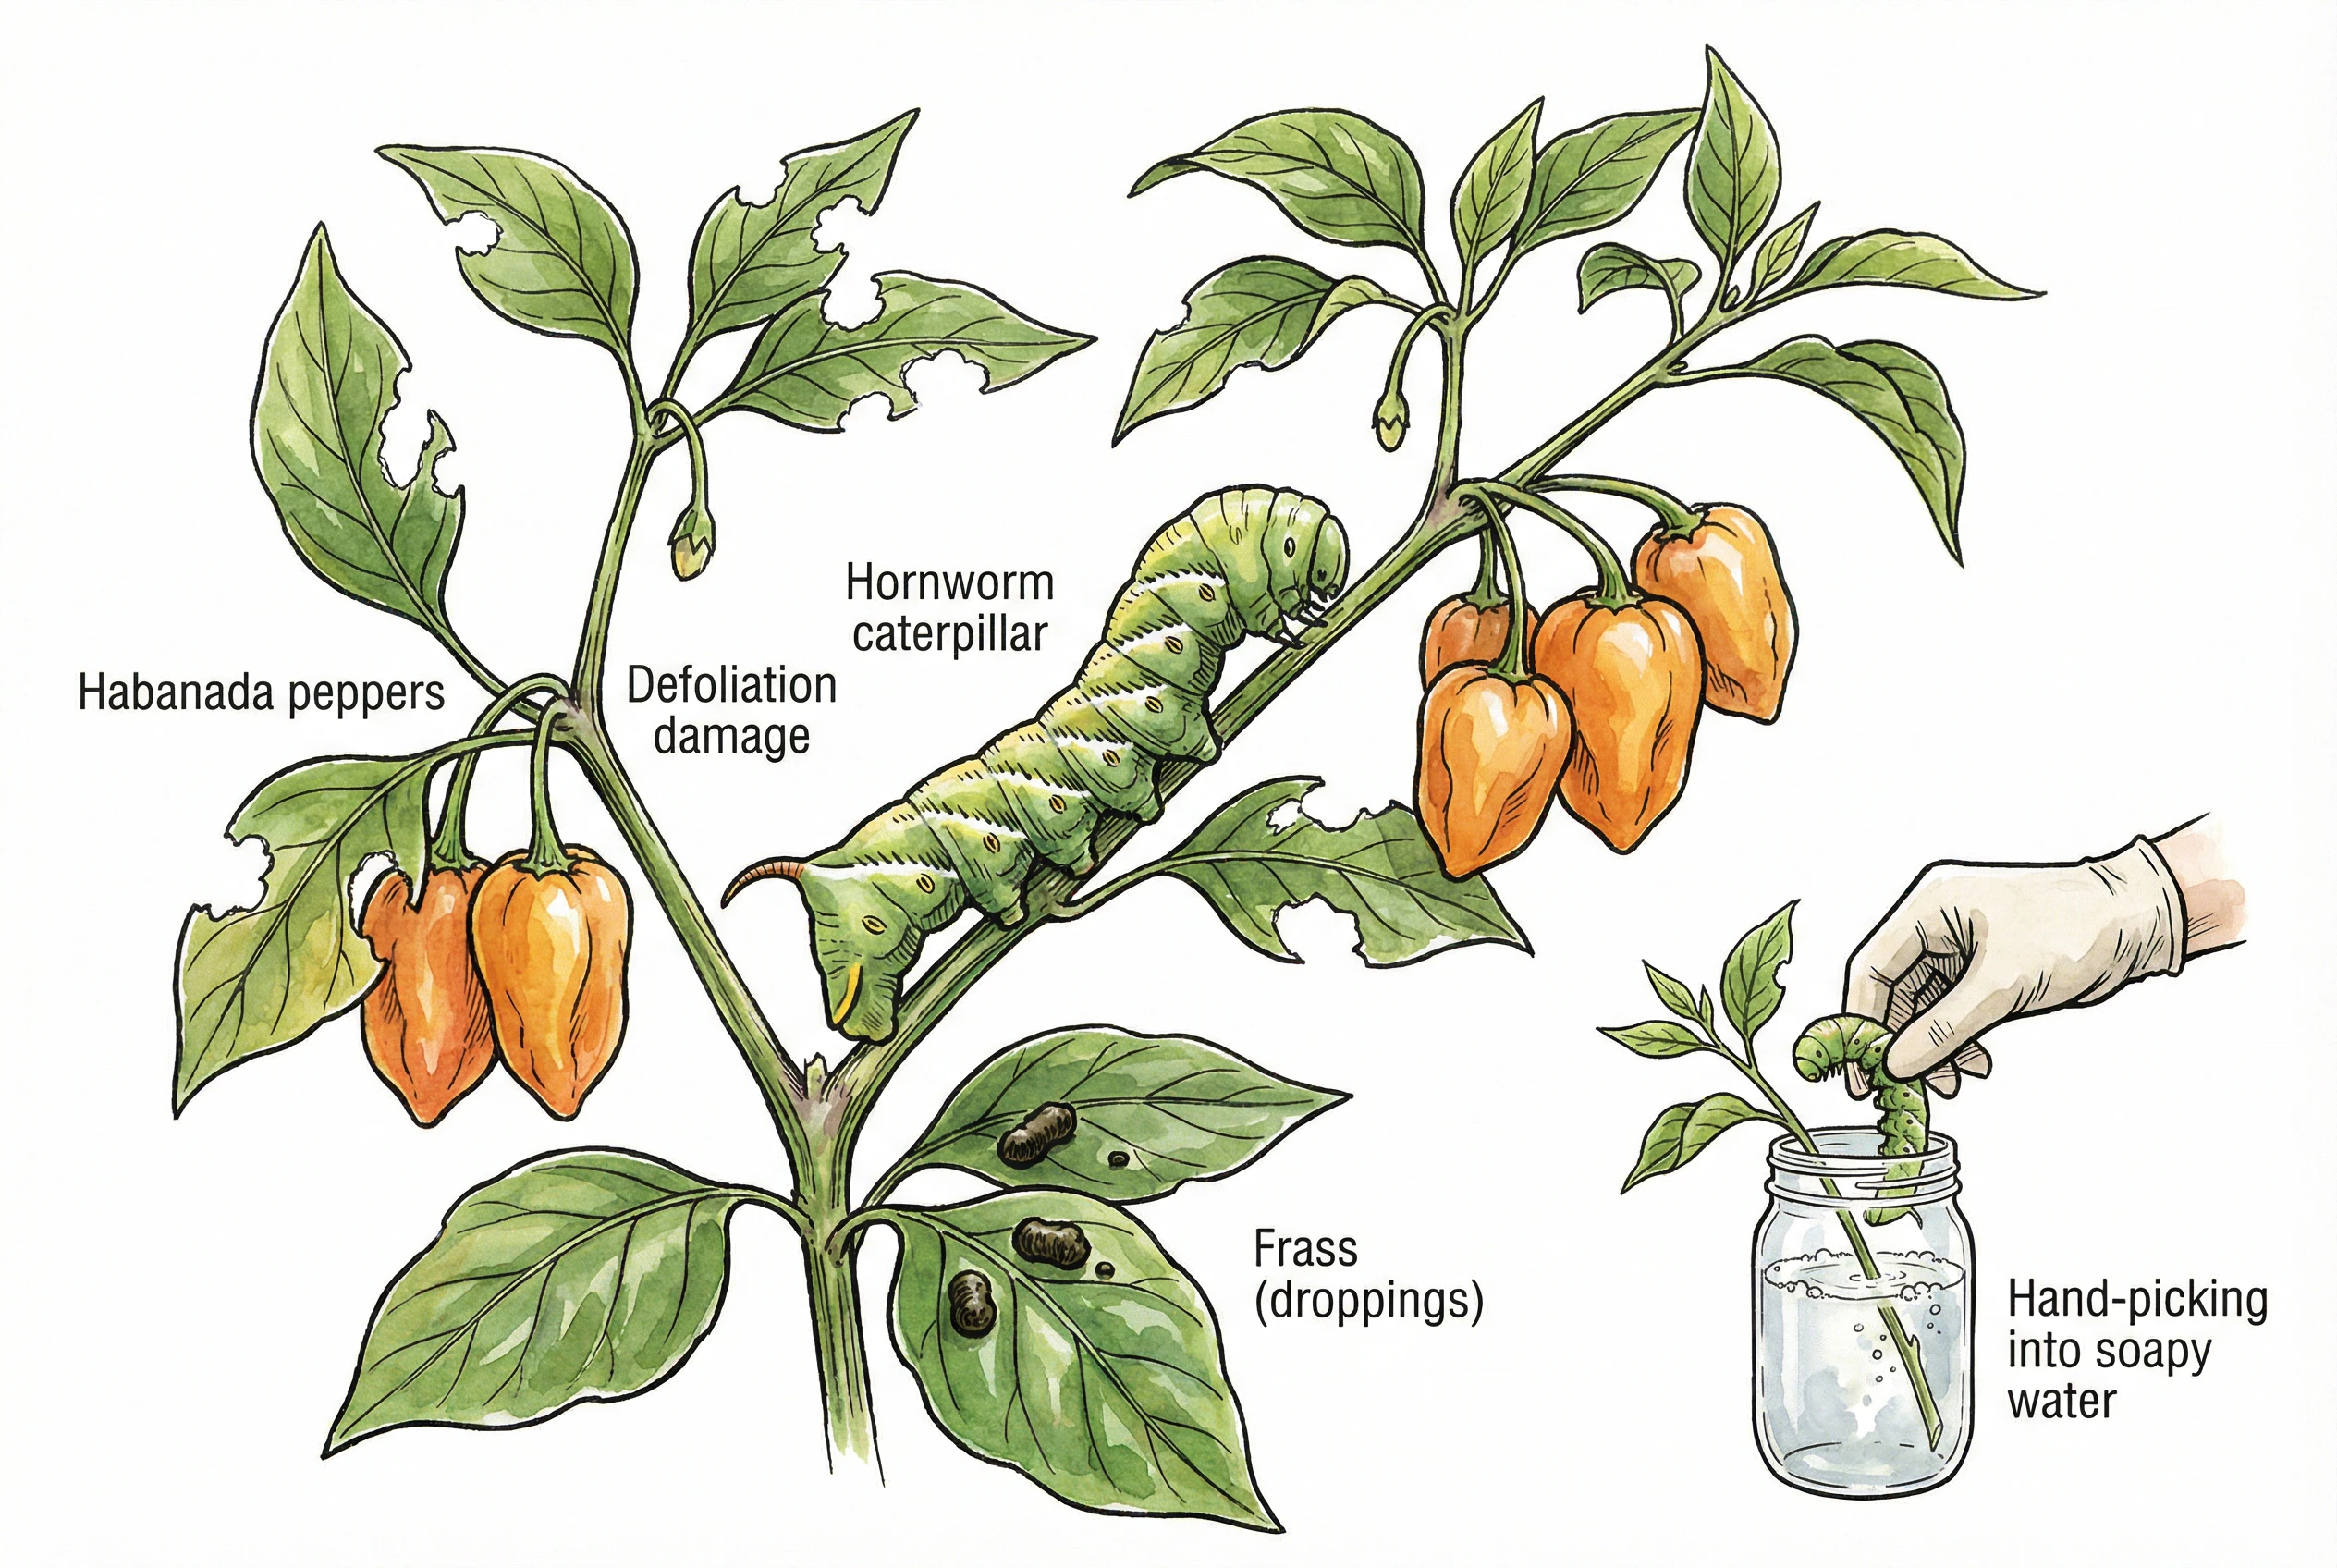
Hornworms blend into the foliage, but their damage is obvious. Look for missing sections of leaves and dark green droppings on the leaves below. These caterpillars can grow large and eat a lot in a few days.
Hand-picking works well in home gardens, especially with a careful morning inspection.
Drop hornworms into soapy water. If you see white rice-like structures on a hornworm’s back, those are parasitic wasp cocoons. Leaving that caterpillar in place lets the wasps emerge and help control future hornworms.
For heavier infestations, Bacillus thuringiensis subsp. Kurstaki (Btk) selectively targets caterpillars.
Follow the product label, while it’s considered low-risk to people and many beneficial insects, it can affect non-target butterfly and moth larvae, so use it only where caterpillars are the problem.
Bacterial Spot Prevention
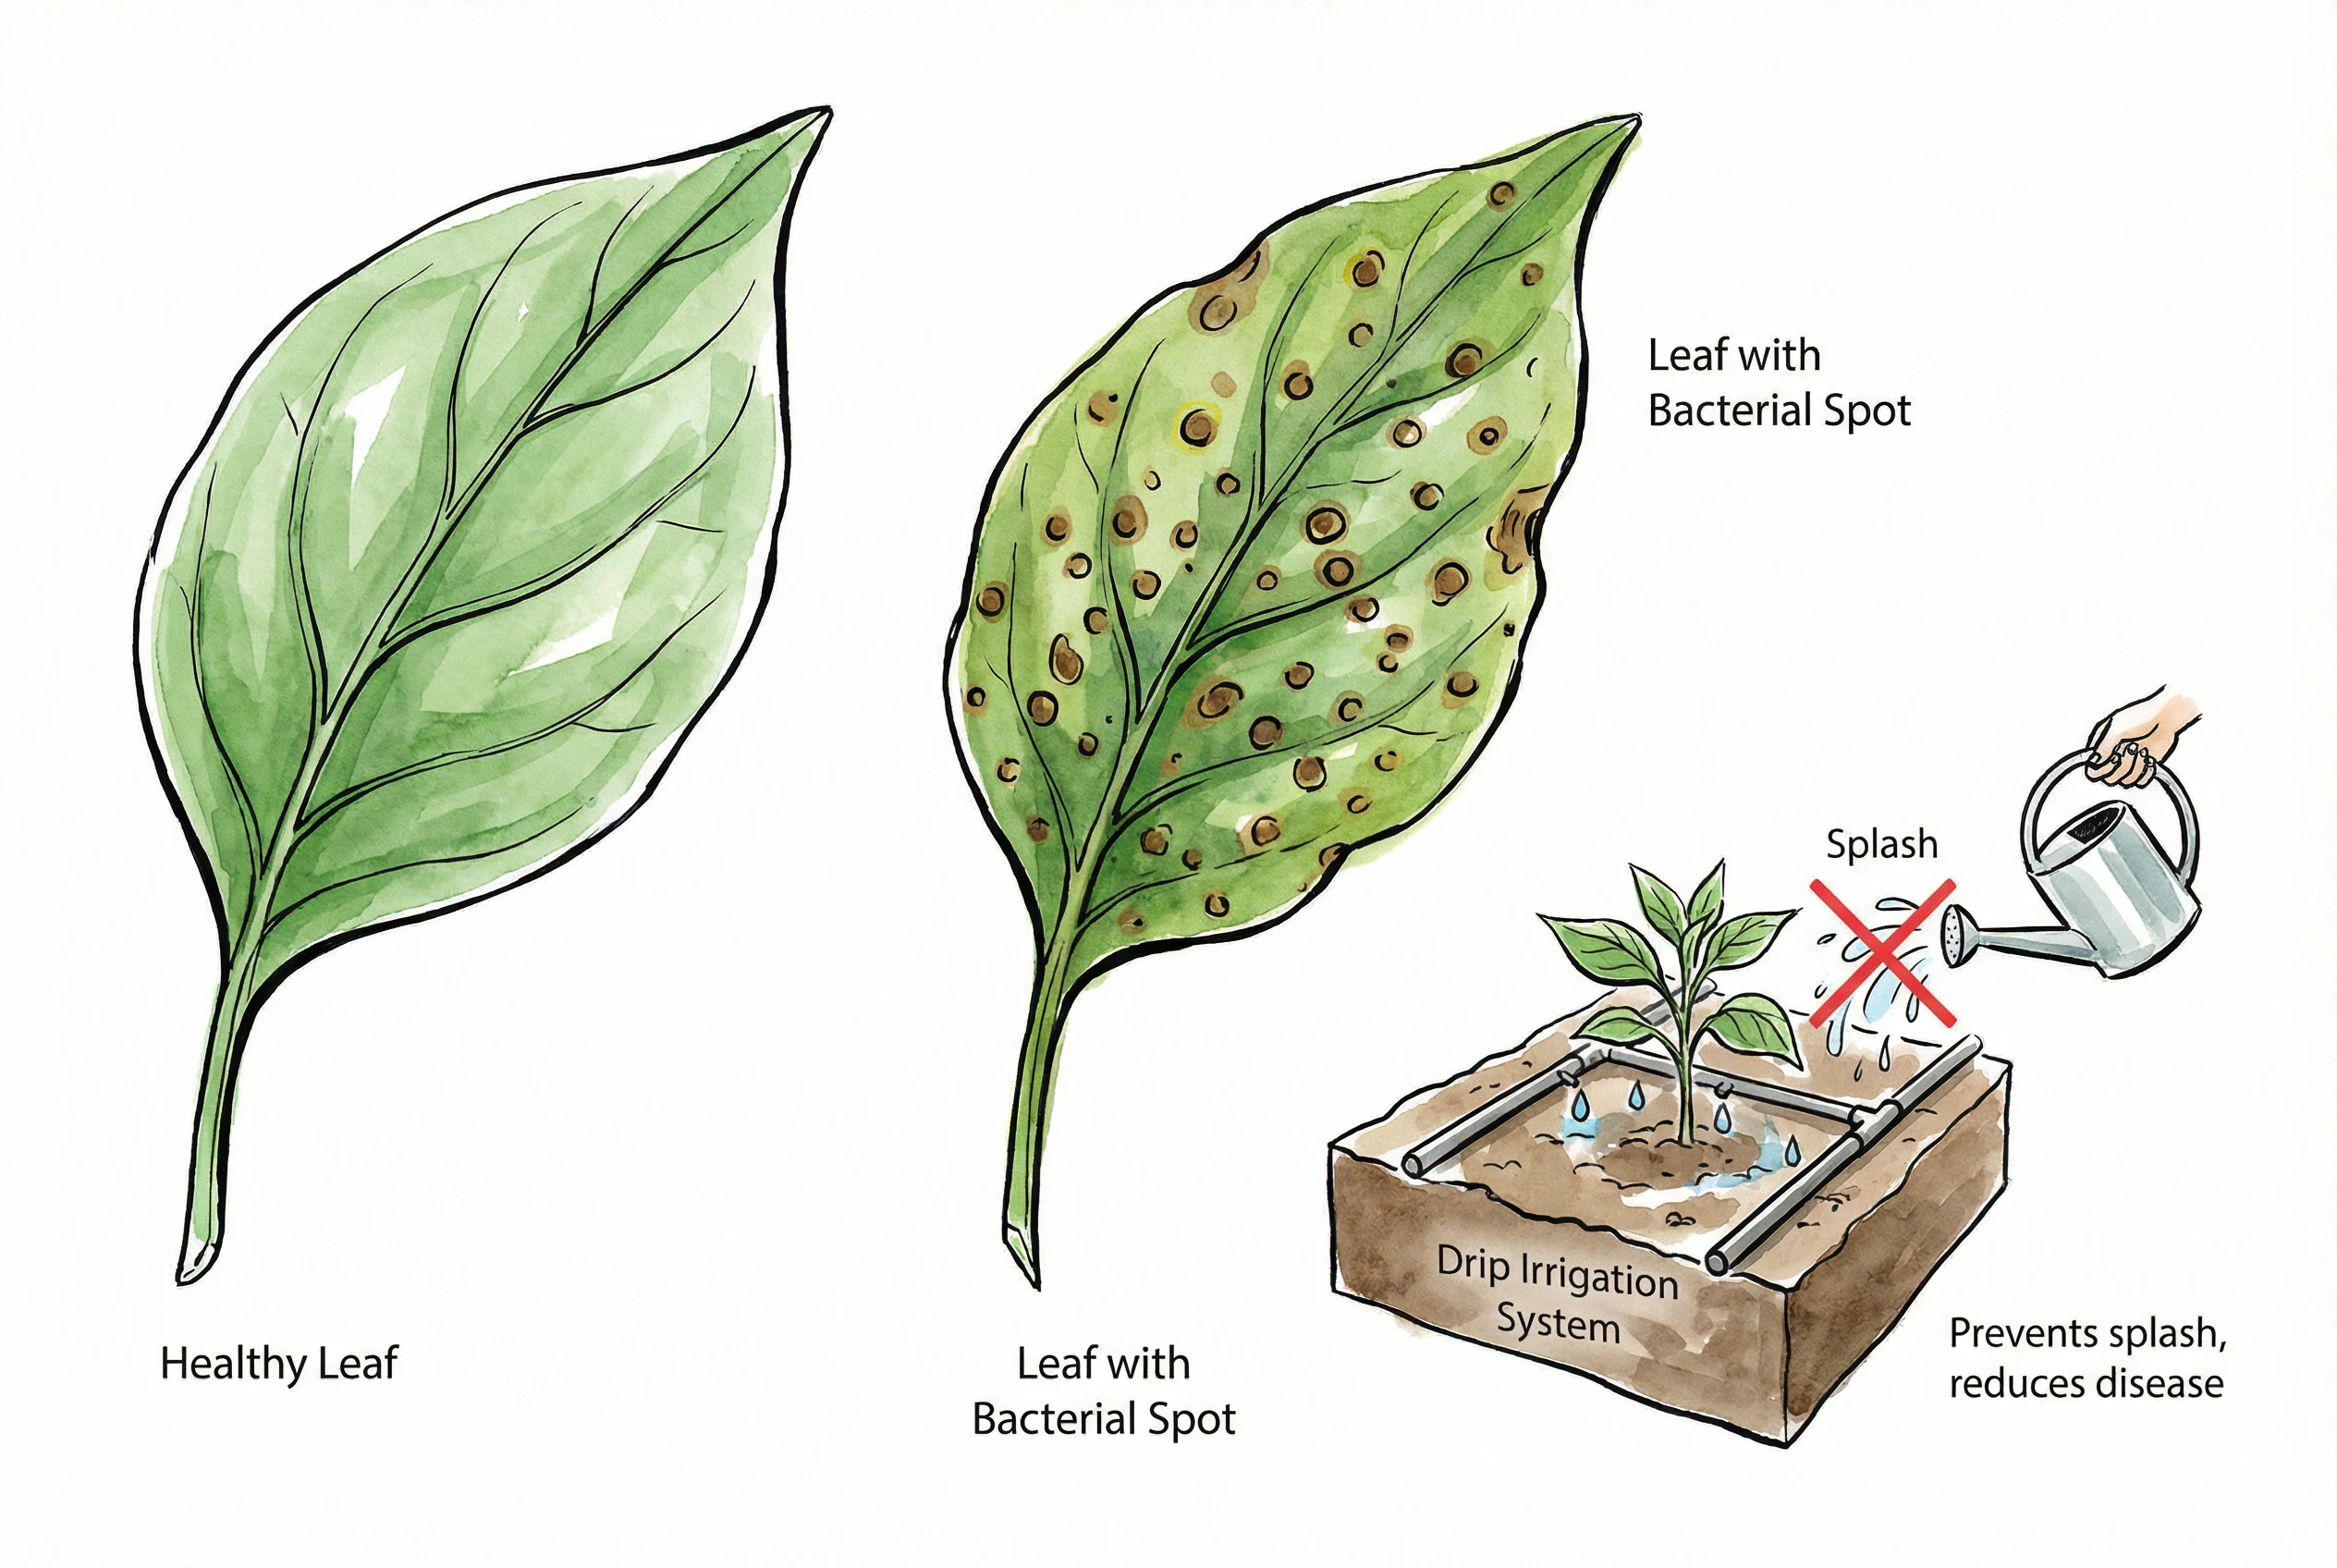
Bacterial spot can be a damaging pepper disease and is common in warm, humid regions. Small brown spots appear on the leaves, sometimes without an obvious yellow halo.
It spreads through water splash and contaminated tools.
Prevention is the priority, since there is no simple cure once plants are infected. Start with resistant or clean, disease-free seed and transplants from reputable sources.
Hot-water seed treatment (about 30 minutes at 125°F / 51°C) can reduce seed-borne bacteria, but it must follow a proper protocol from a source such as Ohio State or Penn State. Preheat, hold the temperature precisely, then cool and dry the seed.
Too much heat kills the seed, and treated, primed, or old seed should generally be excluded, so for most home growers, starting with reputable disease-free seed is the simpler choice.
Favor drip irrigation or soaker hoses over overhead watering to keep foliage drier where you can control it.
Avoid working among plants while they’re wet, and rotate away from related nightshades (tomatoes, potatoes, eggplant) on a roughly 3-4 year cycle if you’ve had disease.
If bacterial spot appears, remove affected leaves and dispose of them rather than composting, following local disposal guidance.
Blossom End Rot Solutions
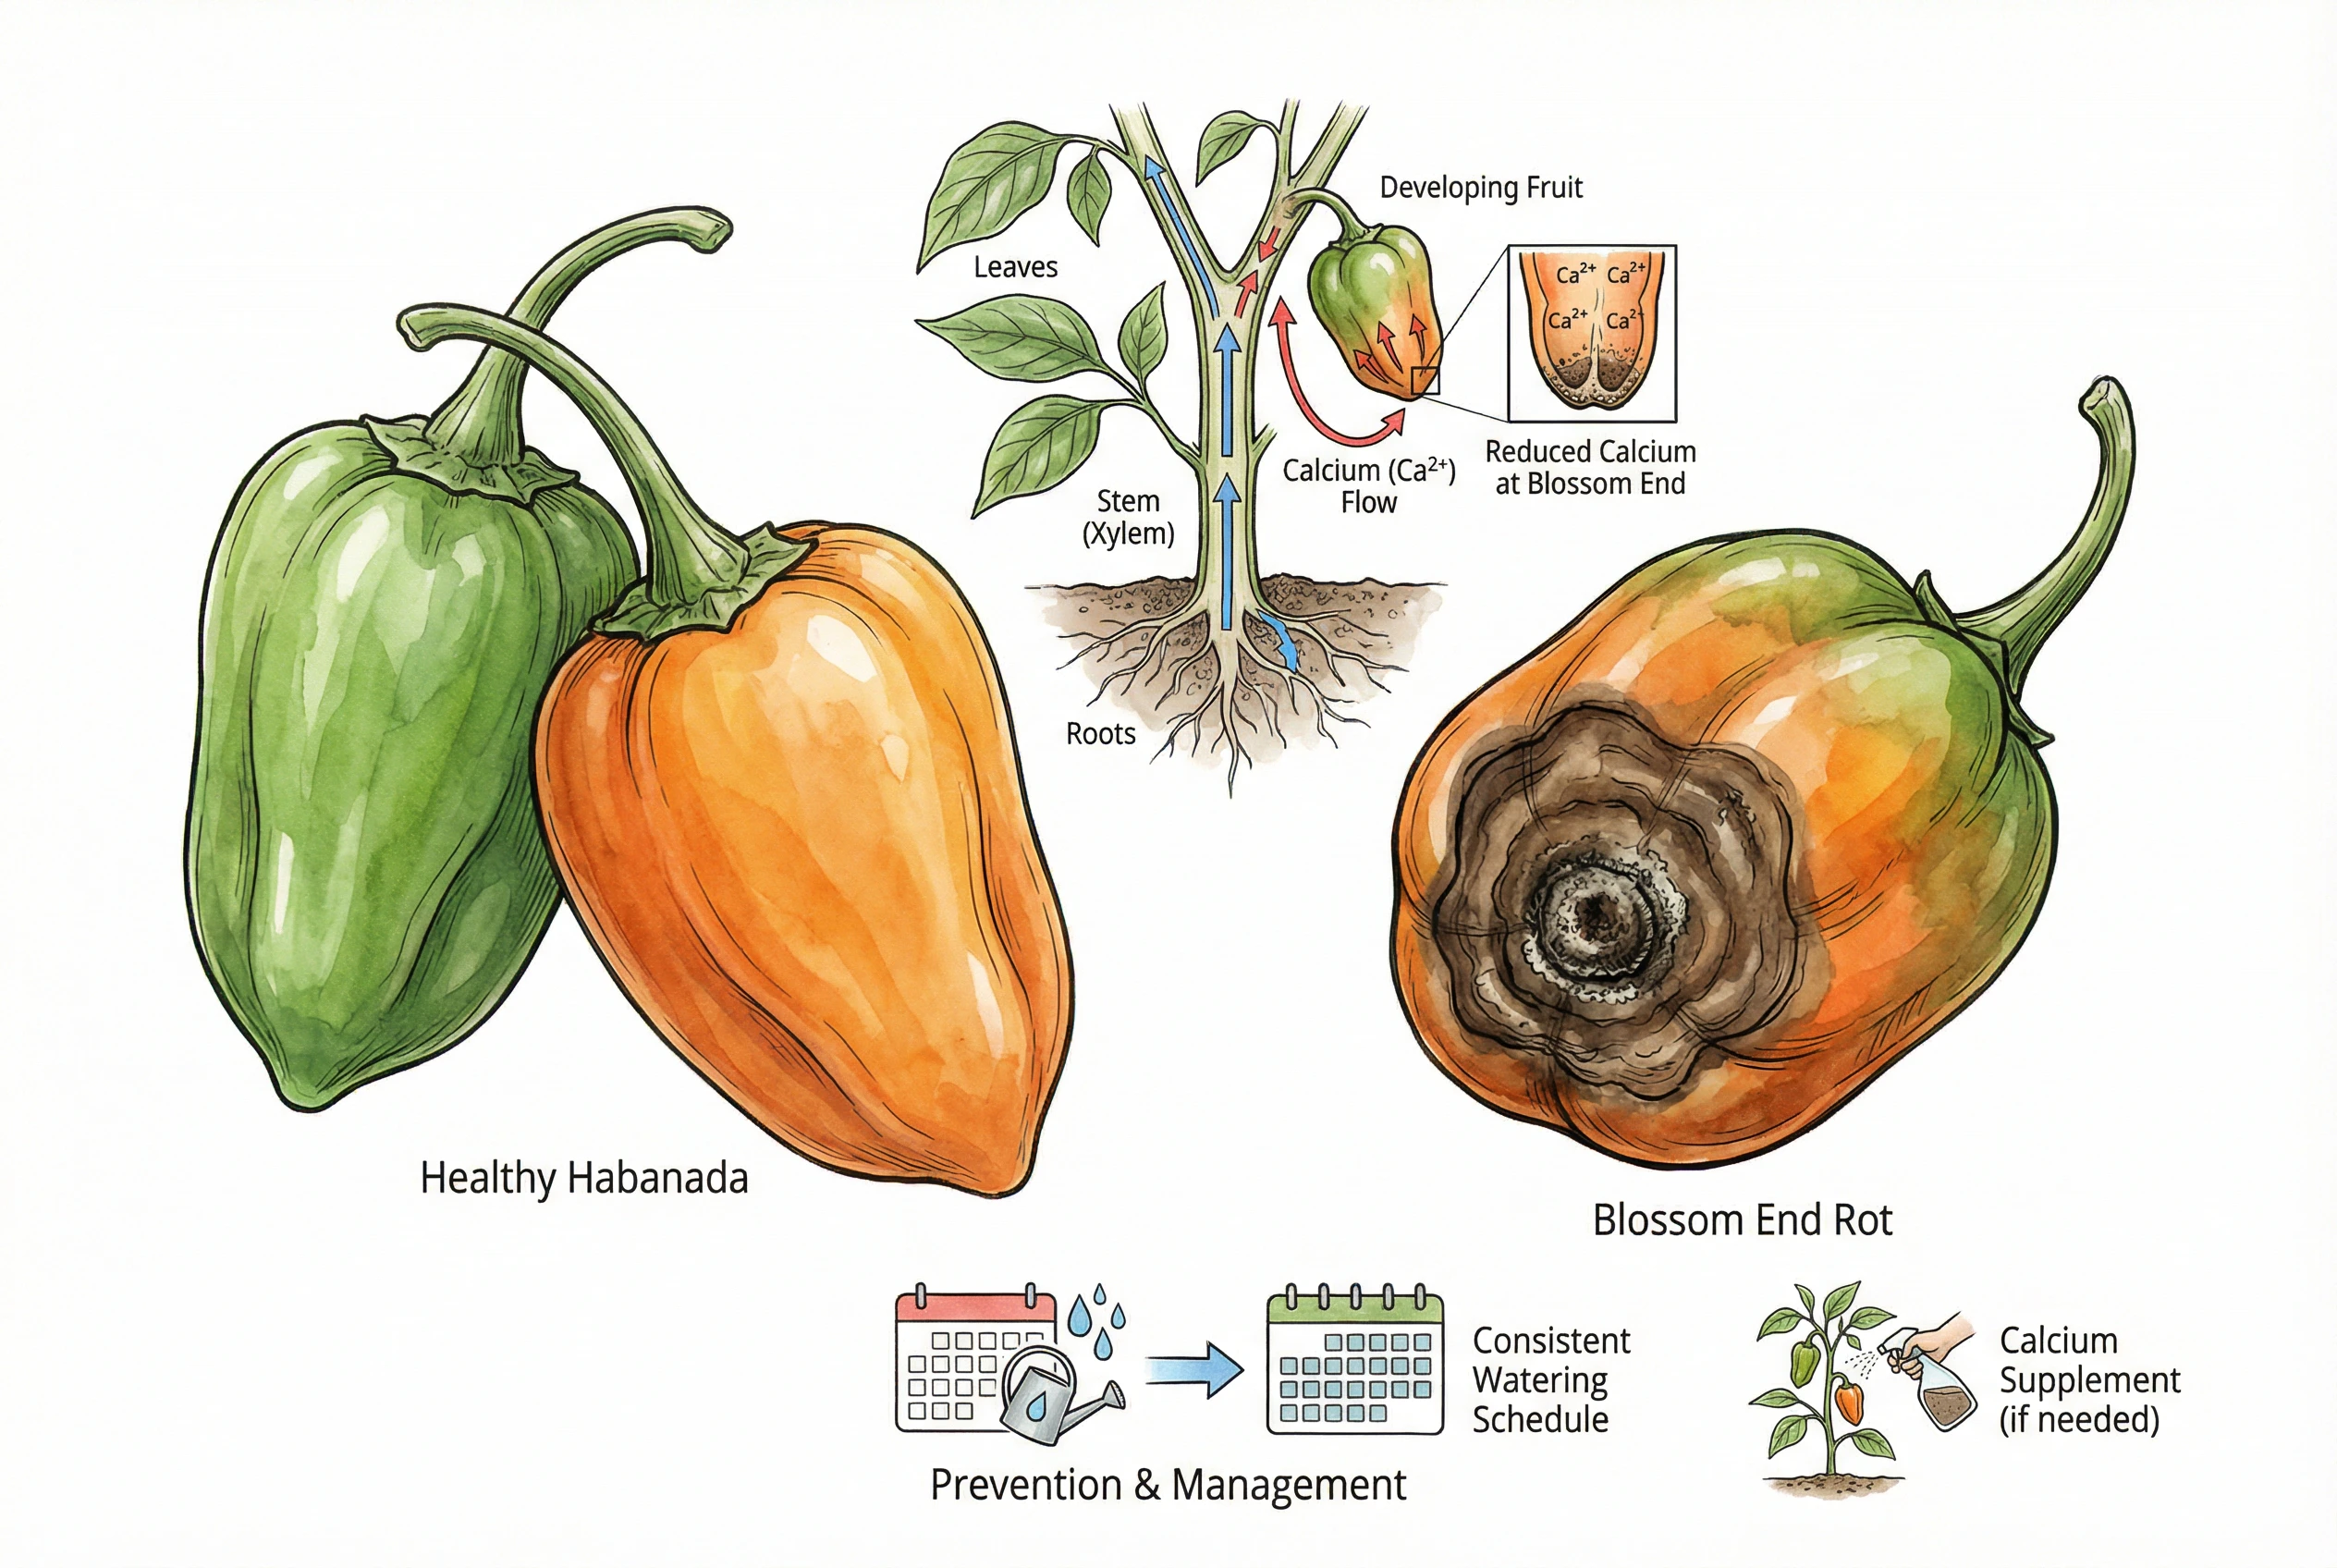
Blossom end rot isn’t an infectious disease. It’s a calcium deficiency in the tissue of expanding fruits.
Light green or yellow sunken spots appear on the fruit bottoms and can expand into darker, collapsed areas, which may then be colonized by secondary rots.
Soils usually contain enough calcium. The problem more often comes from uneven watering, root damage, salinity, or very rapid growth that limits calcium reaching the fruit.
Aim for even soil moisture (roughly 1-2 inches per week), use drip irrigation for consistency, and mulch to buffer fluctuations, adjusting the amount to your soil temperature, rainfall, and drainage.
A soil test can flag pH or nutrient issues. Calcium is generally more available in the mildly acidic to near-neutral range rather than at a single pH value.
Avoid heavy nitrogen after flowering, which can push growth faster than calcium moves into the fruit.
Affected fruits won’t recover and can be removed. Improving watering consistency usually reduces the problem on later fruit, though it isn’t a guarantee that every new fruit will be unaffected.
Use a Treatment That Matches the Pest
- Safer Brand Insect Killing Soap suits confirmed soft-bodied pests such as aphids and spider mites. It is a ready-to-use contact treatment, so coat the pest and follow the current label for repeat use and harvest timing.
- Garden Safe neem oil is a concentrate for gardeners who will mix it exactly as labelled. Check crop, pest, temperature, and harvest directions before treating, and test a small area first for leaf injury.
- Monterey B.t. Concentrate is for listed caterpillars such as hornworms, not for aphids or mites. Follow its label for timing, repeat use, and protective measures. It can affect non-target butterfly and moth larvae.
Bacterial Spot of Tomato and Pepper. University of Minnesota Extension
Blossom-End Rot in Bell Pepper. Causes and Prevention. University of Florida IFAS
Companion Planting for Natural Pest Control
Interplanting a diversity of flowering plants can support beneficial insects, which may help with pest pressure.
The strong repel and prevent claims in many companion-planting charts have limited controlled-trial support, so treat the pairings below as habitat planting rather than guaranteed pest control.
Best Companion Plants
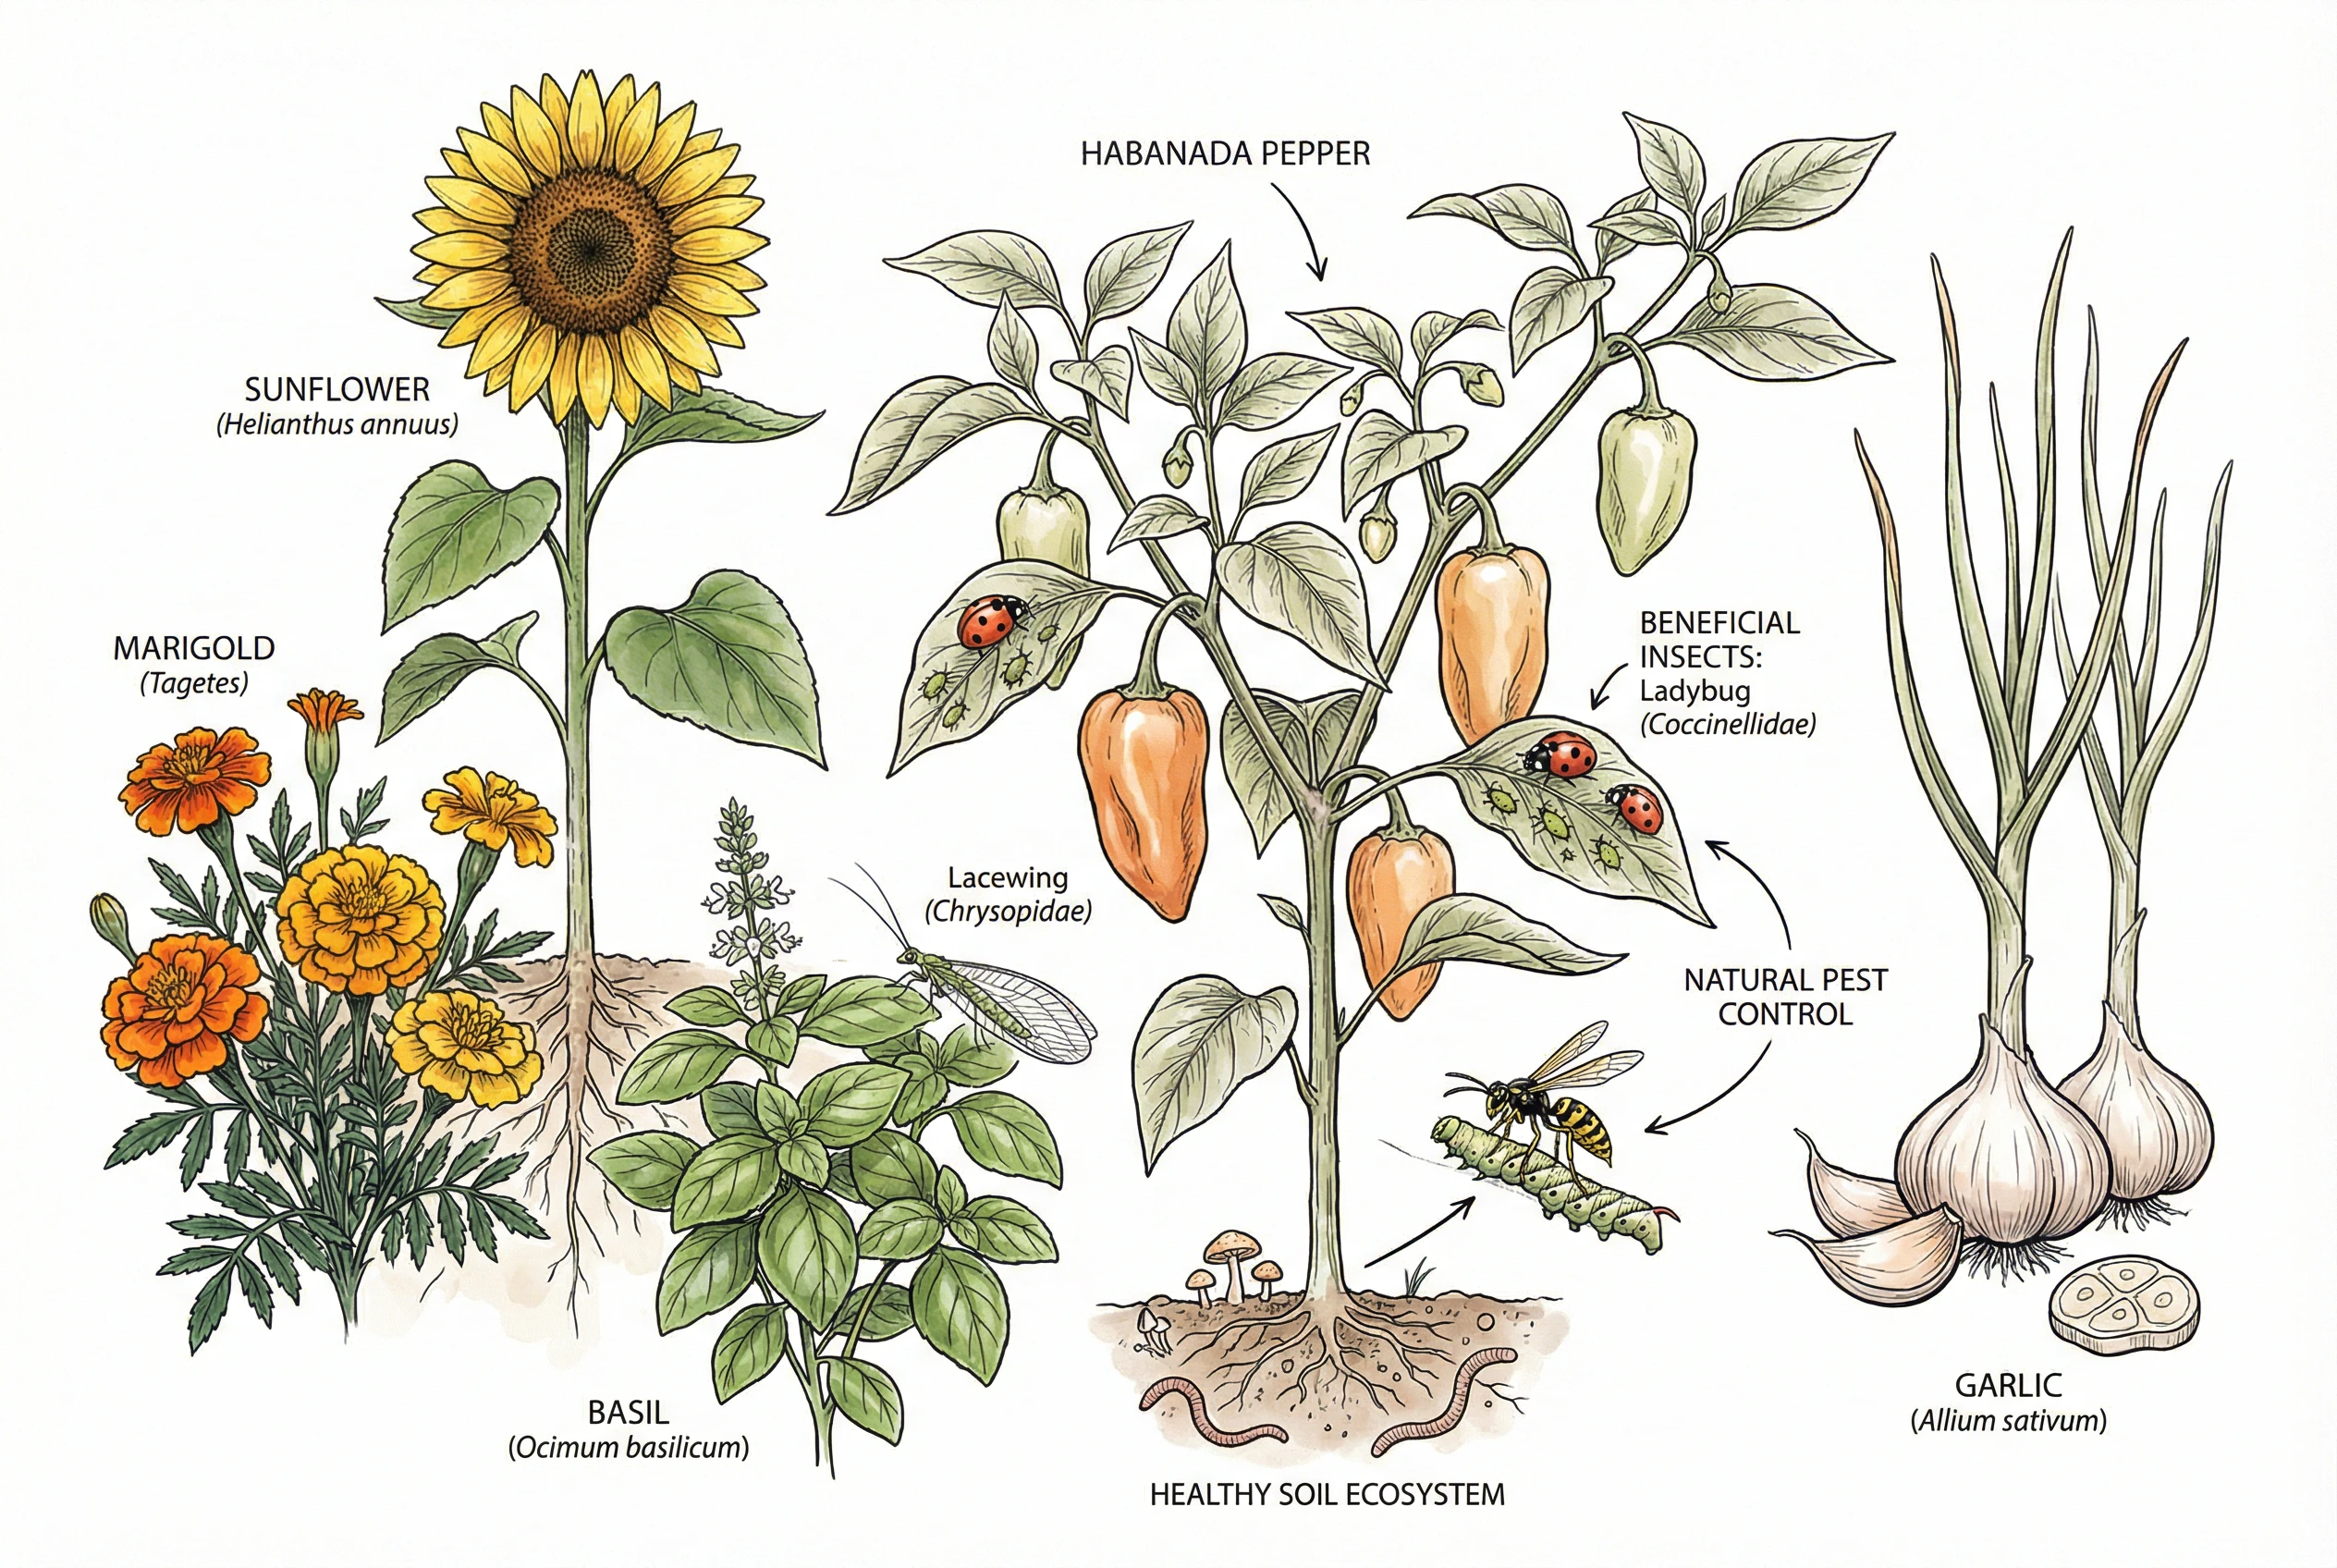
Alliums (garlic, onions, chives, leeks) have strong scents that are often said to discourage aphids. The evidence for reliably repelling pepper pests is limited.
They’re easy to tuck between rows or around bed edges.
Marigolds are commonly planted around beds and can attract some beneficial insects. Claims that they deter hornworm moths or control multiple pests on their own are not well established.
Basil is sometimes credited with reducing whiteflies and makes a good border plant. Sunflowers provide nectar and pollen, and some produce extra-floral nectar that supports beneficial insects.
Outcomes depend on the predators present, flowering, and the surrounding landscape.
Plants to Avoid
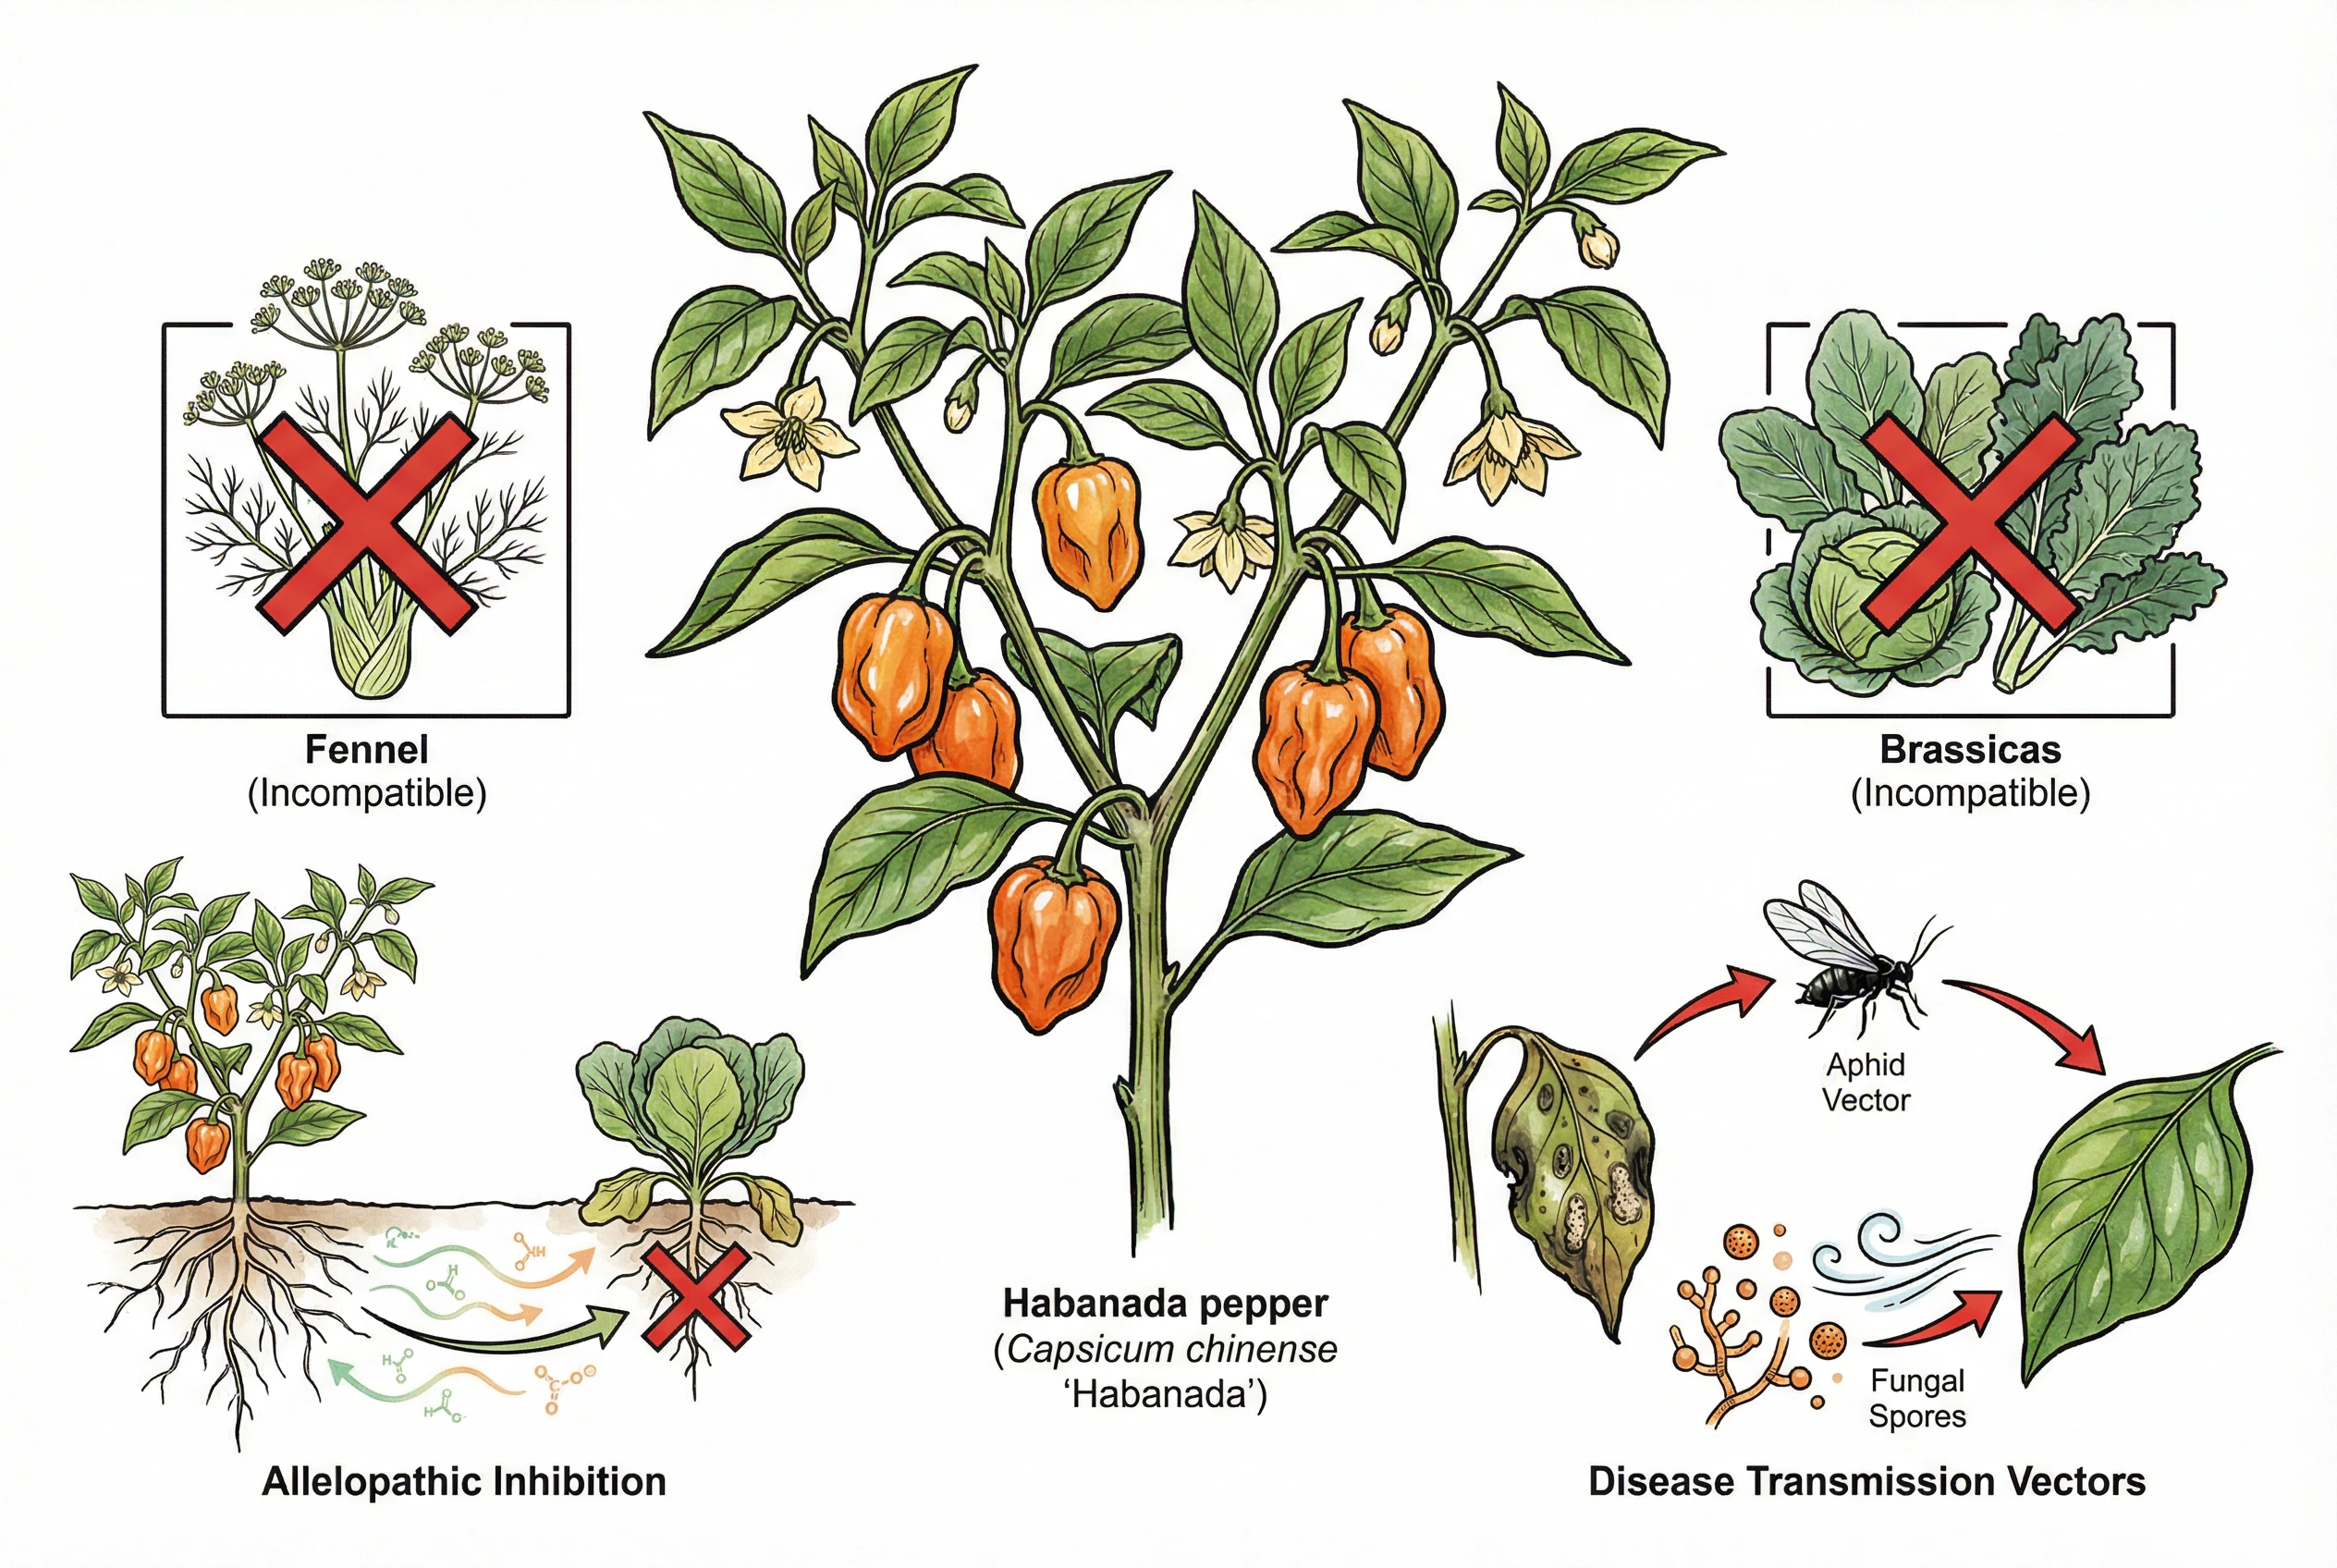
Fennel is often listed as a plant to keep away from many vegetables because of possible allelopathic effects, though garden-scale evidence that one or two plants noticeably harm nearby peppers is thin.
If you’re unsure, it’s easy enough to give it its own spot. There’s no strong reason peppers and brassicas (cabbage, broccoli) can’t coexist. Simply attracting different pests isn’t a reason to separate them.
The clearer concern with other nightshades (tomatoes, potatoes, eggplant) is shared diseases.
This is mainly a crop-rotation issue based on your site’s disease history, rather than a rule that adjacent planting always spreads disease.
If bacterial spot or early blight have been a problem, rotate accordingly.
Harvesting Habanada Peppers
Use color as the harvest signal
Harvest timing makes a real difference to flavor. Fully colored fruit tastes more complex than under-ripe fruit. Color is your main guide.
Recognizing Harvest Readiness
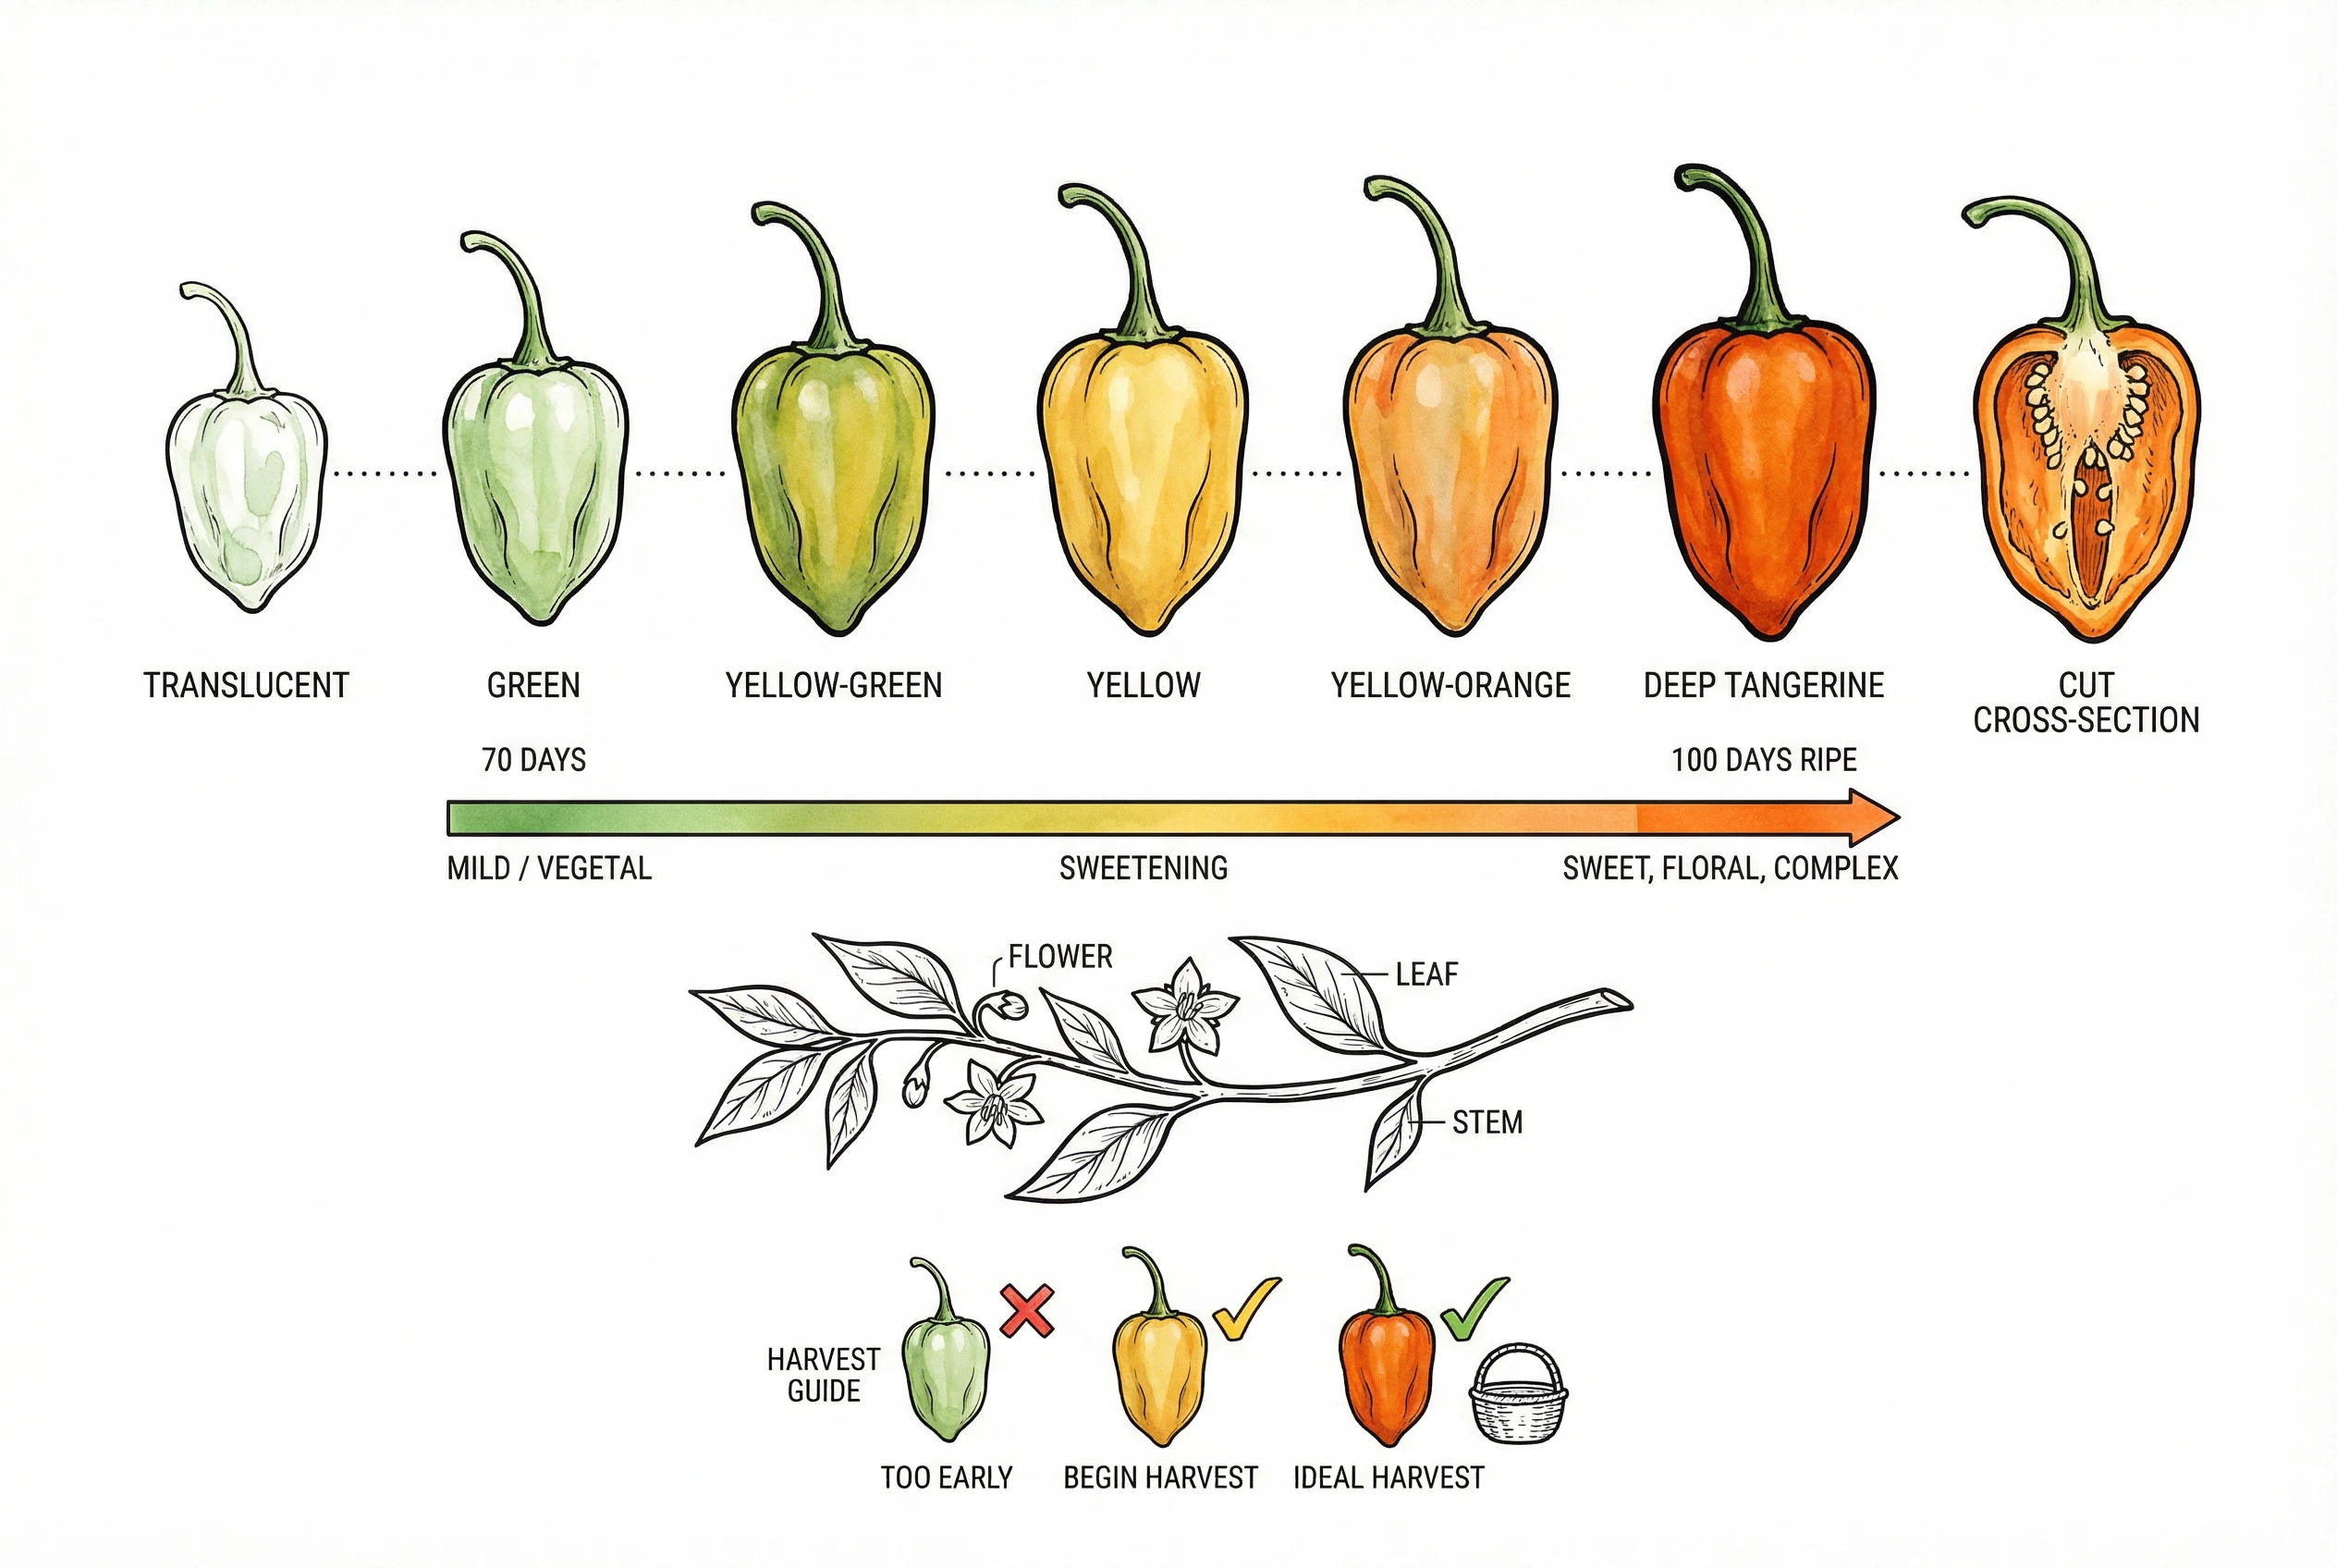
Habanadas transition through distinct color stages. Nearly translucent, then neon yellow-green, then yellow-orange, and finally deep tangerine. Harvest when they reach that deep, vivid tangerine-orange color.
The final color change takes patience. Green and yellow-orange peppers are edible and can be picked earlier, but they have less of the floral complexity and fruity notes that develop at full orange.
Row 7 lists roughly 70 days to green and 100 days to full orange, with those catalog figures counted from transplant rather than from seed.
Marking flowering dates on a calendar helps you track individual fruit. The interval from flowering to full color varies with cultivar and conditions, and there isn’t a Habanada-specific published figure, so use color rather than a fixed day count as your final cue.
I tie different colored threads loosely to fruit on the same healthy plant when they reach green, yellow-orange, and full orange. The tagged fruit is harvested together for a side-by-side taste. Using one plant reduces the chance that soil or plant vigor is mistaken for a ripeness difference.
For each fruit, I cut samples from the shoulder and lower wall and taste them at the same temperature. The notes become my harvest reference for that seed lot, which is more dependable than comparing fruit remembered from different weeks.
Proper Harvesting Technique
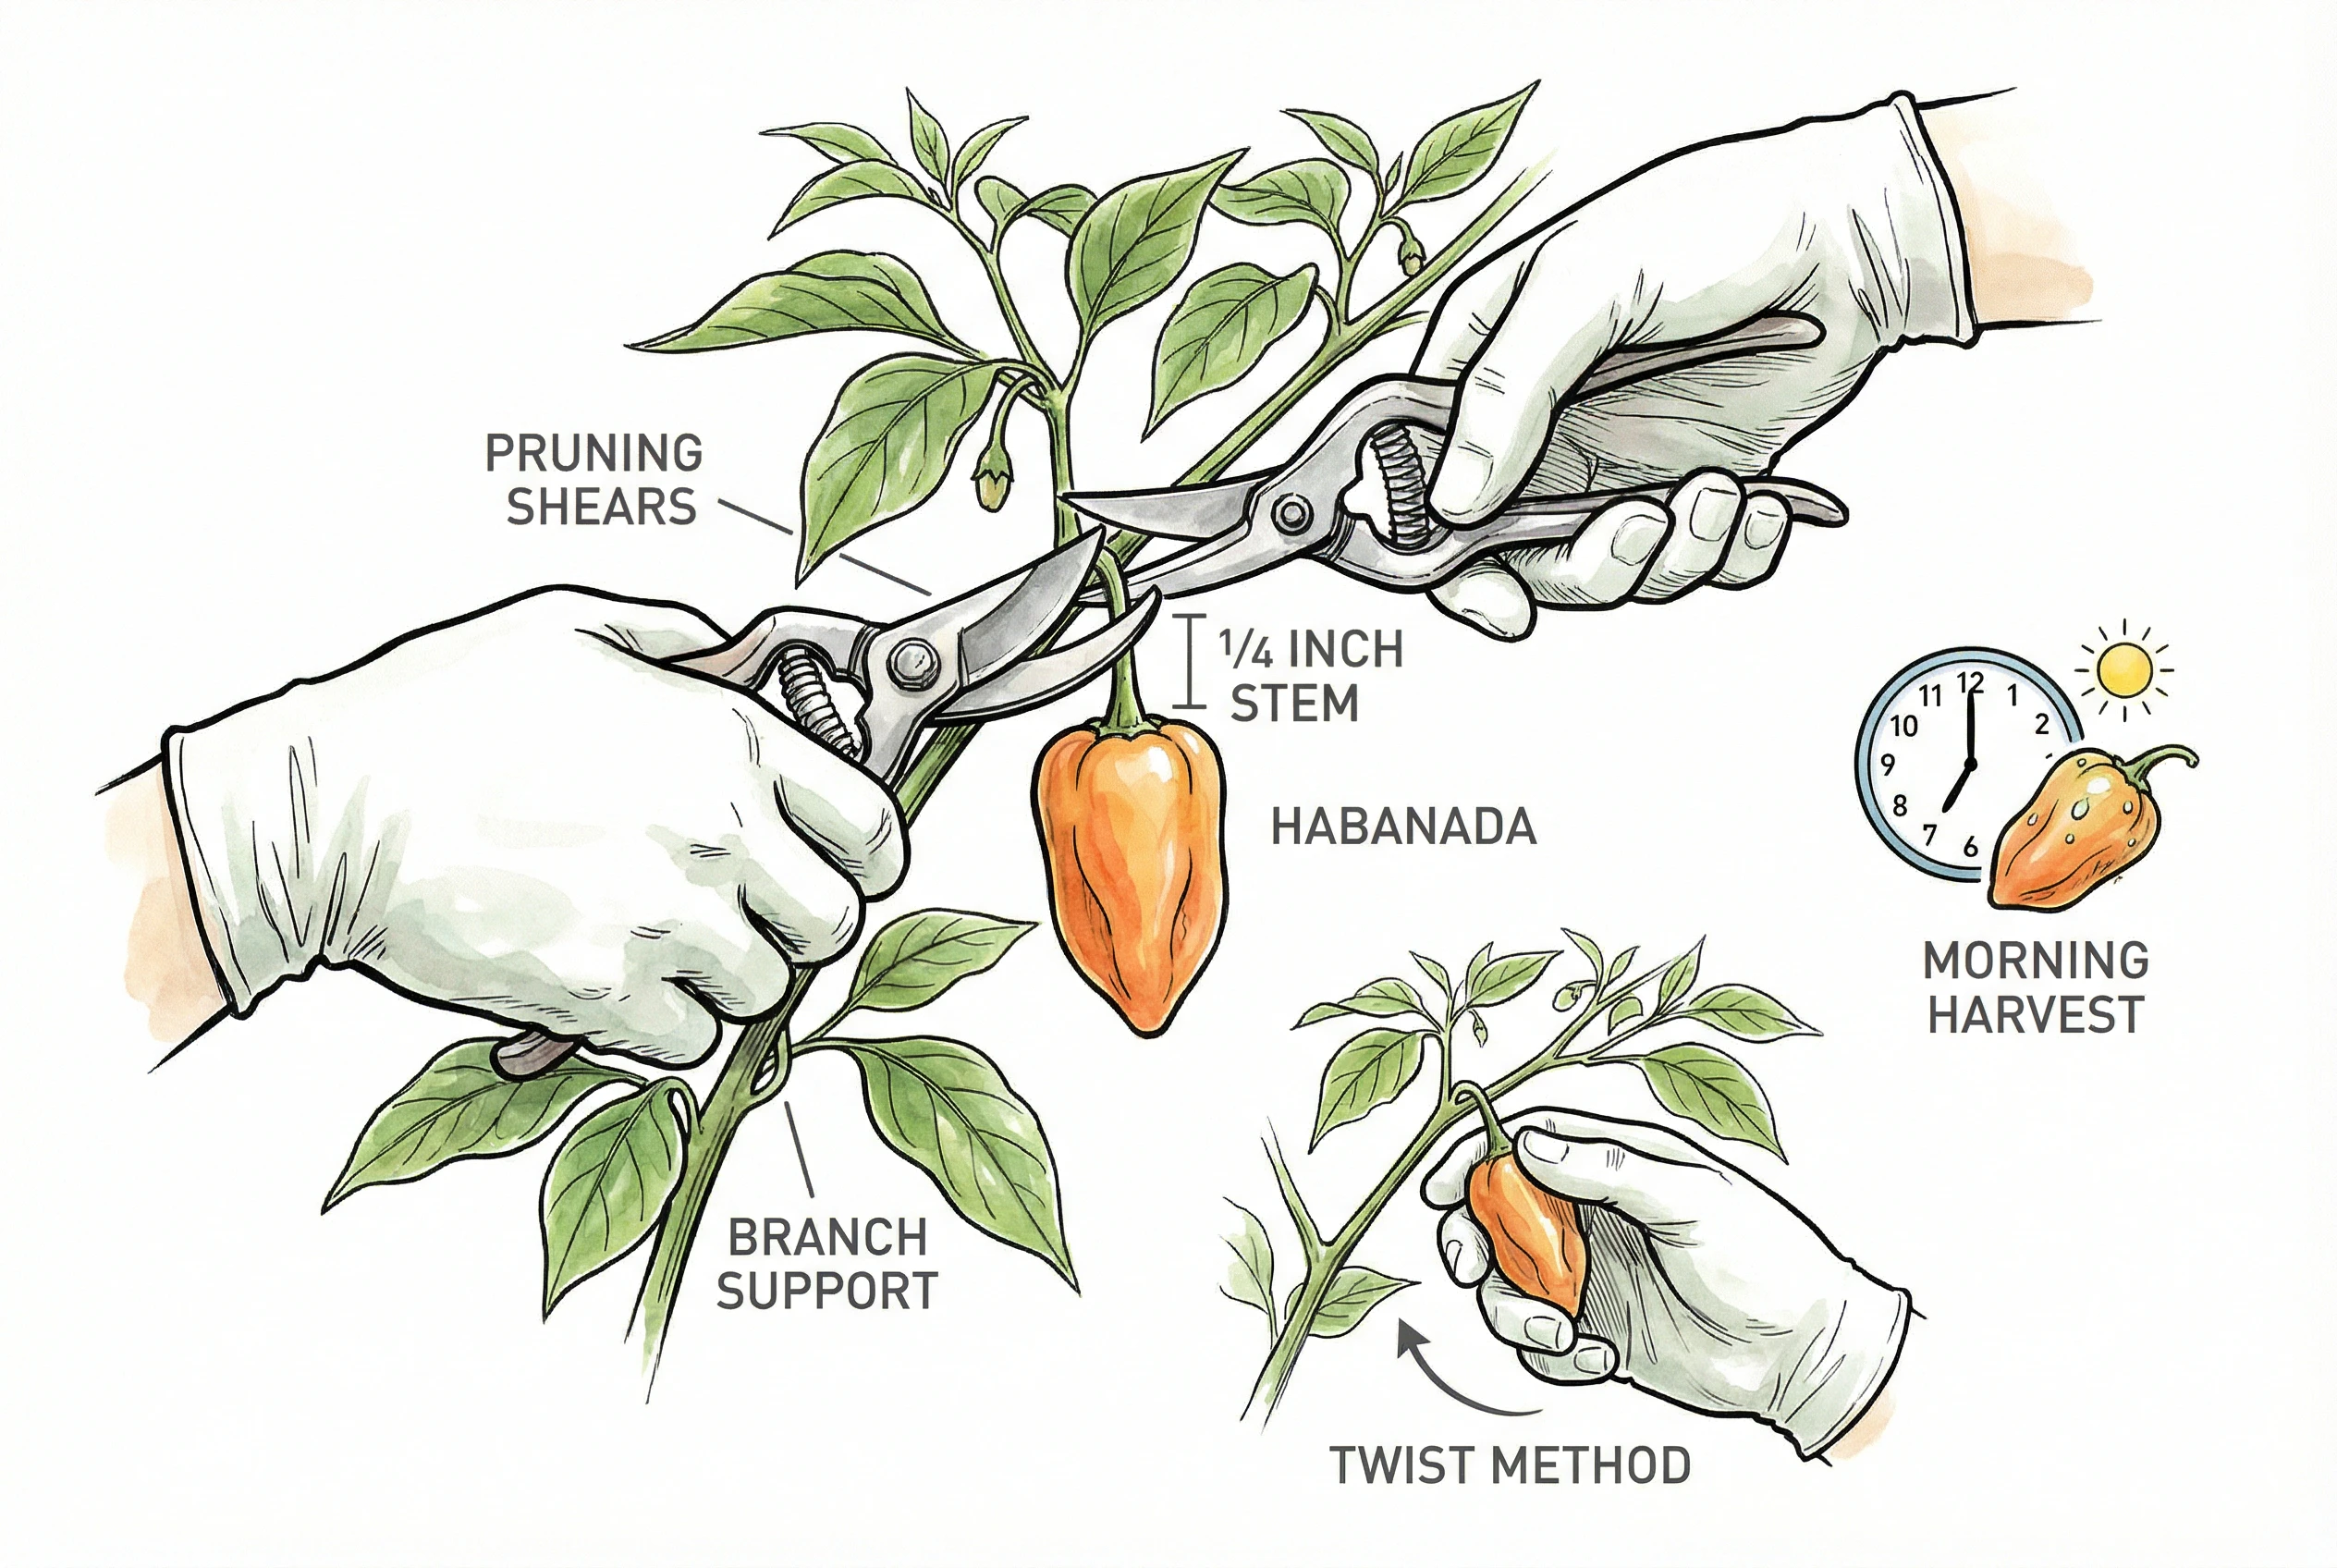
Avoid yanking peppers off, since the brittle branches break easily. The safest method is to cut the fruit with clean pruning shears or scissors, leaving 1/4 to 1/2 inch of stem attached.
If you don’t have shears handy, you can support the branch with one hand and twist the fruit off gently with the other. The point is a controlled removal rather than an uncontrolled pull.
Harvest in the morning after dew dries but before peak heat. Fruits have maximum turgor pressure and cut cleanly, and you’re less likely to damage heat-stressed branches.
Picking ripe fruit regularly can encourage continued production, so check plants every several days once fruiting begins.
Removing mature fruit tends to keep plants setting new flowers and fruit rather than putting energy into ripening seed.
Extending the Season
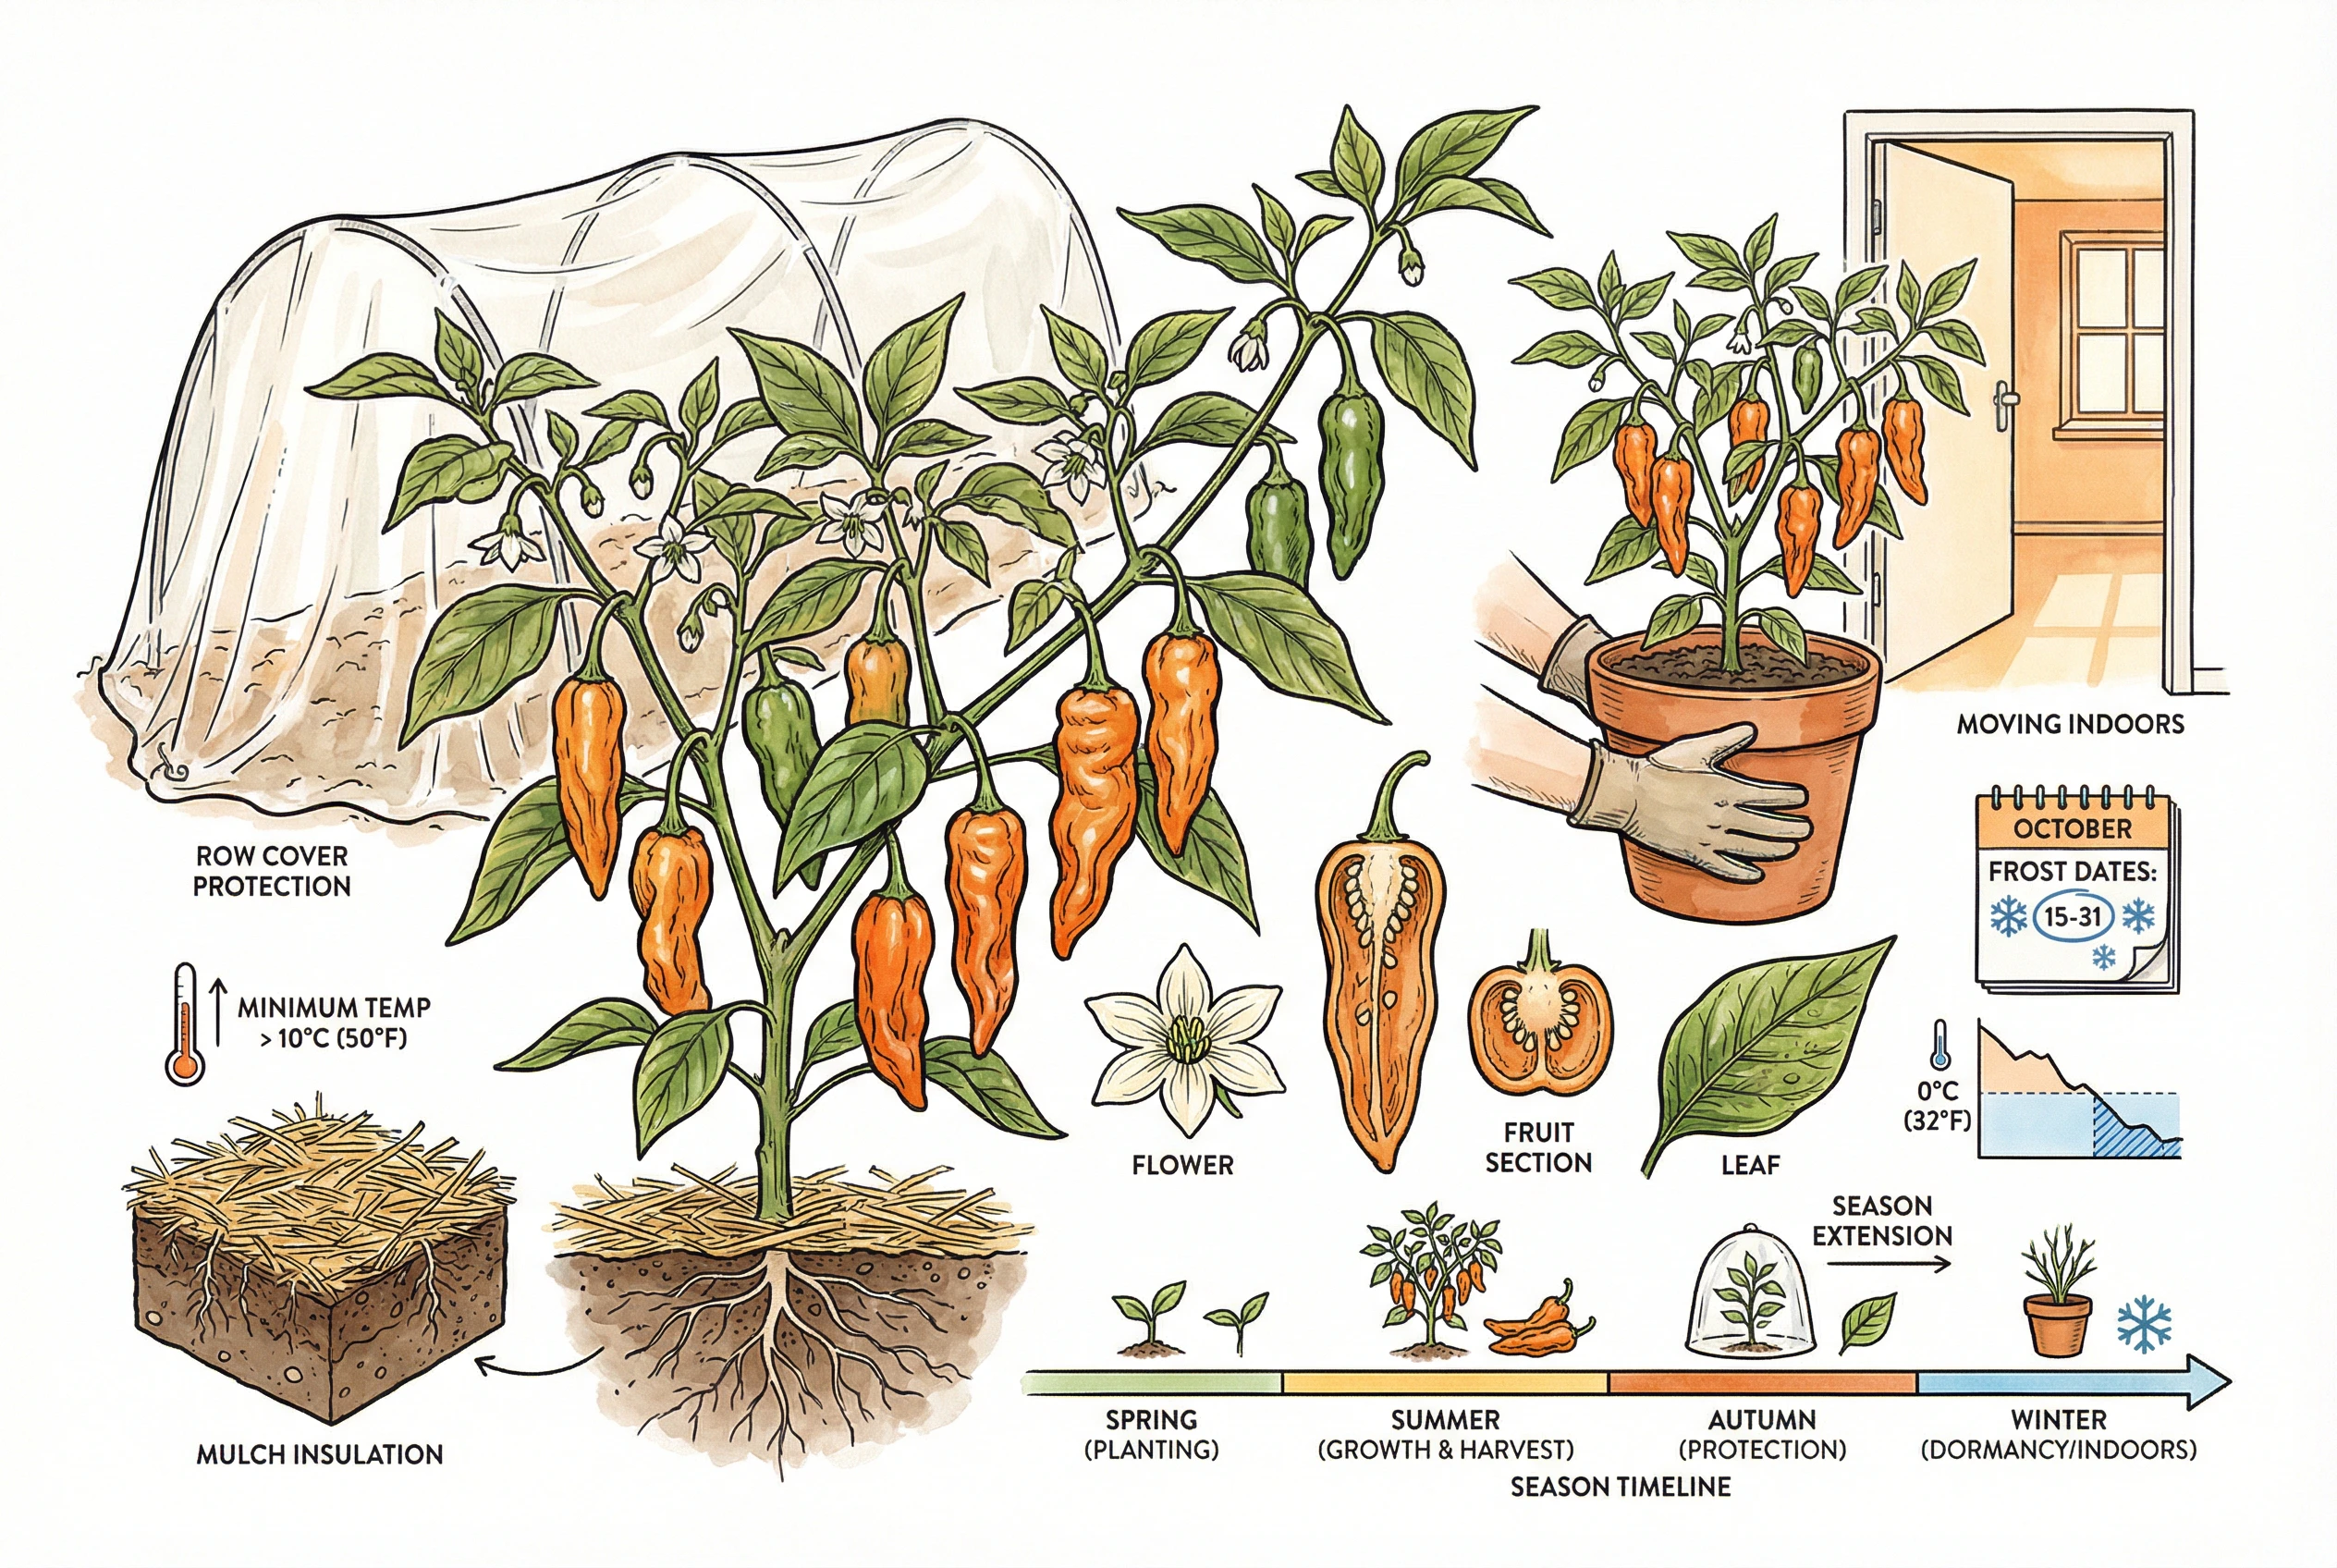
When frost threatens but many peppers remain green, cover plants with row covers, blankets, or plastic on frost nights and remove the covering during the day so plants don’t overheat.
Support the cover on stakes or hoops so it doesn’t rest directly on the foliage, especially with plastic, which conducts cold where it touches leaves.
Light frost (around 32°F) can damage foliage without necessarily killing the plant.
Harvest fruit before a hard freeze (around 28°F or below is a practical threshold). Mature-size green peppers can finish ripening indoors at room temperature. They won’t match vine-ripened flavor but are still usable.
Container plants can be moved indoors, but keeping them productive takes strong light (a bright window may not be enough), stable warmth, and a check for hitchhiking pests before bringing them in.
Storage and Preservation
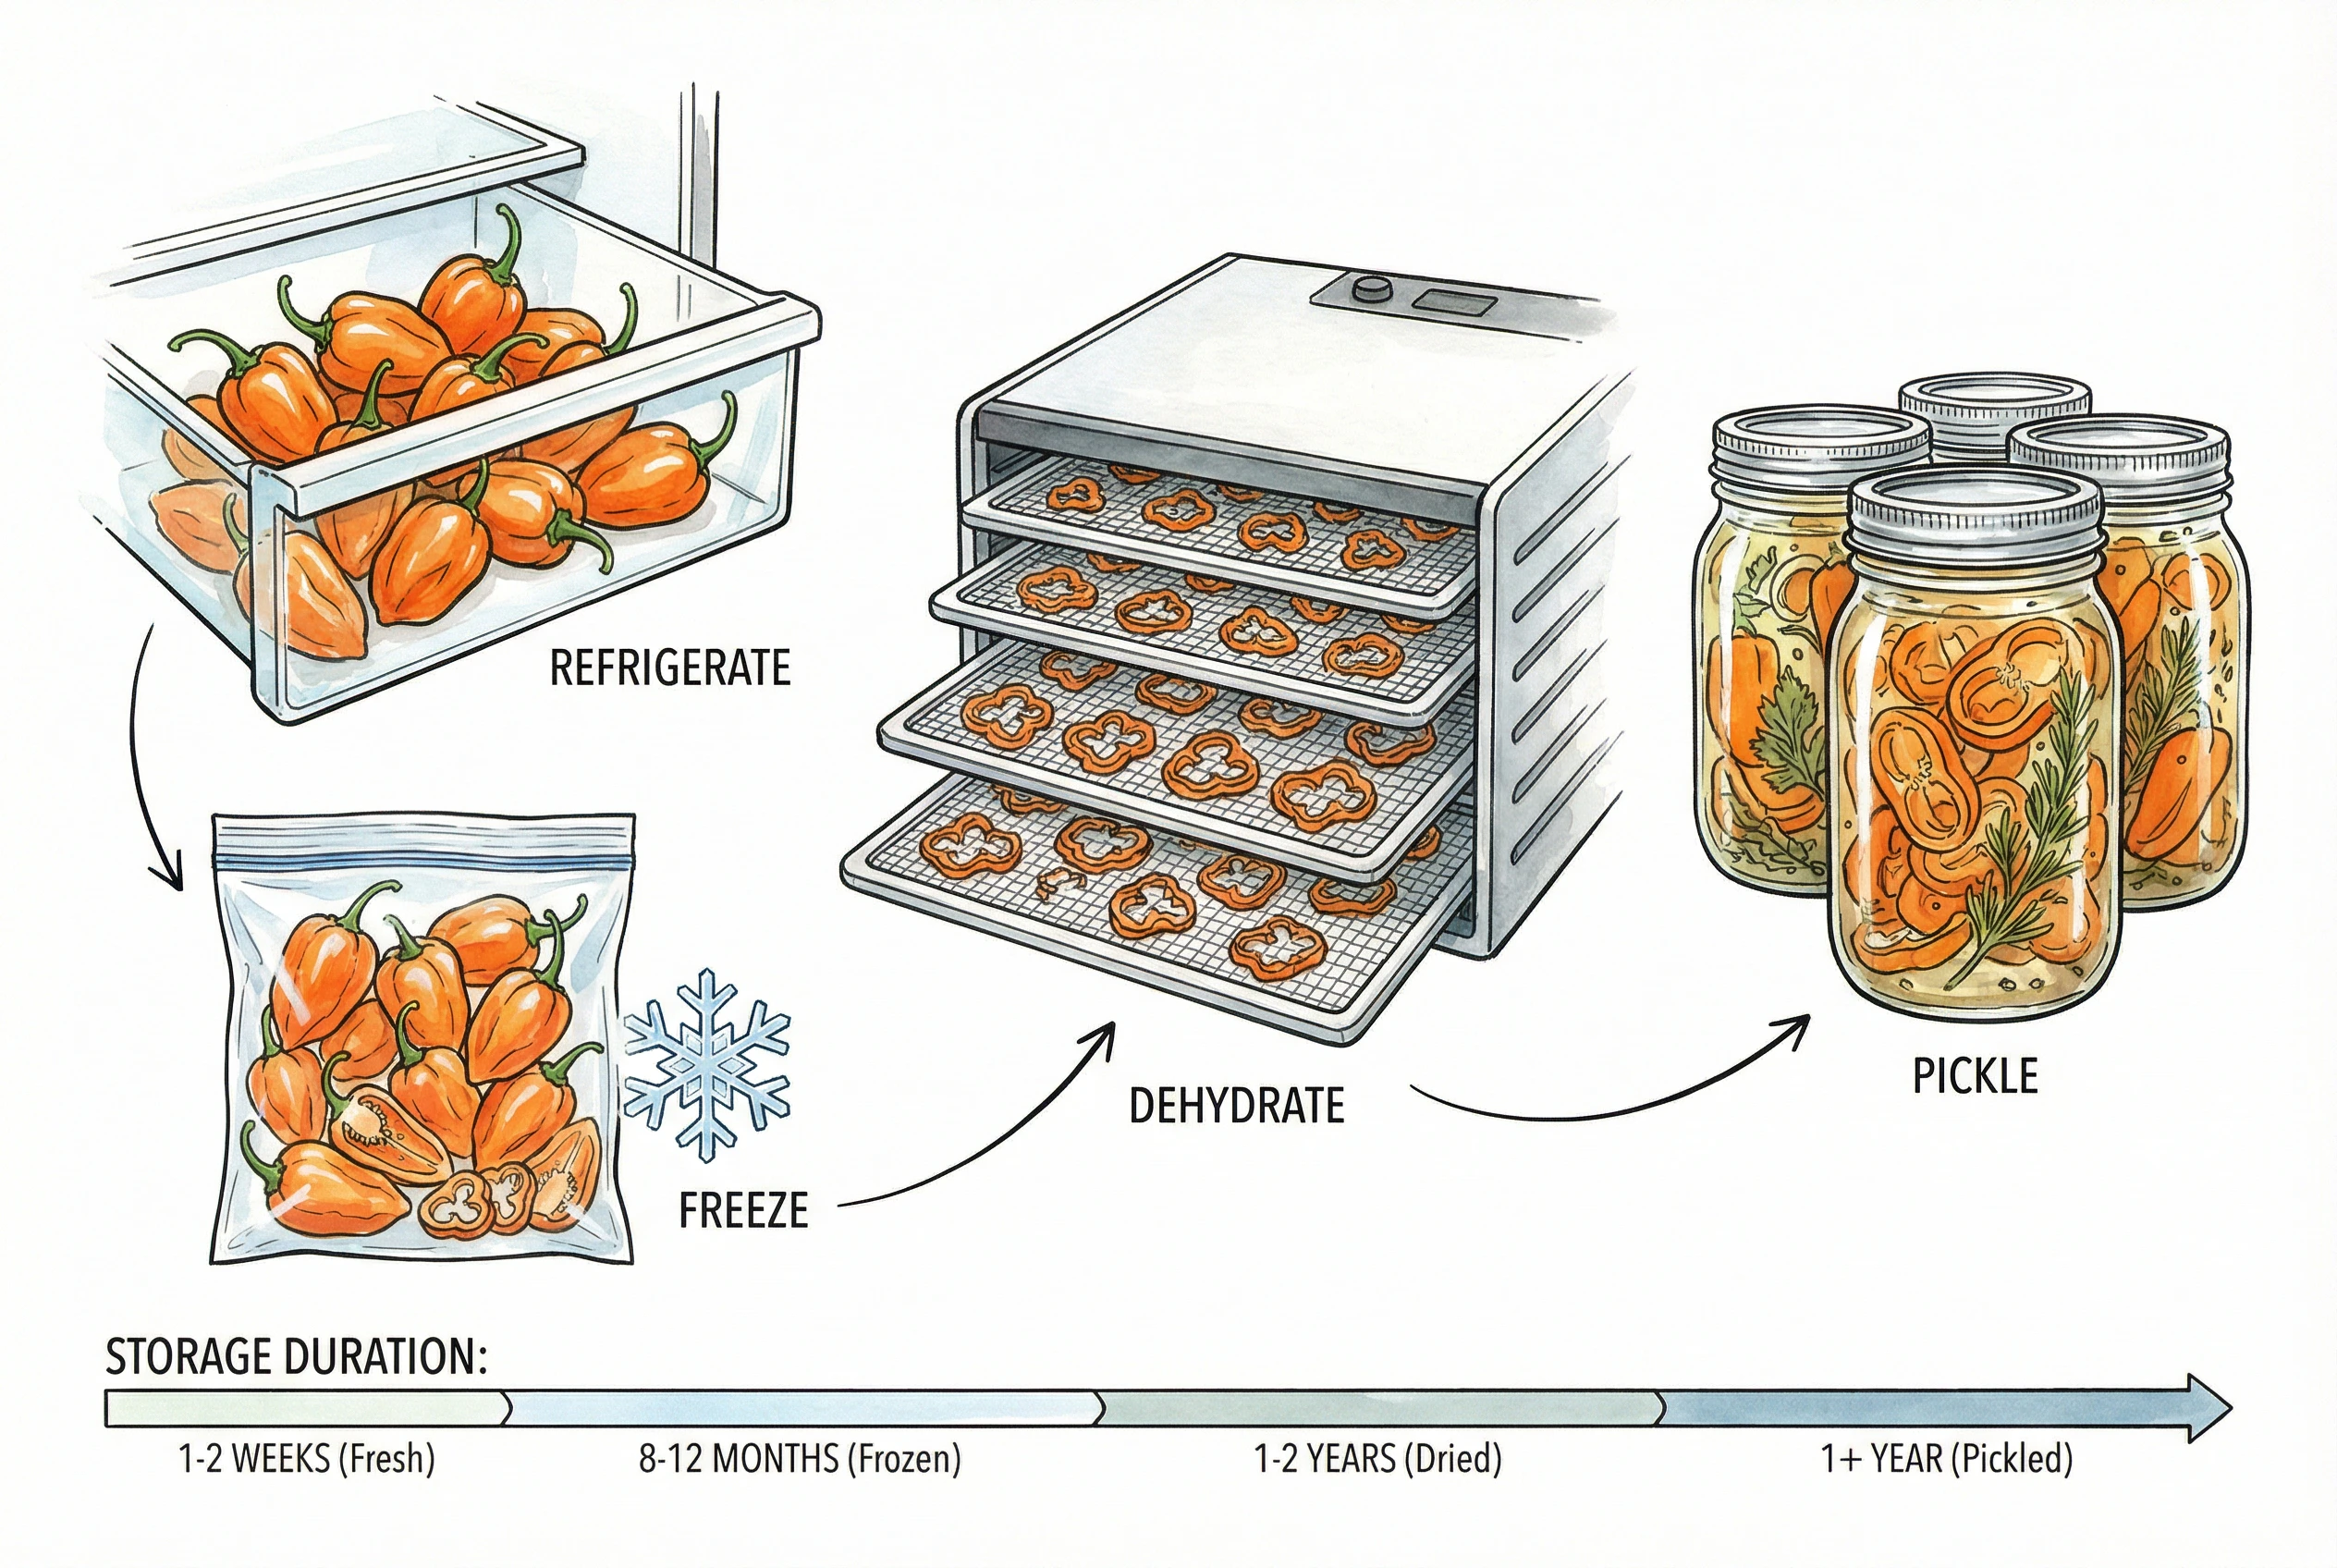
Fresh Habanadas store 1-2 weeks refrigerated. Ensure they’re completely dry before refrigerating and store in the crisper drawer in a perforated bag for gas exchange.
Check every 2-3 days and remove any showing decay.
For longer storage, freeze without blanching. Peppers are one of the few vegetables that freeze acceptably unblanched.
Wash and dry completely, then freeze whole, sliced, or diced in bags with the air removed.
Frozen peppers keep good quality for roughly 6-8 months (a quality guideline, not a safety cutoff).
Dehydrating concentrates flavor and extends shelf life. Slice thinly and dry at 125°F until brittle (often around 8-12 hours, depending on slice thickness and humidity), then condition and store in airtight containers, grinding into flakes or powder as needed.
Pickling and canning low-acid peppers must follow a specific tested recipe, not a general ratio.
Peppers are low-acid, and improperly canned low-acid foods can cause botulism. A generic one-to-one vinegar-to-water guideline does not make an arbitrary recipe safe.
Use a named tested recipe from OSU Extension or USDA exactly as written, including standardized 5% vinegar, the specified ingredients and cut sizes, jar type and headspace, boiling-water processing time, altitude adjustment, and storage.
Don’t improvise or scale the acid on your own.
Harvest and Preservation Tools
- Fiskars Micro-Tip snips suit clean pepper harvests when branches are brittle or fruit is crowded. Keep the blades clean to avoid spreading disease between plants.
- FoodSaver Vacuum Sealer Machine can help reduce freezer burn for a larger frozen harvest. It improves storage quality, not the safety of an improperly preserved food.
- NESCO FD-75A suits a harvest large enough to justify drying in batches. Set the temperature and dryness according to a tested preservation method, then store fully dried peppers in airtight containers.
Preserving Peppers. Oregon State University Extension
Culinary Uses for Heatless Habaneros
Habanadas open up uses that hot peppers can’t, letting the tropical flavor come through without heat. Individual preferences still vary.
Fresh Applications
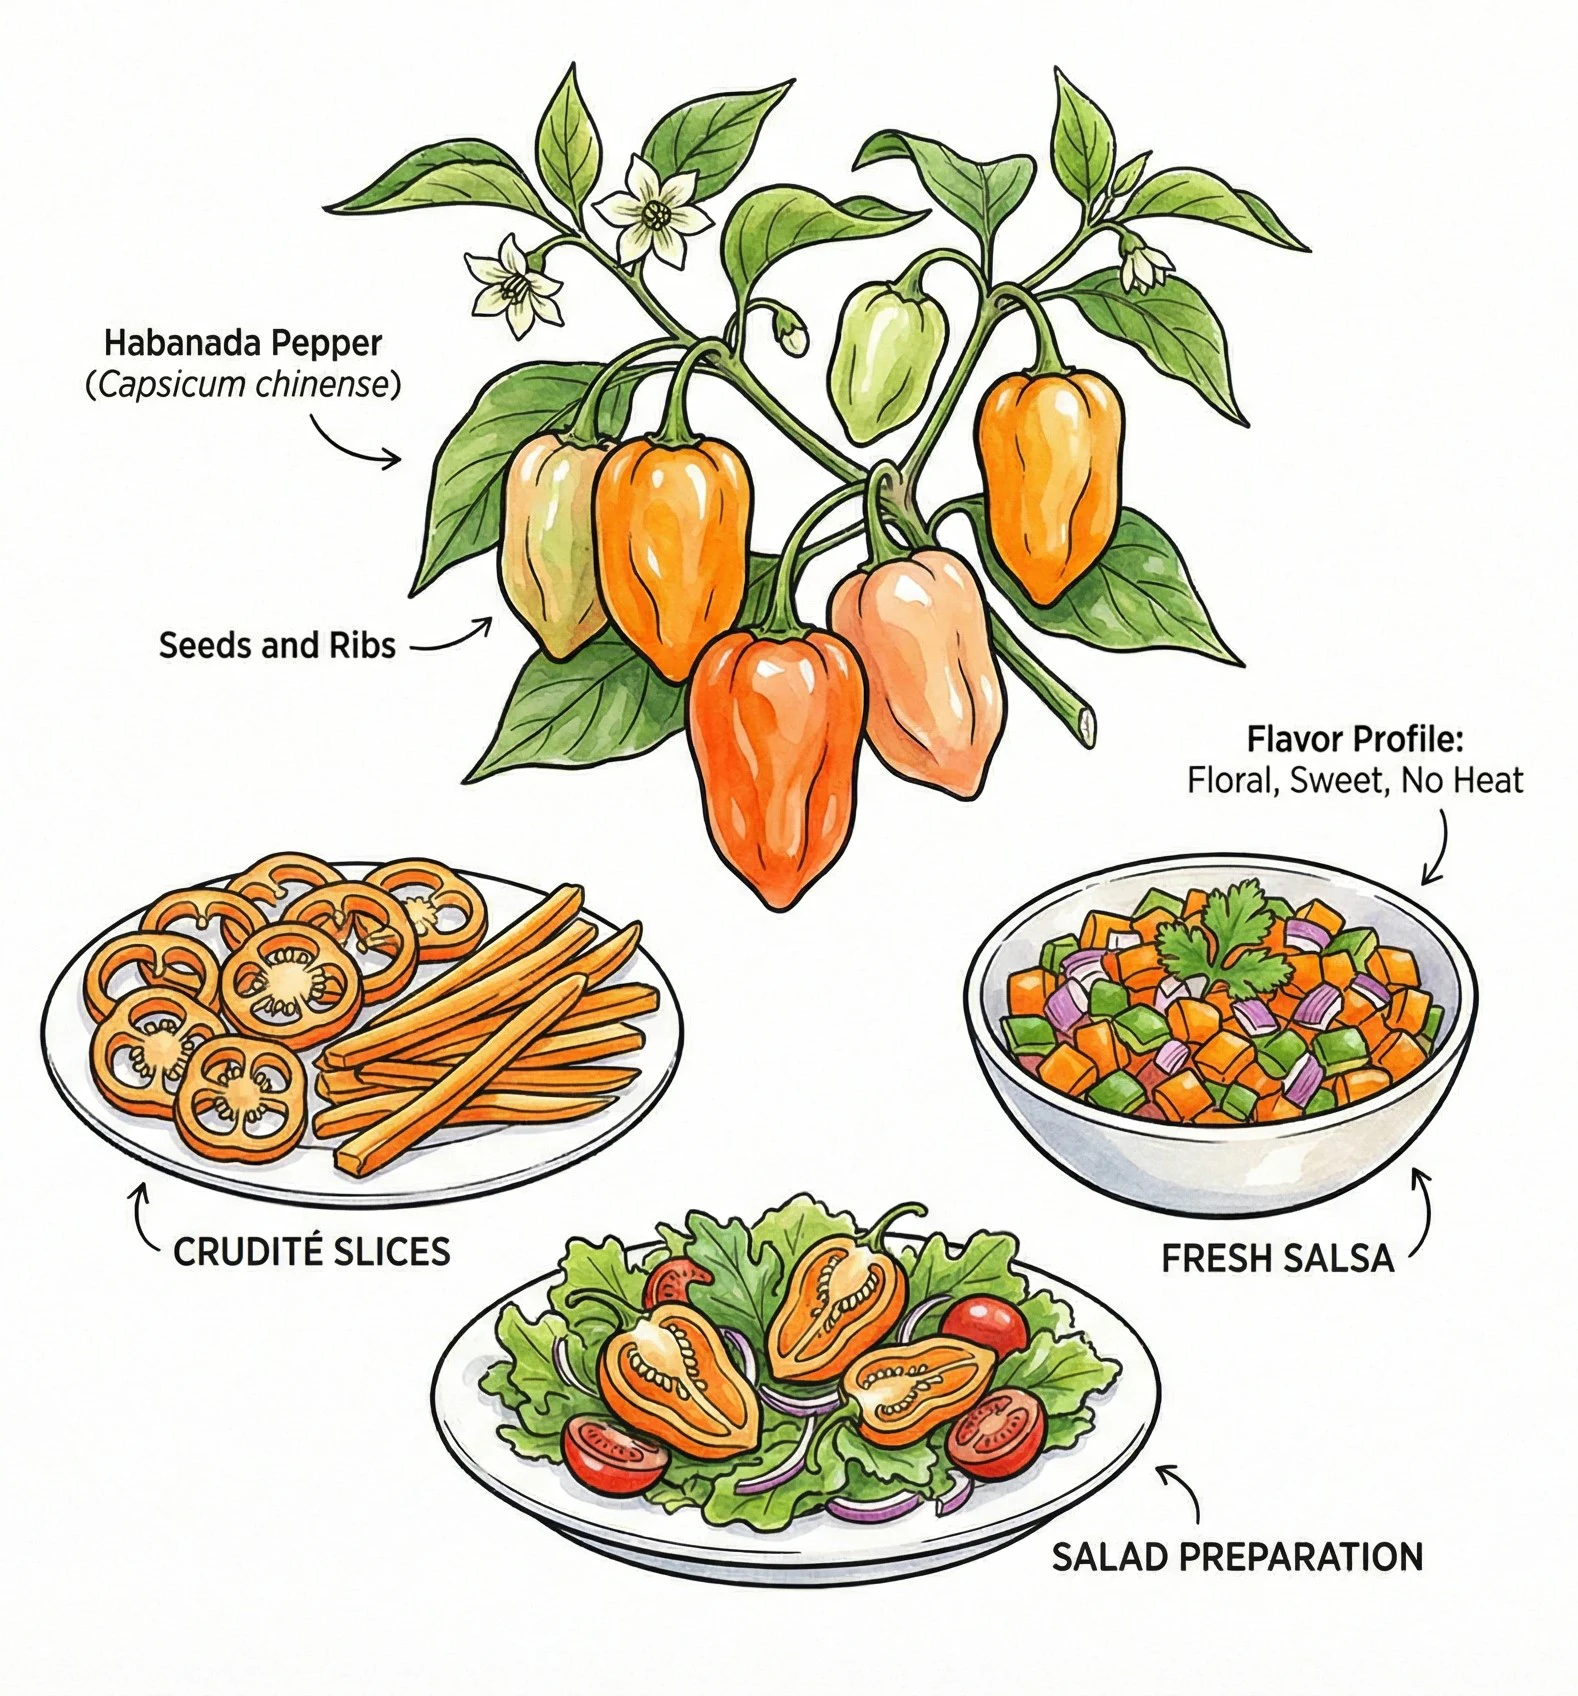
Raw Habanadas are excellent snacking peppers. Slice them for crudité platters with creamy dips. The natural sweetness plays beautifully against rich, fatty dips.
Dice them into fresh pico de gallo or mango salsa for fish tacos, where the fruity notes complement seafood.
They also add color and flavor to green and fruit salads. Try them with citrus, avocado, and jicama for a refreshing summer side.
Cooked Dishes
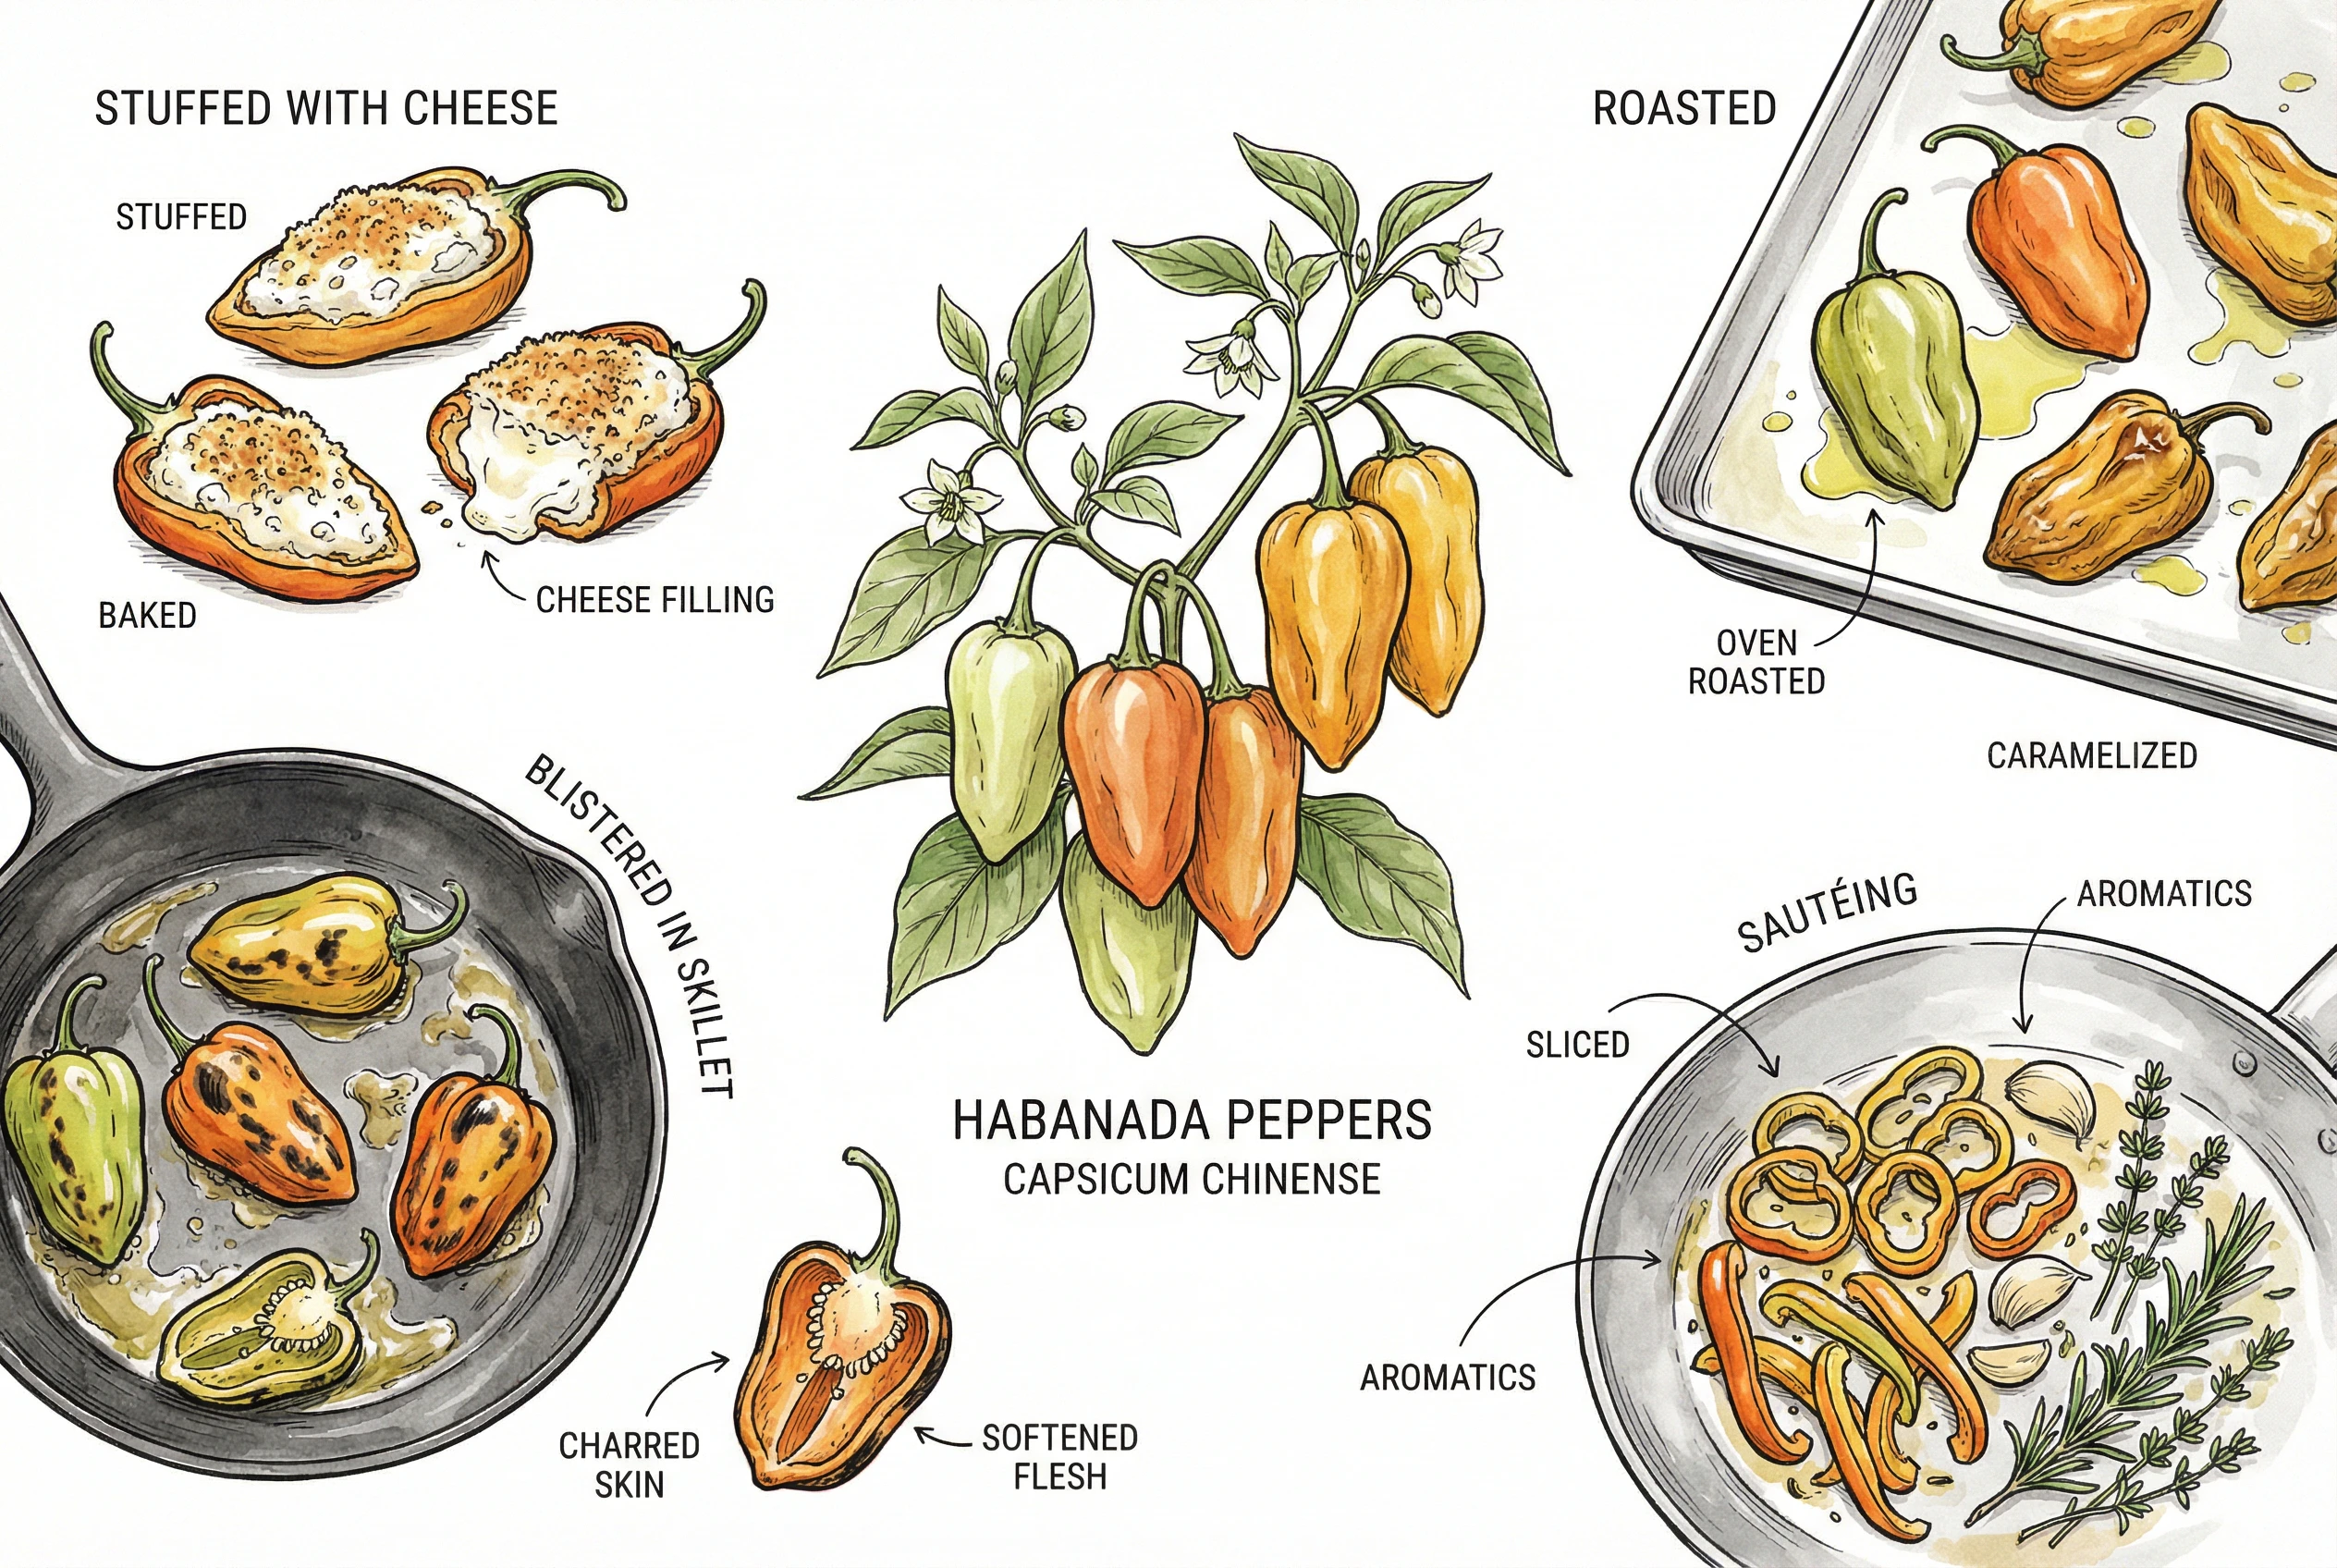
Roasting or charring Habanadas deepens flavor and adds smokiness (blister them in a hot skillet with a little oil and top with sea salt for a simple appetizer).
Sauté them with shallots in butter until the sweetness caramelizes, or use them in stir-fries, fajitas, and soups where you want pepper flavor without heat.
At roughly 2-3 inches, they’re a good size for stuffing. Halve them, fill with cheese, and bake.
Sauces and Condiments
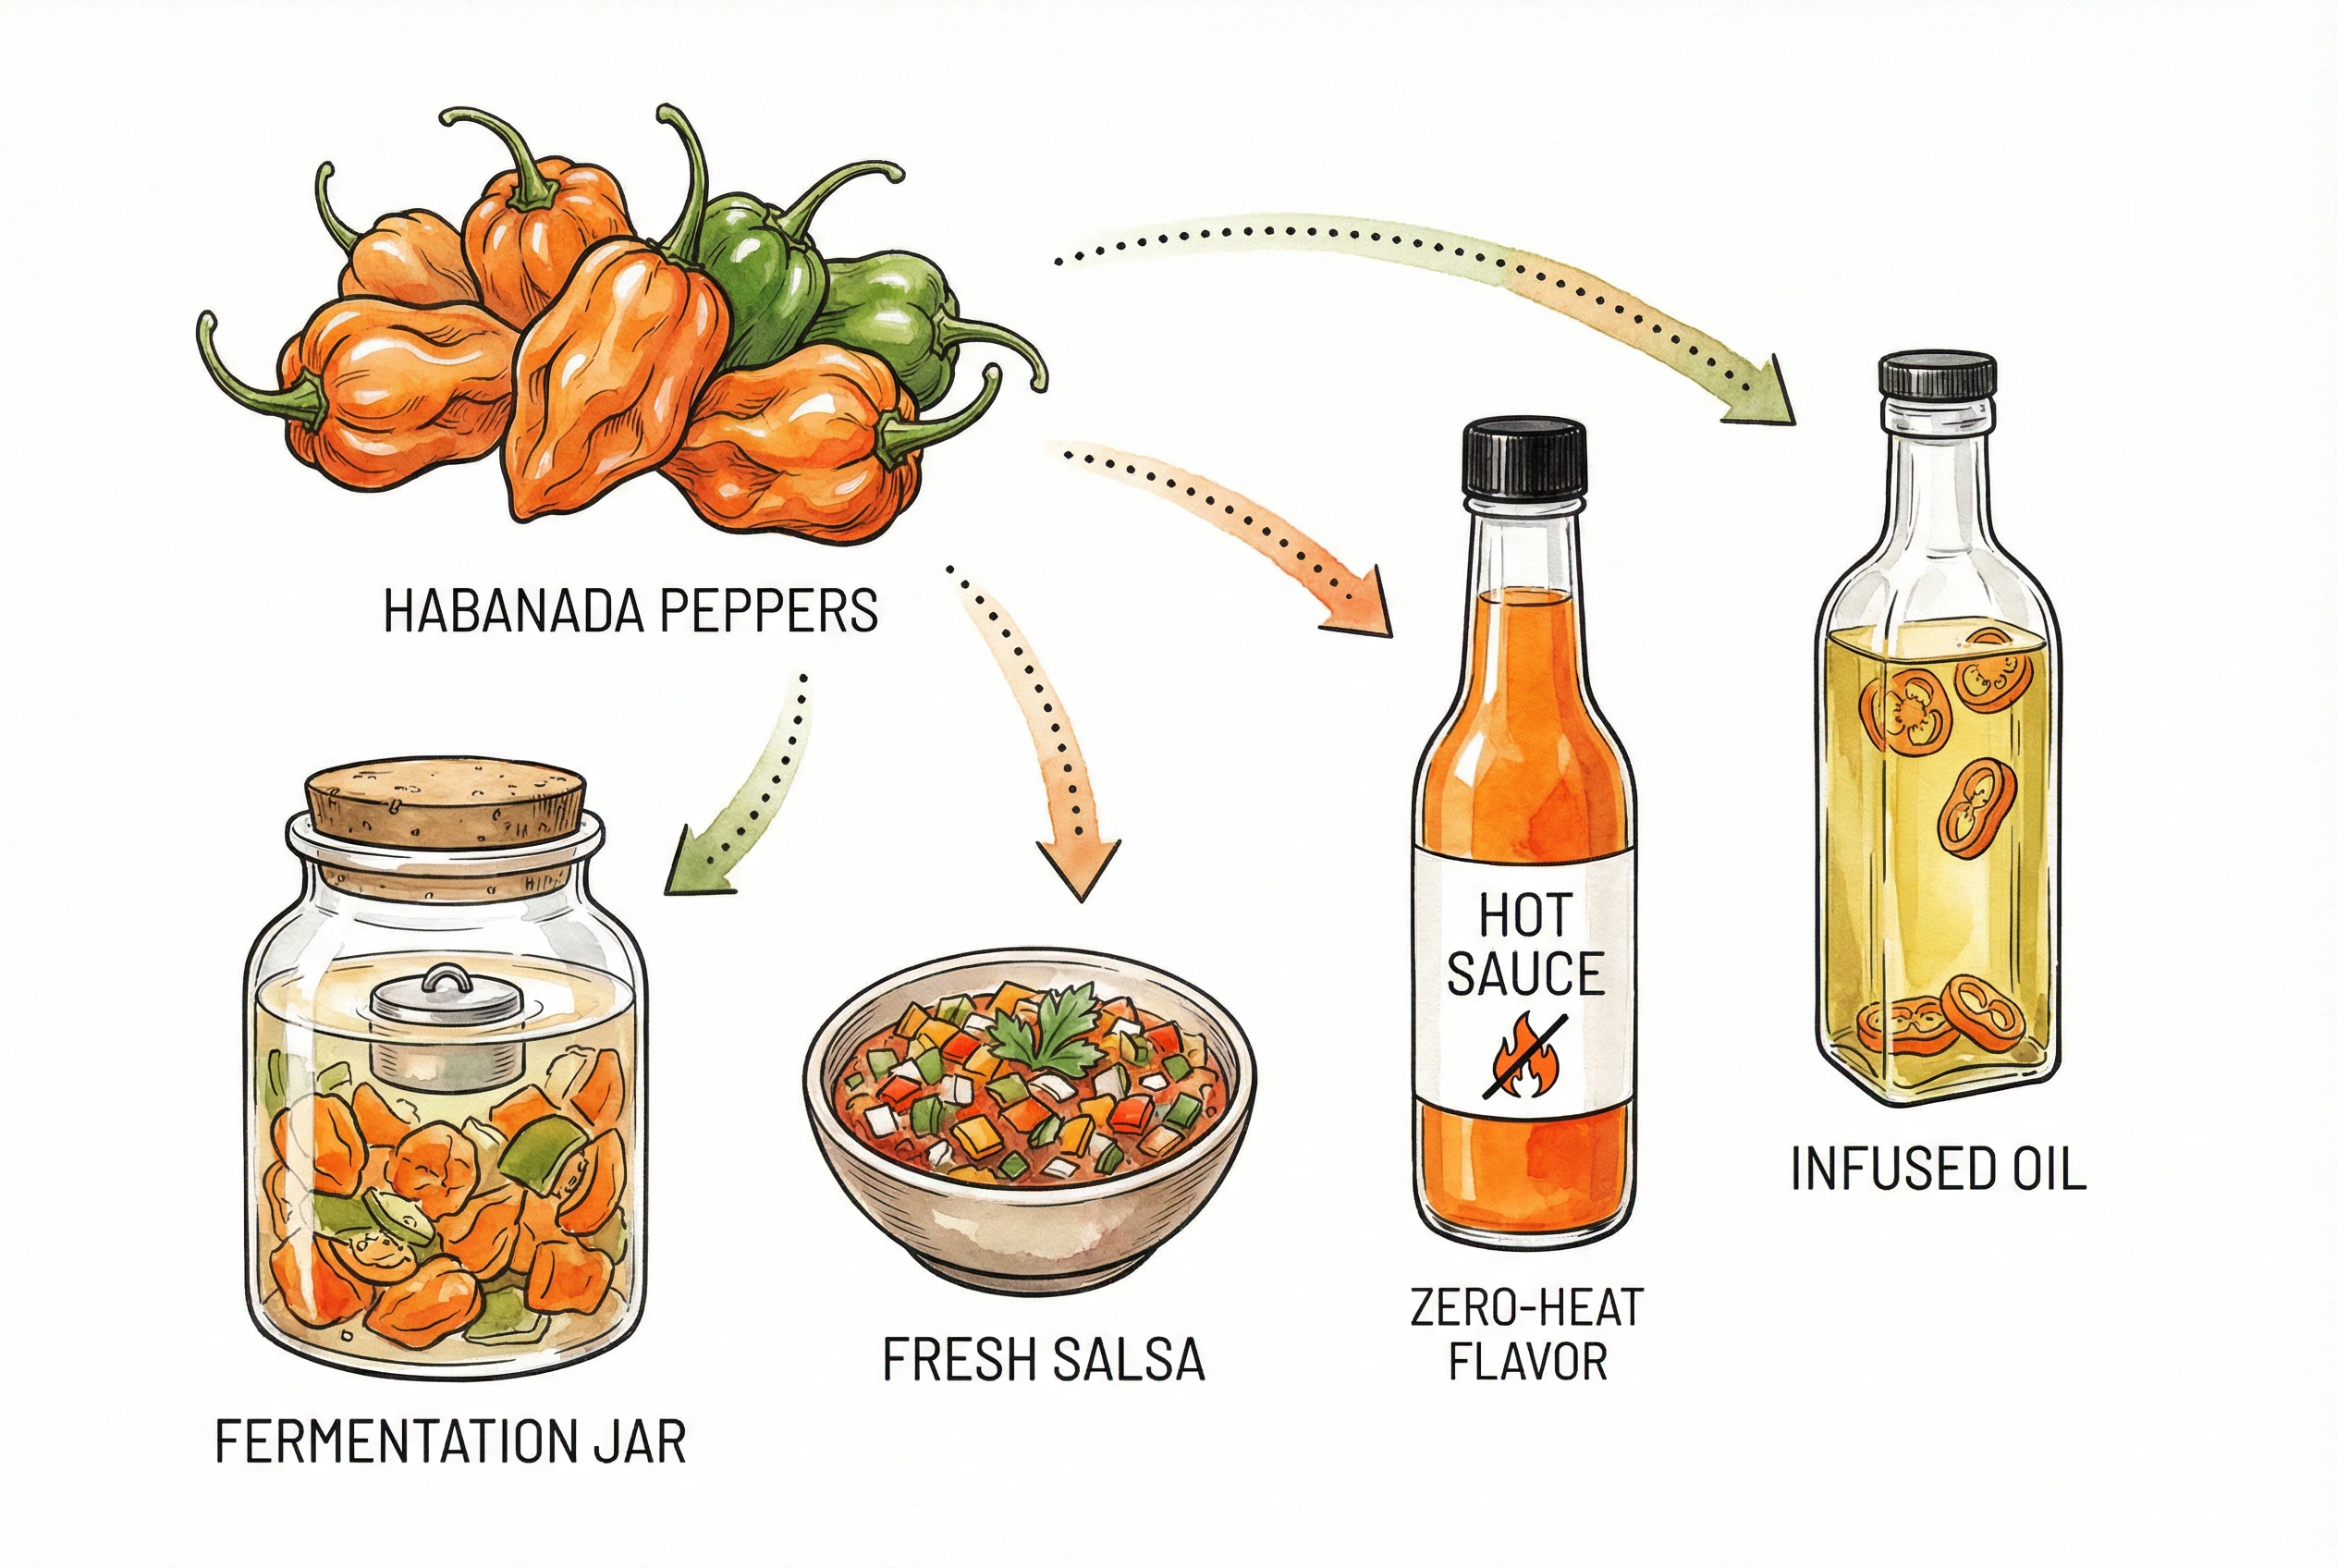
Habanada sauce delivers complex flavor with no heat, which can appeal to families with kids.
You can lacto-ferment peppers in a salt brine to develop tangy, savory notes, but follow a verified food-safety method. Use a measured salt-to-water ratio, commonly a few percent by weight of water, with a clean vessel, keep the peppers fully submerged under the brine for an anaerobic environment, ferment at roughly 68-72°F, and confirm the finished ferment reaches pH 4.6 or below and that active bubbling has stopped before refrigerating.
Fermentation typically takes a few weeks, not a guaranteed one, so rely on those checks rather than a fixed date.
You can blend roasted Habanadas into fresh salsas or make Habanada jellies. Do not, however, put fresh peppers into oil for storage. Fresh vegetables in oil create a low-acid, oxygen-free environment where Clostridium botulinum can grow and produce toxin.
Unless you use a research-tested acidification method, keep any home fresh-chili oil refrigerated and use it within about four days, or freeze it. Never store it at room temperature.
Because there’s no capsaicin heat, you can use more of these peppers than you would a hot habanero, adjusting to taste and to the flavor, salt, and acidity of the recipe.
Affiliate Disclosure
This article contains Amazon affiliate links. As an Amazon Associate I earn from qualifying purchases. If you use these links, the site may earn a commission at no extra cost to you. Product availability, price, and specifications can change. Check the current listing before buying.