
Alocasia Corm Propagation: Grow Plants from Corms
Propagate Alocasia corms step by step: identify viable offsets, compare Fluval Stratum, sphagnum, perlite, and water, then prevent rot during rooting.
Priya Patel · Published 2025-12-15 · 17 min read
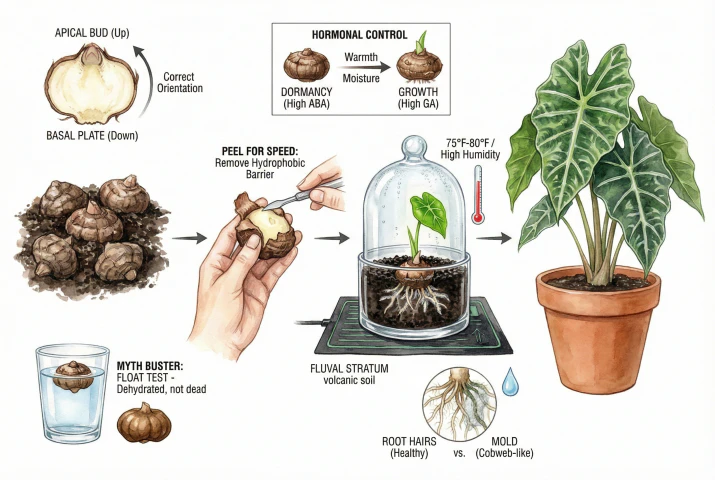
To propagate an Alocasia corm or offset, separate only firm, healthy material with a clean blade, place the root zone down in a lightly moist and airy medium, leave the growth tip exposed, and keep the chamber warm and vented. Do not use standing water, and do not assume peeling, floating, or a fixed sprouting time proves whether a piece is viable.
Key Takeaways
- Growers use the word corm loosely, so identify the growth point and root zone instead of relying on the nickname. Your piece may be a rooted offset, bulbil, tuberule, or part of a rhizomatous stem.
- Leave the papery skin intact by default. Peeling has no controlled Alocasia success-rate evidence and can wound the bud or root zone.
- Use a lightly moist, oxygen-rich medium rather than standing water. Porous aquarium substrate, loose sphagnum, perlite, and shallow water each work differently, and none is proven universally best.
- Keep the medium moderately warm, around the mid-70s °F (mid-20s °C) as a practical starting range, and measure it with a probe if you use bottom heat. Vent the chamber continuously rather than chasing 100% humidity.
- Once a green shoot appears, add bright indirect light and reduce humidity gradually. Remove any piece that becomes mushy, oozes, smells off, or develops a spreading soft lesion.
1. How Alocasia Corms and Offsets Work
An Alocasia propagule is not a seed or a stem cutting, so it will not follow a fixed sprouting schedule. Growth and rest patterns vary among species, cultivars, and growing conditions.
1.1 What Growers Call a Corm
Growers use corm for the small round storage structures produced by Alocasia. The botanical name varies, but that does not change the handling decision.
Look for a firm piece, an undamaged growth tip, and a root zone that is not soft or blackened. Those features matter more for propagation than deciding whether the piece is technically a corm, tuber, or offset.
The Papery Skin or Tunic
This brown outer layer appears to limit water loss and offer some protection.
Growth Eyes or Buds
These are the points from which a shoot can emerge.
The Root Zone
This is usually the base where roots emerge.
Where you can identify a distinct top and bottom, plant it that way up. If you can’t tell (which is common with small, unrooted pieces) laying it on its side is a reasonable default. Orientation-specific survival rates for Alocasia aren’t well documented.
RHS Alocasia growing guide
1.2 Conditions That Support Sprouting
A firm piece can stay inactive for a long time and still be viable. Research on seed hormones cannot tell you when an Alocasia propagule will sprout, so do not try to force it with hormone treatments or a calendar. Check the piece and its conditions instead.
Moisture Without Saturation
Use a lightly moist medium so the propagule does not dry out without leaving it waterlogged.
Consistent Warmth
Consistent, moderate warmth supports propagation, but there is no proven setpoint that guarantees sprouting.
Oxygen Supply
Roots and buds respire, so avoid standing water, which starves tissue of oxygen and invites rot.
Before calling a firm piece dormant, check for lesions or odor and confirm that the medium is warm, lightly moist, and draining freely. Soft tissue, a spreading dark area, or a sour smell calls for isolation and disposal rather than more waiting.
1.3 Offsets and Stolons Vary by Species
Some Alocasia make offsets or stolon-tip propagules and others do not. Check what your own plant produces rather than expecting every species or cultivar to yield loose corms.
When you unpot a plant, you may find rooted offshoots and loose pieces. Separate only mature offsets that can come away cleanly with roots. Treat separation as a way to multiply plants, not as a treatment for the parent.
2. How to Propagate Alocasia Corms Step by Step
The setup below uses a porous aquarium-substrate chamber. It is practical to inspect and adjust, but no controlled study has established its Alocasia success rate. The alternatives that follow can work just as well depending on your conditions and how closely you watch the medium.
2.1 The Harvest
A repot is a convenient time, since you have to loosen the roots anyway. Spring or early summer is typical, but under warm indoor conditions you can do it at other times.
- Unpot gently (turn it sideways and tap, don’t yank the stem).
- Excavate by massaging the root ball, feeling for firm, dense bumps. Some are rooted offsets attached to the rhizome. Others are loose.
- Separate mature, rooted offsets with a sterilized blade, keeping as many roots as you can (the RHS suggests carefully cutting rooted offsets away in spring). Cut cleanly rather than tearing near the rhizome, and inspect both cut faces, on the offset and on the mother, for damage. Leave immature pieces that are still firmly dependent on the parent in place.
- Sort by gentle feel, treating firmness as a first screen rather than proof. Firm pieces are worth trying. Clearly soft, mushy, or oozing pieces are likely rotting. Discard them (bag and bin, don’t compost). A firm piece can still fail, and floaters aren’t automatically dead (see troubleshooting).
2.2 To Peel or Not (Optional)
Some growers scrape off the papery skin, believing it speeds sprouting. No controlled Alocasia trials compare peeled and intact propagules, so there are no established sample sizes, cultivar comparisons, or rot and failure rates. Claims such as peeled sprouts in 1–2 weeks and unpeeled sprouts in 3–6 months remain anecdotal.
The same skin that some want to remove is also described as limiting water loss and offering protection, and scraping can wound living tissue.
The reasonable default is to leave the propagule intact. Treat peeling as an optional experiment on a few pieces, not a required step. If you do try it, keep it minimal and clean.
- Sterilize your tool, and work on only a few test pieces so you can compare against intact ones.
- Remove as little as possible of the loose brown skin. Don’t gouge into firm flesh.
- Avoid the growth eyes and root zone. Damaging the bud can kill the growth point, and damaging the base impairs rooting.
- Quarantine and watch peeled pieces separately, and discard any that develop lesions after wounding.
Alocasia Sap Safety
Alocasia sap contains calcium oxalate raphides (microscopic needle crystals). On skin contact they can cause itching, burning, and irritation, so wear gloves when cutting or handling cut surfaces, especially if you’re prone to dermatitis. Ingestion is the more serious risk. A documented poisoning case involved swallowing A. odora, causing oral and throat irritation.
Keep propagules and trimmings away from children and pets. If a person may have swallowed or otherwise been exposed to plant material, contact Poison Control immediately (in the US, 1-800-222-1222). Call emergency services if the person collapses, has a seizure, has trouble breathing, or cannot be awakened. If a pet ingests it, call your veterinarian or an animal poison line.
Severity varies by species and by how much is exposed, so a single case report shouldn’t be read as a fixed danger level for all handling.
Alocasia odora poisoning due to calcium oxalate needle crystals in Japan
2.3 Choosing a Substrate
You want a medium that holds some moisture without staying saturated, drains freely, stays reasonably clean, and lets you inspect the propagule.
No medium is proven best for Alocasia, there’s no failure-rate data, so think in tradeoffs of water-holding, air-filled porosity, cleanliness, and how much watering attention it demands.
| Medium | Main advantage | Main risk or cost | Best fit |
|---|---|---|---|
| Fluval Stratum | Porous granules are easy to drain and inspect | Higher cost. Off-label propagation use | Growers who want a tidy, reusable chamber medium |
| Loose sphagnum | High water-holding with good air space when loose | Overpacking stays wet. Roots tangle in fibers | Growers who tend to let media dry too far |
| Perlite | High air space and low nutrient load | Floats and can still stay wet above standing water | Growers who can monitor moisture and feed later |
| Shallow water | Roots and tissue remain easy to inspect | Stagnation, contamination, and low oxygen | Close monitoring with frequent water changes or aeration |
Fluval Stratum
Fluval Plant and Shrimp Stratum suits growers who want a granular medium that is easy to inspect and does not compact quickly. It is an aquarium substrate used off-label here, not a proven way to improve Alocasia survival. Choose it for the handling and drainage, not because the listing promises a propagation result.
It costs more than perlite or moss and breaks down over time. Use a different medium if you need a lower-cost option or cannot check the moisture level regularly.
New Zealand Sphagnum Moss
New Zealand sphagnum moss is a good fit when your room dries media too quickly, provided you keep it loose. It holds moisture around a propagule, but packed or constantly wet moss can cut off air and invite rot.
It can also tangle young roots at transplant. Use a more open medium if you tend to overwater or want the simplest move into a permanent pot later.
Perlite Medium
Expanded volcanic glass has plenty of air space and drains well, so it is difficult to overwater in an open, freely draining container. Perlite can still stay too wet in a closed container or a tray of standing water.
It is inert, with little nutrient content or buffering. A newly rooting propagule draws on its own reserves at first, but longer-term growth requires feeding.
It also floats.
Water/Jar Method
A propagule in shallow water puts oxygen, contamination, and temperature all on you at once. Stagnant water loses oxygen and can rot tissue unless you change it often or run an air stone.
It’s easy to watch but demanding to keep clean.
2.4 Incubation Hardware
Propagation Dome
Viagrow propagation dome is useful when adjustable vents make it easier for you to maintain humidity without sealing the chamber. A clean recycled container can work equally well, so choose this dome for the airflow control and reusability, not as a required upgrade.
It is sold without a base tray. Whatever container you use, keep the medium lightly moist and give it continuous air exchange.
Bottom Heat
In a cool room, gentle bottom heat can help keep the medium in a warmer range. But heat is not something to apply blind, and this class of mat needs care.
- VIVOSUN Seedling Heat Mat is appropriate only if a probe shows that the propagation medium is too cool. This model does not include a temperature controller, so do not use it by itself to set a safe root-zone temperature.
- Add a separate thermostat and place its probe at the propagule’s depth. Check the actual medium rather than relying on room temperature or touch.
- Keep the mat on a well-drained surface, away from standing water, and do not wrap it in insulation. Stop using it if the medium overheats or the setup cannot stay dry.
- Heat is a correction for a verified cold medium, not a requirement for every Alocasia propagule.
One tradeoff is that the mat is inexpensive but cannot hold a safe temperature on its own. Budget for a thermostat and probe if you use it, and target a warm medium rather than a fixed number.
2.5 Planting Steps (Fluval Stratum Method)
- Pour 1–2 inches of Stratum into the clear vessel. If the vessel has no drainage, keep the medium only lightly moist so no free water pools at the bottom.
- Moisten the Stratum until it’s damp but not saturated. It should hold together without water pooling or running when tilted. Avoid a standing water layer, which starves tissue of oxygen.
- Nestle propagules in, growth eye(s) up, root zone down. Can’t tell which way is up? Lay it on its side.
- Bury the bottom third to half. Leave the growth tip exposed.
- Put the lid on to hold humidity, but leave a vent cracked for air exchange rather than sealing it airtight. High humidity reduces drying, but a saturated, stagnant chamber favors rot. The goal is moist and ventilated, not fully closed.
- Check daily at first. If you see heavy, persistent condensation, standing water, any sour or off smell, or a spreading soft spot, open it up, let it dry back, and remove any affected piece.
I label each piece with its harvest date, medium, and original orientation, then take the first photograph through the same side of a clear container. A grease-pencil line on the outside marks the corm’s top edge and water level. That reference distinguishes a piece that shifted in loose media from one that produced a new root, without lifting it and breaking the fresh tip.
If one piece softens while the others remain firm, I isolate it before changing the whole chamber. I then change one condition at a time, usually excess water or ventilation first, and photograph the same surface again the next day. Changing the medium, heat, light, and venting together may save a piece, but it also hides which condition caused the problem and makes the next batch no easier.
3. Warmth, Humidity, Light, and Hardening Off
3.1 Warmth
Warmth generally helps, but it isn’t a single switch that overrides everything else, and it won’t rescue tissue that’s already infected or short of oxygen.
A cold windowsill can also run cooler than room air when a wet medium is evaporating, so the medium may be colder than you think.
Aim for a warm but moderate medium. Roughly the mid-70s °F (mid-20s °C) is a reasonable target range, kept well below the ~104 °F an uncontrolled mat can reach.
The reliable way to know is to measure the actual medium temperature with a probe at the propagule’s depth, using a thermostat if you’re on a heat mat, rather than trusting a fixed number or the room reading.
3.2 Humidity and Air Exchange
Before roots form, a propagule can lose moisture to dry air and shrivel, so raising humidity around it helps reduce that drying. Higher humidity is protective up to a point.
But 100% isn’t a target to chase, and condensation isn’t proof of success. It only means a surface is below the dew point, and constant wetness is exactly what fungal and bacterial rots like.
Aim for humid but ventilated. Keep a vent cracked or use the dome’s adjustable vents for continuous air exchange rather than sealing the chamber and opening it on a fixed schedule. The right amount of exchange depends on container size, seal, and what’s inside.
Let what you observe guide you (persistent heavy condensation, an off smell, a spreading soft spot, or a soggy medium all mean give it more air and check for rot).
3.3 Light (After the Shoot Emerges)
Before a green shoot appears, light isn’t what wakes an underground propagule. There’s no evidence that light level drives dormancy in Alocasia pieces that have no green tissue yet, so too dark is not a likely reason a corm hasn’t sprouted.
Focus pre-emergence on warmth, moisture, and air.
Once a green shoot breaks the surface, it does need light. A sprout kept in the dark etiolates (long, pale, stringy, and weak).
From that point give bright, indirect light (a grow light or bright window, not harsh direct sun).
Cooler, blue-rich light tends to keep growth more compact, though the effect depends on intensity and duration as well as color.
If a bright window isn’t enough for the new plant, the aroid grow-light chooser sizes a fixture by the PPFD and DLI it delivers at the leaf rather than by wattage.
3.4 The Transition (Hardening Off)
A leaf grown in high humidity can wilt when moved suddenly to drier room air, because it developed with little demand to retain water and its young roots can’t yet keep up.
Exactly how a leaf responds depends on species, leaf age, light, airflow, and root development, so acclimate gradually and let the plant’s response set the pace rather than a fixed calendar. The same transition principle is explained in more detail in the humidity hardening-off guide for tissue-culture plants.
Use the following progression and adjust it to what you see.
- Once a leaf has unfurled, start by opening the vents partway.
- Over the following days, open the vents further as the plant tolerates it.
- Then begin removing the dome for short daily periods, lengthening them gradually.
- Move to full exposure only when new growth stays firm without wilting.
If a leaf wilts and doesn’t recover quickly, or new leaves look stressed, slow down or step back a stage.
Drier ambient air means going slower. Humid rooms let you move faster.
4. Alocasia Corm Troubleshooting
Does a floating Alocasia corm mean it is dead?
Not necessarily. The float test is a seed folk-rule and unreliable even for seeds, and buoyancy hasn’t been shown to predict viability in Alocasia propagules.
Floating can reflect trapped air or slight dehydration rather than death, but it isn’t proof of life either.
Don’t rely on it, and be aware that long soaks intended to make a piece sink add their own low-oxygen and infection risk.
Judge a piece on its overall condition over time, not on whether it floats.
Is white fuzz on an Alocasia corm mold?
It can be hard to tell, so don’t rely on a single quick test. New roots in humidity can be coated in fine white root hairs that you shouldn’t wipe off, but fungal growth can also look white and can change appearance when wet, so a misting-and-watching test isn’t a reliable way to tell them apart.
Instead, look at the whole picture over a few days. Root hairs sit on emerging root tips and stay put, while spreading fuzz across the medium or skin, an off smell, or softening tissue point to rot or mold.
Improve airflow, keep things cleaner and less wet, and if you’re unsure, isolate the piece and watch it rather than assuming.
Can a mushy Alocasia corm be saved?
Mushy, oozing, or a spreading soft area is a serious sign. If a piece squishes throughout or the soft area keeps expanding, remove and dispose of it (bag and bin. Don’t compost infected tissue, which can spread the problem).
Clean and disinfect the container and any tools it touched, and isolate neighboring pieces.
If only a small tip or side is soft, you can try to save it, but keep expectations modest. With a blade sterilized between cuts, cut back to firm, healthy tissue, then let the cut surface dry and callus in open air before replanting in a drier, well-drained medium and watching closely.
Do not dip the wound in kitchen cinnamon or hydrogen peroxide. Neither has a verified, labeled dose for this use on Alocasia, and both can injure plant tissue.
If you use any product, follow its label for an appropriate crop and concentration. Physical removal, clean tools, and disposal of infected tissue matter more than a home dip.
Why has my Alocasia corm not sprouted after two months?
A propagule can simply take time and still be viable. Rather than assuming deep dormancy, check whether the medium is warm enough, lightly moist but not soggy, and getting air.
Confirm the piece is still firm with no lesions or odor. Light is not the trigger for an unemerged, non-green propagule, so darkness is not the likely culprit.
A repeated dry-then-soak cycle has not been shown to trigger Alocasia corm sprouting. If the mother plant also lost its leaves after a temperature change, use the Alocasia dormancy diagnostic to separate cool stress from rot.
Can you propagate Alocasia corms in LECA?
It can work, but the coarse pebbles leave gaps a tiny propagule can slip through, and how wet it stays depends on your reservoir and wicking setup.
A finer medium is usually easier to start small pieces in and to inspect. You can move to LECA once the plant has a solid root system, if you prefer it.
5. Alocasia Corm Propagation Checklist
Propagating from offsets is a rewarding way to multiply an Alocasia collection, and having extra plants is a nice cushion if one struggles.
It does not, though, replace good hygiene. Propagation won’t undo an infectious rot, contaminated tools or medium, or the loss of a mother plant, so keep preventing problems even when you have spares.
It takes patience (a piece might sprout in a week or take a couple of months) but when that first small plant unfurls, it’s one of the more satisfying moments in growing.
So next time you repot, look for viable offsets. Check them, keep them clean, give them warmth, moisture, and air, and let your collection grow.
Affiliate Disclosure
This article contains Amazon affiliate links. As an Amazon Associate I earn from qualifying purchases. If you use these links, the site may earn a commission at no extra cost to you. Product availability, price, and specifications can change. Check the current listing before buying.