
Paludarium Glue: Safe Adhesion & Hardscaping Guide
The chemistry of safe paludarium glue: how cyanoacrylate and silicone cure, why mold-inhibitor silicones can be risky for invertebrates, and reading manufacturer cure and use ratings to protect livestock.
Jordan Cole · Published 2025-12-14 · 21 min read
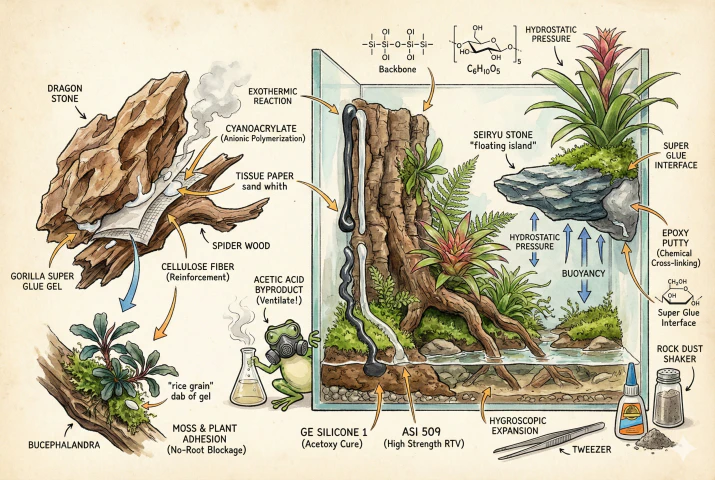
Key Takeaways
- Choose an adhesive by its manufacturer-rated use, cure instructions, and load limits because a product that bonds well is not automatically safe for immersion or animals.
- Cyanoacrylate cures through moisture and becomes a rigid plastic, but the cured bond still depends on formulation, additives, contact area, and whether the product is actually rated for aquatic use.
- Silicone remains flexible, yet its curing chemistry and any mold-inhibiting additives determine whether it belongs in a paludarium or only in a dry household repair.
- Never treat cotton-soaked cyanoacrylate as a routine bonding trick because the reaction can produce intense heat, smoke, burns, and ignition.
- Use mechanical support for heavy or moving hardscape, ventilate during curing, and wait for the full product-specific cure before adding water or animals.
Introduction
Wet Enclosures Change Adhesive Demands
Building a beautiful hardscape is easy. Keeping it together in a wet, humid box is the hard part.
Buoyancy and humidity defeat ordinary glues, and adhesives that release biocides or uncured byproducts can harm sensitive livestock, so chemical choice and cure time matter.
I assign a number to every structural bond on a build photograph and record the adhesive, batch, surface preparation, application time, and full cure time beside it. Similar-looking clear joints can use very different chemistries.
If one connection later softens or releases, the map tells me which other bonds share the same material and batch. I can inspect the related joints without dismantling every attachment or guessing from appearance.
Read the Label and SDS First
Acetic acid, polymerization, and adhesion mechanics determine whether a joint survives in a wet enclosure, so read manufacturer directions critically before building a structure that holds. Some steps below involve hazardous chemistry. Where they do, follow the product label and its safety data sheet (SDS) rather than any shortcut.
Choose Adhesive by the Job
Two Adhesive Families Dominate
Rather than choosing by brand name, it helps to understand the chemistry. Two adhesive families are common in the vivarium and aquascaping hobby. Cyanoacrylates are super glues and polysiloxanes are silicones.
Others such as epoxy, polyurethane, hot-melt, and MS polymers are also used and are covered further down.
Chemistry Does Not Replace the Rating
Both stick things together, but their cure triggers and failure modes differ. Understanding that helps, but it does not replace the manufacturer’s label, intended-use rating, and tested load limits.
1. Cyanoacrylate (Anionic Polymerization)
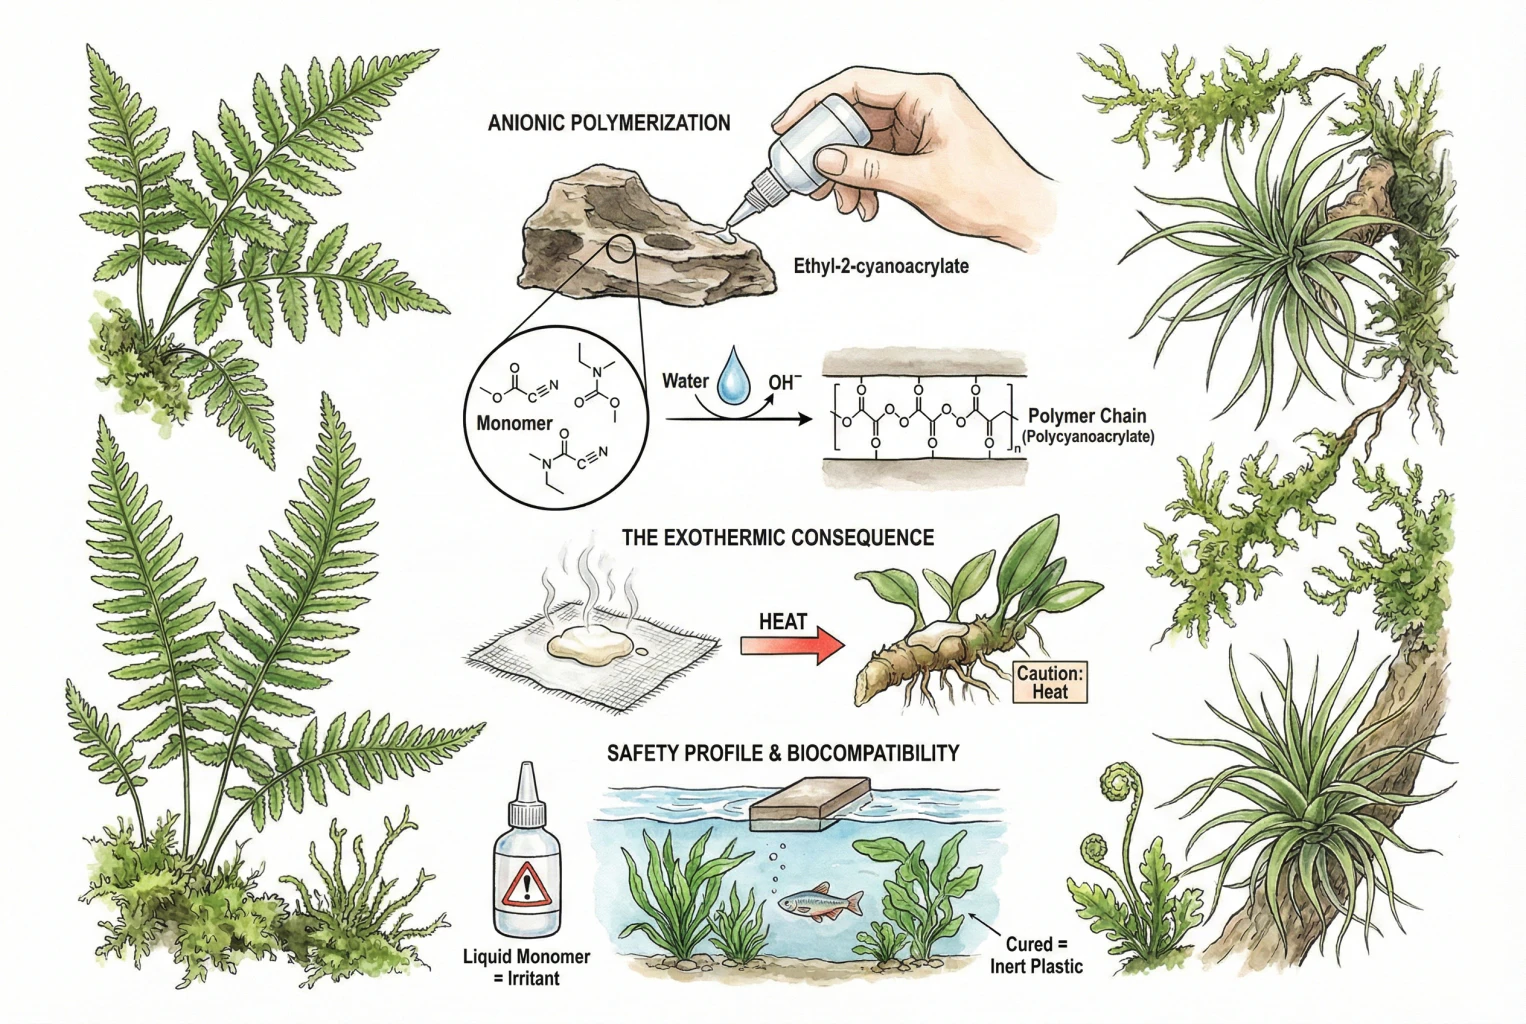
The most common active ingredient in hobby super glues is ethyl-2-cyanoacrylate, an acrylic monomer that sits in the bottle as single molecules waiting for a reason to connect.
Some products instead use methyl, butyl, octyl, or blended cyanoacrylates, and many are formulated with additives, so treat any specific tube by its own label rather than assuming it is pure ethyl monomer.
The core cure is polymerization rather than drying. Cyanoacrylates undergo anionic polymerization, a chain reaction where monomers link into a polymer and the liquid turns to solid plastic quickly.
Commercial gels also contain thickeners and stabilizers, so the bottle is not simply pure monomer.
The Hydroxyl Trigger
The reaction is initiated by a weak base (most commonly the hydroxyl ion (OH⁻) in water). That is a large part of why cyanoacrylates work well in damp settings. The surface moisture that weakens most glues actually starts this one.
(The full picture also involves stabilizers, inhibitors, and surface pH, which vary by formulation.)
When a monomer contacts trace moisture (even microscopic humidity on a rock or in the air), the carbon double bond opens, the activated monomer grabs the next, and the cascade builds a rigid chain of polycyanoacrylate.
The same hydroxyl-driven cure is documented in surgical use, where medical cyanoacrylates polymerize in the presence of hydroxyl ions in moist tissue and release a small amount of heat.
That literature concerns specific medical-grade formulations. It describes the cure mechanism, not the aquatic safety of any hardware-store product.
The Exothermic Consequence
This reaction releases heat, and with cotton or other cellulose fibers it can be dangerous, not just a curiosity.
Cotton and similar fibers have a huge surface area and abundant hydroxyl groups, so the reaction runs very fast.
Case reports and lab measurements document cotton-plus-cyanoacrylate reaching roughly 68–91 °C and causing full-thickness (third-degree) burns, and the vapor can ignite.
This is a burn and fire hazard, not a technique to seek out.
Because of that heat, deliberately soaking absorbent fibers with liquid super glue is risky.
Some hobbyists have used a small piece of tissue in a joint to add body to a bond, but the exothermic reaction, smoke, and burn/ignition potential make it unsuitable as a routine DIY step without professional safety controls (see the caution in the sandwich-method section below).
Safety Profile and Biocompatibility
In its liquid monomer form, ethyl cyanoacrylate is a respiratory irritant and bonds skin instantly, so work with ventilation and keep it off your fingers.
Cured cyanoacrylate is far less reactive than the liquid, which is one reason it is used in some medical products.
Medical use does not prove that a hardware-store super glue is inert or safe in water. Medical products use specific, tested formulations, cured cyanoacrylate can slowly degrade with formaldehyde among possible breakdown products, and residual monomer and additives depend on the product.
Treat cured super glue as reasonably stable, but not as certified aquarium-safe unless the label says so.
Medical-grade glues often use 2-octyl cyanoacrylate (a longer alkyl chain, more flexible and slower to degrade).
For hardscape, the rigidity of ethyl cyanoacrylate can help stiffen a joint, but rigidity also means brittleness and weak peel and impact resistance, so a small rigid bond still needs good contact area and should not be the only thing carrying a load.
Oral Applications of Cyanoacrylate Adhesives. A Literature Review
2. Silicone (The Inorganic Elastomer)
Silicone Forms a Flexible Gasket
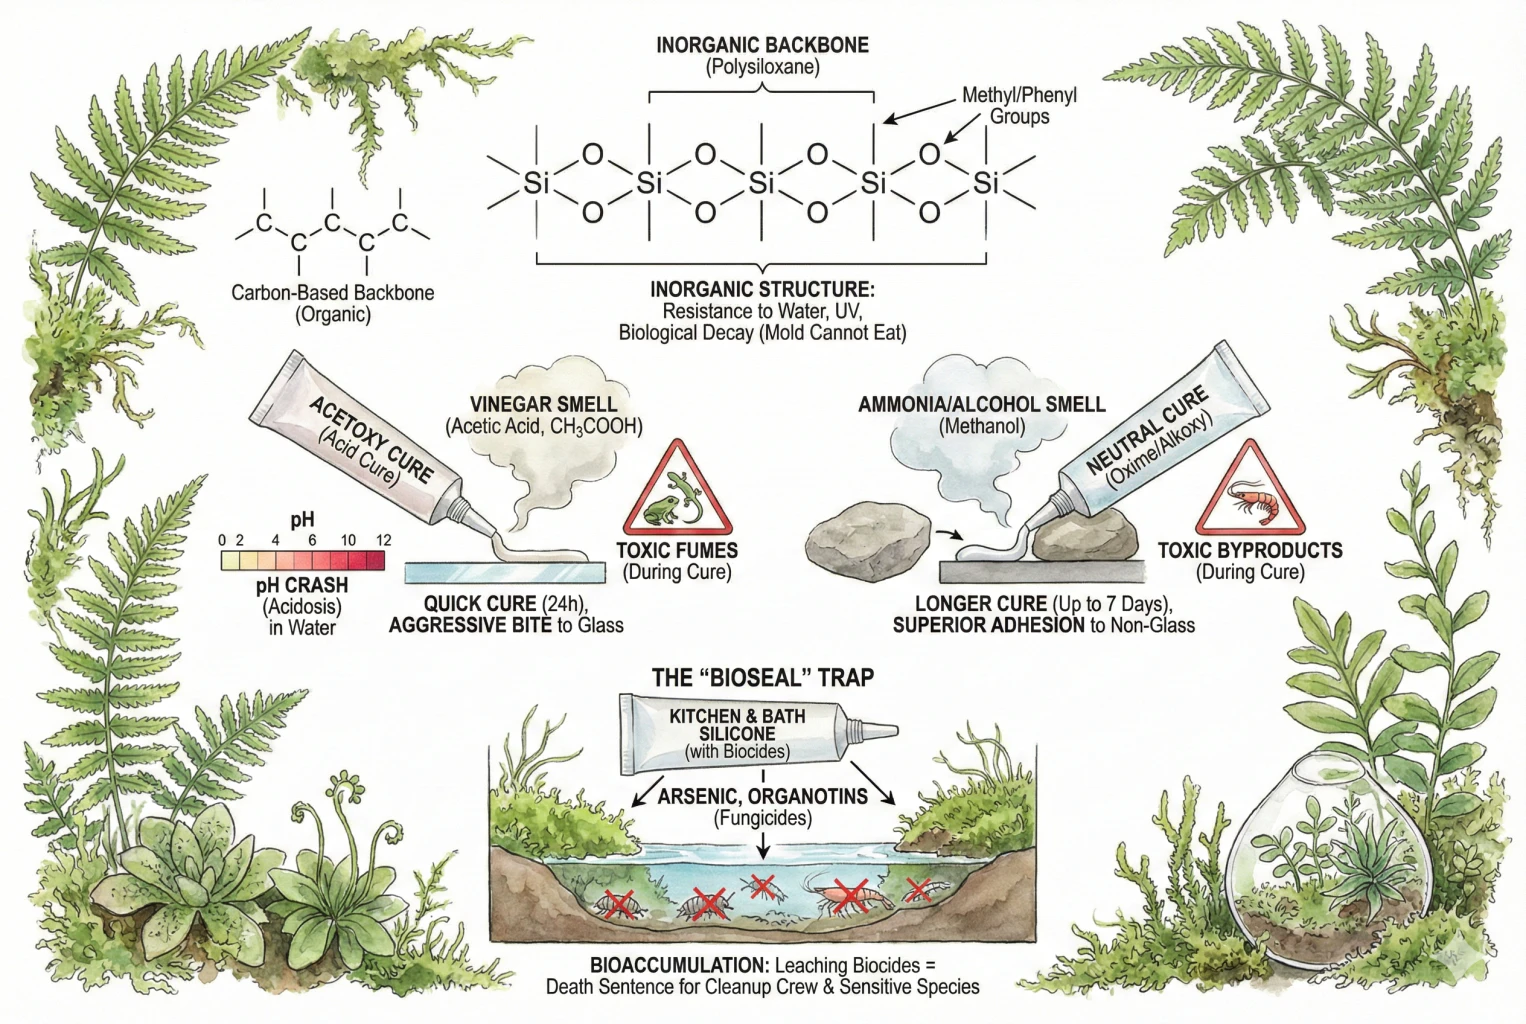
Where super glue makes a rigid plastic bridge, silicone makes a flexible rubber gasket. Silicones are polysiloxanes, built on an inorganic backbone of alternating silicon and oxygen atoms (Si–O–Si) rather than carbon.
Surface Cleanliness Still Matters
That structure gives silicone good resistance to water and UV. The polymer itself is not a food source for mold, but mold can still grow on soap scum, dust, and organic residue sitting on the surface, and adhesion at the interface can still fail, which is why even manufacturers tell you to keep the surface clean.
Curing Agents Determine Enclosure Safety
The safety of silicone in a vivarium, however, comes down to the curing agent. Silicone sealants are RTV (room-temperature vulcanizing). They react with atmospheric moisture and release volatile byproducts as they cure.
The Acetoxy Cure (Acid Cure)
This is the common vinegar-smelling silicone. The odor is a useful hint that a sealant is acetoxy-cure, but smell alone does not confirm which exact product you have, so always check the label.
Acetoxy Releases Acetic Acid
As acetoxy silicone polymerizes, it releases acetic acid (CH₃COOH). How much reaches the water or air depends on bead size, cure state, enclosure volume, and ventilation.
Uncured Acetoxy Can Irritate Livestock
Introducing animals before the cure is complete exposes them to acetic acid, which can lower pH in a small water volume and irritate amphibian or reptile airways. Severity depends on dose, species, and conditions, so wait out the cure and test water rather than assuming a specific outcome.
Thick Beads Cure More Slowly
Acetoxy silicones cure relatively fast and bond well to glass. Manufacturer figures for a thin bead are often around 24 hours, but that assumes conditions like roughly 73 °F / 50% RH and a shallow bead. Thick or confined beads cure more slowly, and only from the exposed face. Loss of odor is a hint, not proof of full-depth cure or aquarium safety, so check the product’s intended-use rating.
The Neutral Cure (Oxime/Alkoxy)
Neutral-Cure Byproducts Still Need Caution
Depending on the formulation, these release compounds such as methyl ethyl ketoxime (MEKO) or an alcohol during cure. MEKO is not the same substance as ammonia, and the alcohol is not always methanol.
They don’t release acetic acid the way acetoxy does, but their byproducts can still be irritating or toxic during the cure phase.
Neutral-Cure Adherence Varies by Surface
Neutral-cure sealants can adhere better to some non-glass substrates like certain plastics, metals, and stone, which makes them useful for some non-glass hardscapes.
Full-depth cure time varies with the product, bead thickness, and conditions and can run several days, so follow the specific product’s cure guidance rather than a fixed figure.
The BioSeal Trap
Mildew-Resistant Does Not Mean Animal-Safe
The idea that all silicone is safe is not a reliable rule. Some sealants marketed as mildew- or mold-resistant, often in the Kitchen and Bath category, add biocides or fungicides to slow mold growth in wet environments.
Whether a given tube contains them, and what they are, is a product-by-product question you answer from its label or SDS, not from the category name alone.
Small Enclosures Can Retain Leachables
In a shower those additives largely wash away. In a small closed enclosure, leachable additives could accumulate, and some biocides are toxic to the small invertebrates, shrimp, isopods, springtails, that make up a cleanup crew.
The conservative choice is to avoid mildew-resistant caulk for animal enclosures and use a sealant whose label states an appropriate intended use. That is a precaution, not a measured prediction for any specific tube.
Aquaculture Evidence Supports Caution
For context, the aquaculture literature shows that antifouling and organotin-type biocides can be toxic to non-target aquatic invertebrates at low concentrations and can bioaccumulate.
That research studied antifouling compounds, not household caulk, so it supports caution rather than proving that any particular sealant leaches a harmful dose.
Risks of Using Antifouling Biocides in Aquaculture
3. The Physics of Adhesion Failure
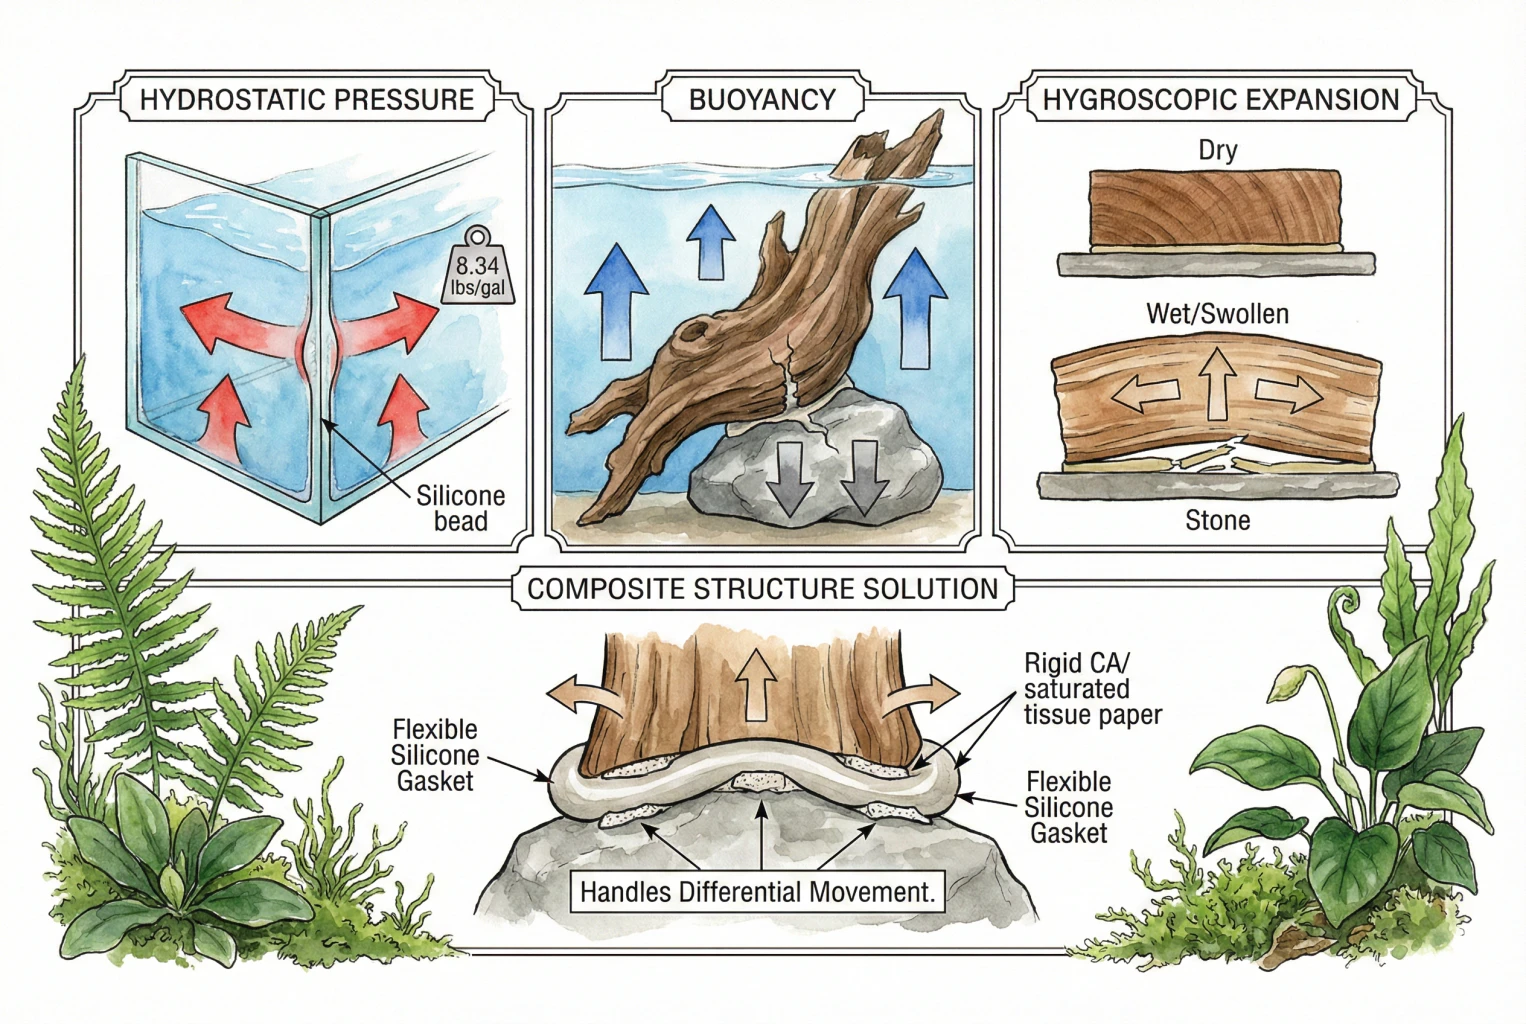
Bonds fail because, in a wet environment, three forces fight you.
- Water pushes outward on the glass and seams through hydrostatic pressure. About 8.34 lb per gallon is water’s weight per volume, not a pressure. Actual pressure increases with depth (p = ρgh), and the load on a given seam also depends on panel size and support. Deeper water and larger panels mean more load.
- Many woods used in aquascaping are less dense than water when dry and float until waterlogged, so a submerged piece can lift and shear the bond holding it down. Not every wood floats because buoyancy depends on the species and how saturated it is, and some pieces sink once soaked.
- Wood absorbs water and swells while stone and glass do not. When wood is glued to stone, expansion can build shear stress at the interface. How much stress develops depends on species, grain, moisture, and joint geometry, so a small or brittle bond is more likely to give way.
The practical takeaway is to design joints that can accommodate differential movement, larger contact area, a flexible sealant where parts move relative to each other, and mechanical support for heavy or moving pieces, rather than relying on a single dab of glue.
The Setup / Process (Building the Skeleton)
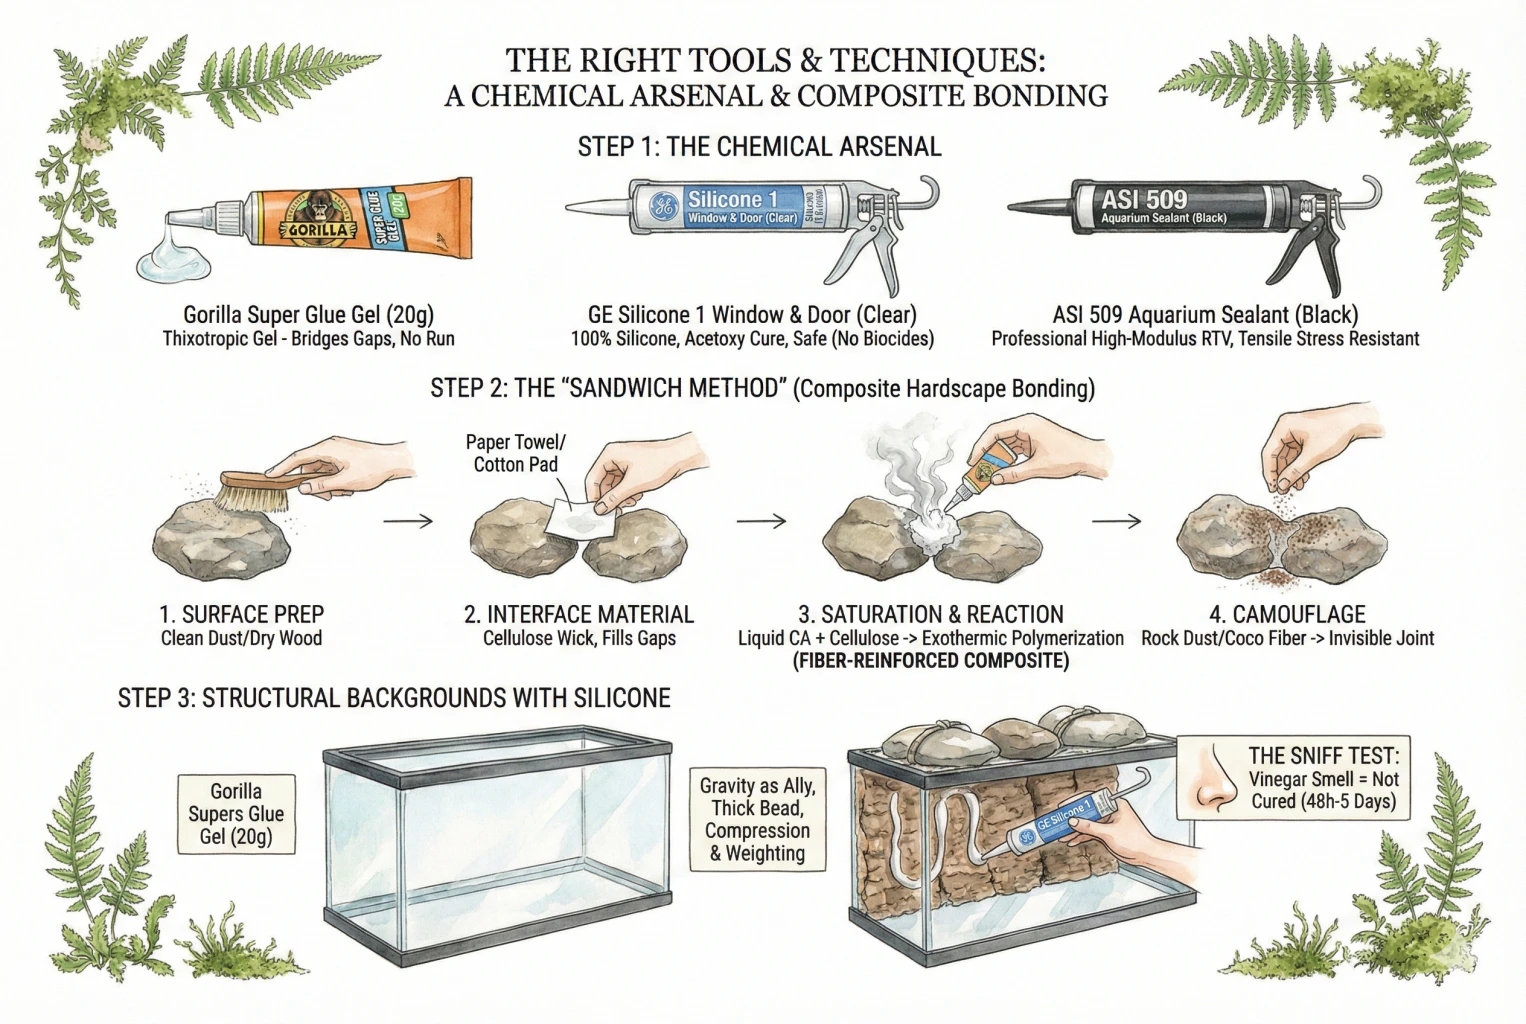
Choose by Composition and Intended Use
Choose adhesives by their composition and intended use rather than by what happens to be on the shelf, and read the label before you buy.
Step 1. Choosing the Adhesives
Gel Cyanoacrylate Suits Close-Fitting Joints
A thickened (gel) cyanoacrylate is helpful for hardscaping. Liquid glue runs down rocks under gravity. A gel is thickened into a paste that stays where you put it.
Manufacturers thicken these gels (often with a filler such as fumed silica, though the exact recipe is proprietary).
Note that some gels, including Gorilla’s, are not rated for gap filling, so use them for close-fitting joints rather than to bridge open gaps.
Gorilla Super Glue Gel
Gorilla Super Glue Gel can position a close-fitting, dry joint during construction. It is not a gap filler and its manufacturer does not certify it for aquariums, continuous immersion, or livestock contact.
Do not use this general-purpose glue as the safety-critical seal for a water-holding or animal enclosure.
A hardware-store ethyl-cyanoacrylate gel is cheaper than a small aquarium or coral glue and shares the same main monomer, but that does not make them identical. Purity, additives, viscosity, and any certifications differ.
It also is not dyed for camouflage, so you may want rock dust to hide white joints as described below.
Read the Intended-Use Rating
For general glass bonding and backgrounds, hobbyists often reach for a 100% silicone sealant.
Read the specific product’s technical data sheet because manufacturer intended-use ratings, not the Window and Door versus Kitchen and Bath label, decide whether it is appropriate.
Many general-purpose GE silicones, including current GE All Purpose Silicone 1 and GE Advanced Silicone 2, are marketed with multi-year mold-free product protection and are explicitly not recommended by the manufacturer for aquariums, continuous water contact, or structural repairs.
The simple Silicone 1 is safe and Silicone II is not split does not match today’s product lines.
GE Advanced Silicone Sealant
GE Advanced Silicone Sealant is GE Advanced Silicone 2, a neutral-cure, low-odor, mold-free product rather than an acetoxy no-fungicide sealant. Its data sheet says not to use it underwater, in continuous water, in aquariums, or for structural repairs.
It is fine for general window-and-door sealing, but for anything that holds water or houses animals, use a sealant the manufacturer actually rates for that (see the dedicated aquarium option below).
If you’re building the tank itself or a seamless background that holds back water, use a dedicated aquarium sealant whose manufacturer rates it for continuous immersion and aquatic-life safety.
Aquarium Silicone Has a Specific Rating
ASI 509 is a black silicone whose maker rates it for aquariums and aquatic life. Its colour can make a seam less conspicuous, but the relevant reason to choose it is the stated wet-use rating.
Follow the label’s full cure time and test the finished joint under your own load and conditions before adding water or animals.
Black Aquarium Silicone Sealant
Black Aquarium Silicone Sealant is a true aquarium sealant. It costs more than general-purpose silicone, but for any seam that actually retains water it is the appropriate choice because general-purpose silicones are usually not rated for sustained immersion.
Follow the label, including the 7-day cure and any bead-depth and tank-design limits, rather than relying on smell alone.
Step 2 (The Sandwich Method (Composite Hardscape Bonding))
Increase Contact Area Before Adding More Glue
Gluing two smooth rocks with a single dot of super glue gives a small, brittle bond that can shear when the hardscape shifts. The usual fix is simply more contact area. Choose mating faces that fit, or bridge them with an aquarium-rated epoxy putty (below) rather than glue alone.
A hobby technique sometimes called the tissue method wicks liquid super glue into a small piece of tissue or cotton inside the joint to add body. Be aware this is a real burn and fire hazard, not a controlled step. Liquid cyanoacrylate soaked into cotton or tissue reacts fast and exothermically. Measurements and case reports document it reaching roughly 68–91 °C, producing acrid smoke, causing full-thickness burns, and potentially igniting.
It is unsuitable for general DIY. If you still use a tiny amount of tissue in a joint after understanding the hazard, treat it as a high-risk exception rather than a standard method.
If Used, Treat the Fiber Method as High Risk
Keep quantities tiny and never soak a wad of absorbent material. Work on a non-combustible surface away from anything flammable, wear eye protection and chemical-resistant gloves, and provide ventilation that pulls fumes away from your face. Keep animals and bystanders out of the area. Do not place fingers or skin near the reacting joint. If you are burned or the material ignites, stop and treat it as an emergency.
Prepare Clean, Dry Surfaces
For clean prep in any of these joints, clean rocks and wood thoroughly (rock dust acts as a release agent, so a dusty surface bonds poorly), and make sure wood is dry, since cyanoacrylate skins over on wet wood without penetrating the fibers.
To hide a white joint after the glue has fully cured, dust it with crushed hardscape stone or coco fiber worked into the surface texture.
Step 3. Structural Backgrounds with Silicone
Use Flexible Sealant for Backgrounds
Super glue is usually too rigid to attach cork bark, tree-fern panels, or foam to the back glass, so a flexible sealant is generally the better choice here.
Use one rated for the job, for a background inside an animal enclosure, prefer a sealant the manufacturer approves for that use rather than a general-purpose caulk whose data sheet excludes aquariums.
- With the tank empty and resting on stable padding, lay it on its back so gravity helps.
- Apply your chosen sealant to the back of the wood or foam. A fuller bead increases contact, but avoid overly thick beads, which cure slowly and squeeze out.
- Press the material firmly to the glass for full contact, checking for voids.
- Silicone shrinks slightly as it cures, so a little padded weight helps keep the material in contact without point-loading the glass. Recheck afterward for gaps that could trap small animals.
- Leave the assembly alone while it cures. A manufacturer’s approximate 24-hour figure is for a thin, air-exposed bead. A bead trapped between cork and glass gets little air and cures much more slowly, so allow several days. Loss of vinegar smell tells you the exposed surface has largely cured, but it is not proof of full-depth cure. Follow the product’s own cure and intended-use guidance before adding water or animals, and remember that many general-purpose GE silicones are not manufacturer-approved for this use at all.
Deep Dive / Tips (Expert Level Techniques)
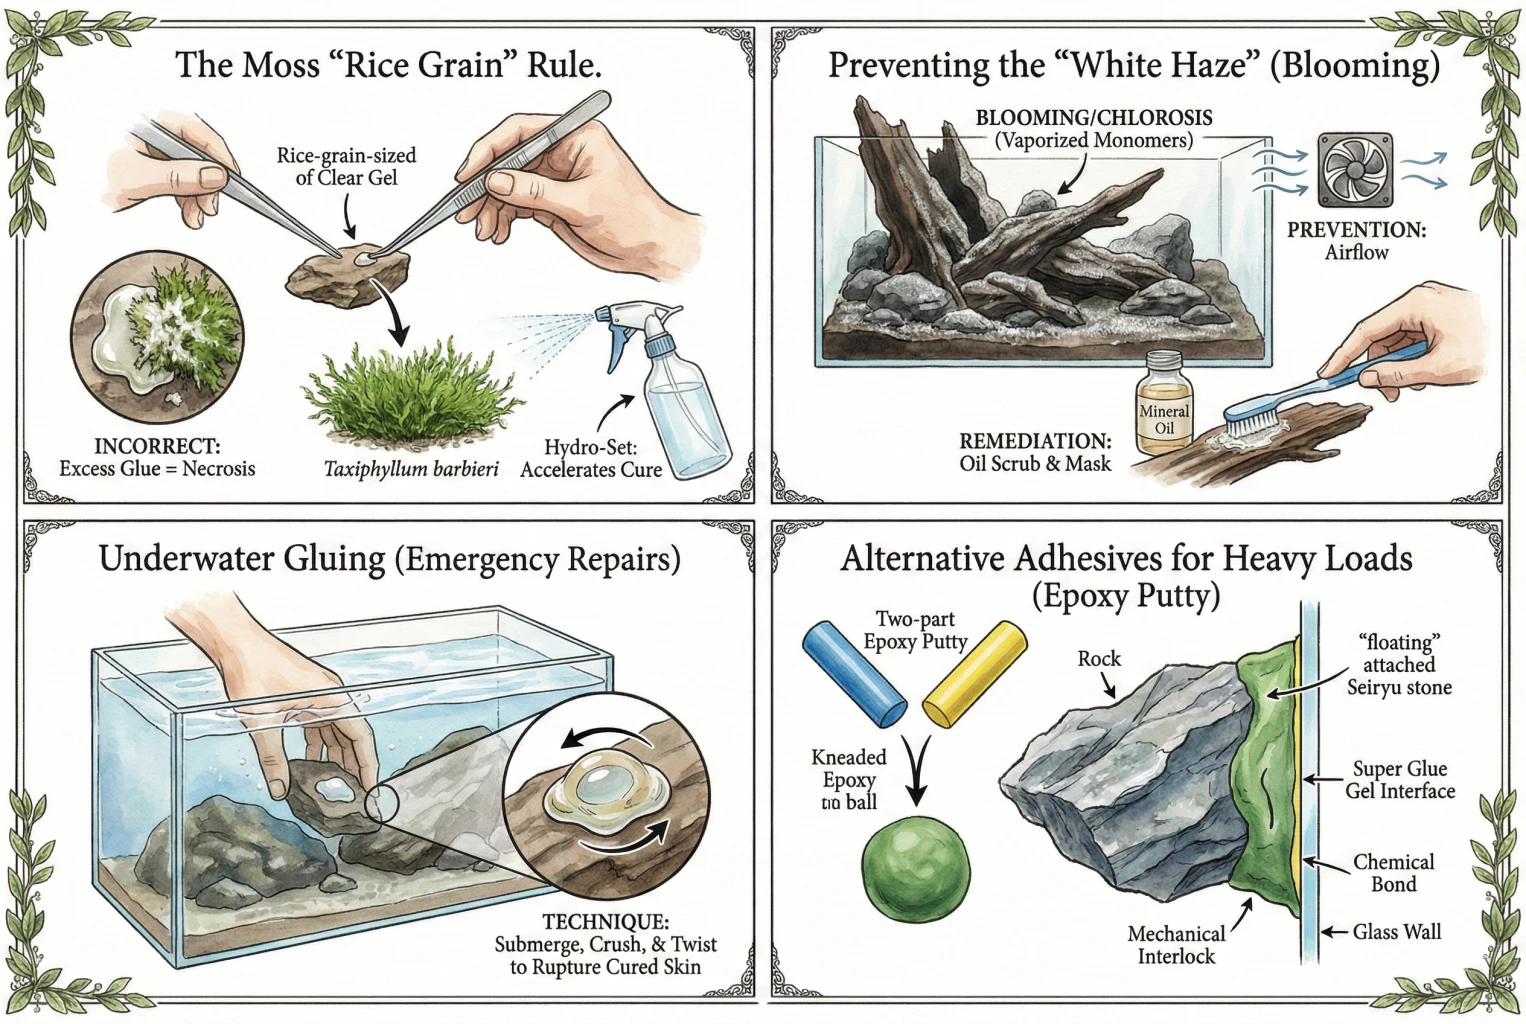
With the basics down, a few finer points help attach plants and troubleshoot common problems.
1. The Moss Rice Grain Rule
Keep Glue Off Living Moss Tissue
Coat moss heavily in glue and you tend to get a damaged, discolored patch where the glue smothered the tissue.
Mosses have no true roots, only anchoring rhizoids, and take up water and nutrients through their leaf surfaces, so keeping glue off the living tissue matters.
Use a Tiny Dab and Free Fronds
Use only a small dab of gel, about the size of a grain of rice as a common rule of thumb. Take a small tuft such as Taxiphyllum barbieri or Vesicularia ferriei, press its center briefly into the glue, and leave the outer fronds free.
Expect the Contact Point to Be Lost
The glued contact point is usually lost, but the free fronds keep growing and new growth tends to cover the anchor over the following weeks, depending on species and conditions.
Mist to Cure, Not to Cool
A light mist right after pressing supplies moisture that speeds the cure and locks the moss in place. Do not rely on misting to cool the reaction because faster curing can actually raise the peak heat rate, which is another reason to use only a tiny amount of glue near living tissue.
2. Preventing the White Haze (Blooming)
Use Less Glue and Directed Ventilation
You finish a stunning hardscape, then wake to a ghostly white powder over everything (blooming).
Bloom Comes From Excess Vapor
Uncured cyanoacrylate gives off vapor, especially from excess product in humid air. The vapor drifts, meets moisture on glass or damp wood, and polymerizes as a white microscopic dust. It is the same chemistry forensic teams use to fume latent fingerprints, so excess glue can dust the inside of a tank.
Mechanical Removal Is the Reliable Fix
The main prevention levers are using less glue and providing directed ventilation. Set up airflow that carries vapor away from the enclosure and away from you, for example by exhausting to the room or outdoors rather than blowing it around the room. Bloom is cosmetic. On glass you can carefully scrape it with a razor blade, but avoid this on acrylic, which scratches and can stress-craze. Mechanical removal and re-cleaning are the reliable options.
3. Underwater Gluing (Emergency Repairs)
Cyanoacrylate can cure underwater, so a submerged repair is sometimes possible, but it is fiddly and not what consumer super glue is designed for.
Note that this is off-label use. Gorilla’s directions call for clean, dry surfaces and a small amount, so a large underwater glob goes against the manufacturer’s guidance and adds excess uncured glue to a tank that may hold livestock.
If you attempt an emergency repair in a tank you can’t drain, use as little gel as possible, apply it to the piece outside the water, then move it into position and press it against the target.
When gel hits water it forms a cured skin while the inside stays liquid, so a slight twist can smear fresh glue onto the mating surface. Then hold it still while it sets.
Because bond strength and cure under water are uncertain, treat the repair as temporary and re-do it properly when you can drain and dry the area.
4. Alternative Adhesives for Heavy Loads (Epoxy Putty)
Epoxy Suits Rock-to-Rock Joints
Two-part epoxy putty (a resin plus a hardener that cross-link into a hard polymer) is useful for joining rock to rock, and an aquarium-rated putty is the right kind for tanks.
Epoxy grips porous rock well but adheres less reliably to smooth glass, and its performance varies by formulation and surface prep.
Do not hang a heavy stone off a vertical glass wall with adhesive alone
A 10 lb rock cantilevered from glass creates a large, off-center load that no generic glue-and-epoxy joint is tested to hold underwater, and a failure can crack the glass or drop the rock onto animals.
Heavy rockwork should be bottom-supported or carried by an engineered shelf or frame with redundant mechanical retention, and any load on the tank glass should be cleared with the tank manufacturer or fabricator.
Use adhesives to position and steady rockwork, not as the sole thing holding weight overhead.
Troubleshooting (Q&A) (Busting the Myths)
Myth 1. GE Silicone II is toxic and will kill everything
It’s more nuanced than that. Neutral-cure silicones release fumes during cure that you shouldn’t breathe, and their cured rubber is much less reactive. Less reactive once cured is not the same as certified aquarium-safe, and the answer depends on the specific product.
The more useful red flag is any sealant marketed with active mold-free / mildew-resistant protection, which may include biocides that can harm small invertebrates.
Rather than assuming a whole category poisons everything, check the individual product’s label and data sheet.
The old shorthand to simply use GE Silicone 1 no longer holds. Current GE All Purpose Silicone 1 is marketed with mold-free protection and its data sheet excludes aquariums, continuous water contact, and structural repairs, the same practical limits as GE Advanced Silicone 2.
The reliable rule is to use a sealant the manufacturer actually rates for aquarium or animal-enclosure use, and to treat a general-purpose caulk’s intended-use statement as the deciding factor rather than the Window and Door versus Kitchen and Bath name.
Myth 2. You need expensive aquarium glue for plants
Read the ingredients on a small coral or aquarium glue and on a general-purpose super glue gel and you’ll often see the same main ingredient, ethyl cyanoacrylate.
A hobby-branded tube usually costs more per gram than a hardware-store gel.
So the price gap is partly branding, but sharing the same main monomer does not mean the products are identical.
Purity, additives, viscosity, coloring, and any aquarium or coral safety testing can differ, and only a product the maker actually rates for aquatic use carries that assurance.
Colored glues, such as purple products intended to camouflage coralline algae, are one clear case where the specialty product does something a plain gel does not.
Myth 3. Hot glue is fine for terrestrial sections
Hot glue is a thermoplastic (it melts, flows into pores, and hardens (mechanical interlocking), forming no chemical bond).
In a warm, high-humidity vivarium, moisture can work between the glue and the glass or wood (delamination), and repeated warming and cooling can make it brittle.
How fast it fails depends on the formulation, substrate, load, and how wet it gets (there’s no fixed timeline, but for a permanent, humid background it’s a poor bet).
Use silicone for adhesion to glass, PU foam for bulk, and super glue for details, and keep the hot-glue gun for dry craft work.
Respect the Forces and the Cure
Building a paludarium means working with specific forces, including buoyancy, hydrostatic pressure that grows with depth, and the swelling of wet wood.
Practical Rules
- Use cyanoacrylate gel for small, close-fitting bonds, and rely on good contact area rather than exotic tricks. Treat any glue-soaked-fiber method as a burn and fire hazard, not a routine step.
- For waterproofing, glass, and backgrounds, use a silicone the manufacturer rates for that use. Many general-purpose caulks (including current GE Silicone 1 and Advanced Silicone 2) exclude aquariums and continuous water.
- Use an aquarium-rated epoxy putty to join rock to rock, and support heavy rockwork mechanically, not with adhesive alone.
- Ventilate the workspace, directing fumes away from you and any animals, to reduce blooming and protect your lungs.
Read the safety data sheet and respect the cure. A vinegar smell (silicone) or acrid-plastic smell (super glue) means the reaction is still ongoing and it isn’t ready yet.
When the smell is gone, the exposed surface has largely cured, but odor is not a measurement of full-depth cure or of aquatic safety, so follow the product’s intended-use rating and cure time.
Know the chemistry, wait out the cure, use products for their rated purpose, and support heavy pieces mechanically, and your hardscape has a good chance of lasting.
Affiliate Disclosure
This article contains Amazon affiliate links. As an Amazon Associate I earn from qualifying purchases. If you use these links, the site may earn a commission at no extra cost to you. Product availability, price, and specifications can change. Check the current listing before buying.